作者:じ☆ve宝贝
找到 -> git 编辑本地 .git/config 增加 [credential] helper = store 保存,输入一次密码后第二次就会记住密码了
作者:微信小助手
<h3 style="padding-bottom: 5px;border-bottom: 1px solid rgb(233, 233, 233);font-size: 18px;font-weight: 600;margin-top: 30px;margin-bottom: 10px;line-height: 1.6;color: rgba(0, 0, 0, 0.8);font-family: "PingFang SC", "Hiragino Sans GB", "Microsoft YaHei", STHeiti, "WenQuanYi Micro Hei", Helvetica, Arial, sans-serif;white-space: normal;background-color: rgb(255, 255, 255);" data-mpa-powered-by="yiban.io"><span style="font-weight: bolder;font-size: 20px;color: rgb(249, 3, 21);">支付宝系统架构概况</span></h3> <p><br></p> <p style="margin-bottom: 15px;color: rgba(0, 0, 0, 0.8);font-family: "PingFang SC", "Hiragino Sans GB", "Microsoft YaHei", STHeiti, "WenQuanYi Micro Hei", Helvetica, Arial, sans-serif;white-space: normal;background-color: rgb(255, 255, 255);"><img class="aligncenter size-full wp-image-160824" data-ratio="0.75" src="/upload/4700fbcf8c759aa9555772768ceb38cc.null" data-type="png" data-w="592" height="444" sizes="(max-width: 592px) 100vw, 592px" style="border-style: none;margin-left: auto;margin-right: auto;display: block;cursor: pointer;" width="592"></p> <h3 style="padding-bottom: 5px;border-bottom: 1px solid rgb(233, 233, 233);font-size: 18px;font-weight: 600;margin-top: 30px;margin-bottom: 10px;line-height: 1.6;color: rgba(0, 0, 0, 0.8);font-family: "PingFang SC", "Hiragino Sans GB", "Microsoft YaHei", STHeiti, "WenQuanYi Micro Hei", Helvetica, Arial, sans-serif;white-space: normal;background-color: rgb(255, 255, 255);"><span style="font-weight: bolder;font-size: 20px;color: rgb(249, 3, 21);">典型处理默认</span></h3> <p><br></p> <p style="margin-bottom: 15px;color: rgba(0, 0, 0, 0.8);font-family: "PingFang SC", "Hiragino Sans GB", "Microsoft YaHei", STHeiti, "WenQuanYi Micro Hei", Helvetica, Arial, sans-serif;white-space: normal;background-color: rgb(255, 255, 255);"><img class="aligncenter size-full wp-image-160825" data-ratio="0.6746987951807228" src="/upload/8808eb76d3bdc8a2790eef949675d520.null" data-type="png" data-w="581" height="392" sizes="(max-width: 581px) 100vw, 581px" style="border-style: none;margin-left: auto;margin-right: auto;display: block;cursor: pointer;" width="581"></p> <h3 style="padding-bottom: 5px;border-bottom: 1px solid rgb(233, 233, 233);font-size: 18px;font-weight: 600;margin-top: 30px;margin-bottom: 10px;line-height: 1.6;color: rgba(0, 0, 0, 0.8);font-family: "PingFang SC", "Hiragino Sans GB", "Microsoft YaHei", STHeiti, "WenQuanYi Micro Hei", Helvetica, Arial, sans-serif;white-space: normal;background-color: rgb(255, 255, 255);"><span style="font-weight: bolder;font-size: 20px;color: rgb(249, 3, 21);">资金处理平台</span></h3> <p><br></p> <p style="margin-bottom: 15px;color: rgba(0, 0, 0, 0.8);font-family: "PingFang SC", "Hiragino Sans GB", "Microsoft YaHei", STHeiti, "WenQuanYi Micro Hei", Helvetica, Arial, sans-serif;white-space: normal;background-color: rgb(255, 255, 255);"><img class="aligncenter size-full wp-image-160826" data-ratio="0.5986159169550173" src="/upload/cd00099d6bbe281797105d9e4c71e994.null" data-type="png" data-w="578" height="346" sizes="(max-width: 578px) 100vw, 578px" style="border-style: none;margin-left: auto;margin-right: auto;display: block;cursor: pointer;" width="578"></p> <h3 style="padding-bottom: 5px;border-bottom: 1px solid rgb(233, 233, 233);font-size: 18px;font-weight: 600;margin-top: 30px;margin-bottom: 10px;line-height: 1.6;color: rgba(0, 0, 0, 0.8);font-family: "PingFang SC", "Hiragino Sans GB", "Microsoft YaHei", STHeiti, "WenQuanYi Micro Hei", Helvetica, Arial, sans-serif;white-space: normal;background-color: rgb(255, 255, 255);"><span style="font-weight: bolder;font-size: 20px;color: rgb(249, 3, 21);">财务会计</span></h3> <p><br></p> <p style="margin-bottom: 15px;color: rgba(0, 0, 0, 0.8);font-family: "PingFang SC", "Hiragino Sans GB", "Microsoft YaHei", STHeiti, "WenQuanYi Micro Hei", Helvetica, Arial, sans-serif;white-space: normal;background-color: rgb(255, 255, 255);"><img class="aligncenter size-full wp-image-160827" data-ratio="0.714759535655058" src="/upload/6d679bf3b0478dce83f48b9f791823fd.null" data-type="png" data-w="603" height="431" sizes="(max-width: 603px) 100vw, 603px" style="border-style: none;margin-left: auto;margin-right: auto;display: block;cursor: pointer;" width="603"></p> <h3 style="padding-bottom: 5px;border-bottom: 1px solid rgb(233, 233, 233);font-size: 18px;font-weight: 600;margin-top: 30px;margin-bottom: 10px;line-height: 1.6;color: rgba(0, 0, 0, 0.8);font-family: "PingFang SC", "Hiragino Sans GB", "Microsoft YaHei", STHeiti, "WenQuanYi Micro Hei", Helvetica, Arial, sans-serif;white-space: normal;background-color: rgb(255, 255, 255);"><span style="font-weight: bolder;font-size: 20px;color: rgb(249, 3, 21);">支付清算</span></h3> <p><br></p> <p style="margin-bottom: 15px;color: rgba(0, 0, 0, 0.8);font-family: "PingFang SC", "Hiragino Sans GB", "Microsoft YaHei", STHeiti, "WenQuanYi Micro Hei", Helvetica, Arial, sans-serif;white-space: normal;background-color: rgb(255, 255, 255);"><img class="aligncenter size-full wp-image-160828" data-ratio="0.7248764415156508" src="/upload/6fcbedc7c16cbfc1104a55a2c66589ad.null" data-type="png" data-w="607" height="440" sizes="(max-width: 607px) 100vw, 607px" style="border-style: none;margin-left: auto;margin-right: auto;display: block;cursor: pointer;" width="607"></p> <h3 style="padding-bottom: 5px;border-bottom: 1px solid rgb(233, 233, 233);font-size: 18px;font-weight: 600;margin-top: 30px;margin-bottom: 10px;line-height: 1.6;color: rgba(0, 0, 0, 0.8);font-family: "PingFang SC", "Hiragino Sans GB", "Microsoft YaHei", STHeiti, "WenQuanYi Micro Hei", Helvetica, Arial, sans-serif;white-space: normal;background-color: rgb(255, 255, 255);"><span style="font-weight: bolder;font-size: 20px;color: rgb(249, 3, 21);">核算中心</span></h3> <p><br></p> <p style="margin-bottom: 15px;color: rgba(0, 0, 0, 0.8);font-family: "PingFang SC", "Hiragino Sans GB", "Microsoft YaHei", STHeiti, "WenQuanYi Micro Hei", Helvetica, Arial, sans-serif;white-space: normal;background-color: rgb(255, 255, 255);"><img class="aligncenter size-full wp-image-160829" data-ratio="0.7333333333333333" src="/upload/bac2017a3f1714ae444d292b0bb86fe3.null" data-type="png" data-w="585" height="429" sizes="(max-width: 585px) 100vw, 585px" style="border-style: none;margin-left: auto;margin-right: auto;display: block;cursor: pointer;" width="585"></p> <h3 style="padding-bottom: 5px;border-bottom: 1px solid rgb(233, 233, 233);font-size: 18px;font-weight: 600;margin-top: 30px;margin-bottom: 10px;line-height: 1.6;color: rgba(0, 0, 0, 0.8);font-family: "PingFang SC", "Hiragino Sans GB", "Microsoft YaHei", STHeiti, "WenQuanYi Micro Hei", Helvetica, Arial, sans-serif;white-space: normal;background-color: rgb(255, 255, 255);"><span style="font-weight: bolder;font-size: 20px;color: rgb(249, 3, 21);">交易</span></h3> <p><br></p> <p style="margin-bottom: 15px;color: rgba(0, 0, 0, 0.8);font-family: "PingFang SC", "Hiragino Sans GB", "Microsoft YaHei", STHeiti, "WenQuanYi Micro Hei", Helvetica, Arial, sans-serif;white-space: normal;background-color: rgb(255, 255, 255);"><img class="aligncenter size-full wp-image-160830" data-ratio="0.7563025210084033" src="/upload/773e4d7d0551a48c4e39f36de7b91a09.null" data-type="png" data-w="595" height="450" sizes="(max-width: 595px) 100vw, 595px" style="border-style: none;margin-left: auto;margin-right: auto;display: block;cursor: pointer;" width="595"></p> <h3 style="padding-bottom: 5px;border-bottom: 1px solid rgb(233, 233, 233);font-size: 18px;font-weight: 600;margin-top: 30px;margin-bottom: 10px;line-height: 1.6;color: rgba(0, 0, 0, 0.8);font-family: "PingFang SC", "Hiragino Sans GB", "Microsoft YaHei", STHeiti, "WenQuanYi Micro Hei", Helvetica, Arial, sans-serif;white-space: normal;background-color: rgb(255, 255, 255);"><span style="font-weight: bolder;font-size: 20px;color: rgb(249, 3, 21);">柔性事务</span></h3> <p><br></p> <p style="margin-bottom: 15px;color: rgba(0, 0, 0, 0.8);font-family: "PingFang SC", "Hiragino Sans GB", "Microsoft YaHei", STHeiti, "WenQuanYi Micro Hei", Helvetica, Arial, sans-serif;white-space: normal;background-color: rgb(255, 255, 255);"><img class="aligncenter size-full wp-image-160831" data-ratio="0.7684210526315789" src="/upload/d543fe67a2c0c71aef615599b9ae1f2b.null" data-type="png" data-w="570" height="438" sizes="(max-width: 570px) 100vw, 570px" style="border-style: none;margin-left: auto;margin-right: auto;display: block;cursor: pointer;" width="570"></p> <p style="margin-bottom: 15px;color: rgba(0, 0, 0, 0.8);font-family: "PingFang SC", "Hiragino Sans GB", "Microsoft YaHei", STHeiti, "WenQuanYi Micro Hei", Helvetica, Arial, sans-serif;white-space: normal;background-color: rgb(255, 255, 255);"><img class="aligncenter size-full wp-image-160832" data-ratio="0.6978998384491115" src="/upload/17f76bcdb3e65214ae2a4852874697bc.null" data-type="png" data-w="619" height="432" sizes="(max-width: 619px) 100vw, 619px" style="border-style: none;margin-left: auto;margin-right: auto;display: block;cursor: pointer;" width="619"></p> <p style="margin-bottom: 15px;color: rgba(0, 0, 0, 0.8);font-family: "PingFang SC", "Hiragino Sans GB", "Microsoft YaHei", STHeiti, "WenQuanYi Micro Hei", Helvetica, Arial, sans-serif;white-space: normal;background-color: rgb(255, 255, 255);"><img class="aligncenter size-full wp-image-160833" data-ratio="0.6625874125874126" src="/upload/a87852a66f3e2f254337238dc6ac095f.null" data-type="png" data-w="572" height="379" sizes="(max-width: 572px) 100vw, 572px" style="border-style: none;margin-left: auto;margin-right: auto;display: block;cursor: pointer;" width="572"></p> <p style="margin-bottom: 15px;color: rgba(0, 0, 0, 0.8);font-family: "PingFang SC", "Hiragino Sans GB", "Microsoft YaHei", STHeiti, "WenQuanYi Micro Hei", Helvetica, Arial, sans-serif;white-space: normal;background-color: rgb(255, 255, 255);"><img class="aligncenter size-full wp-image-160834" data-ratio="0.782608695652174" src="/upload/47a4c53635bdc879a5bfe53013aeafc8.null" data-type="png" data-w="575" height="450" sizes="(max-width: 575px) 100vw, 575px" style="border-style: none;margin-left: auto;margin-right: auto;display: block;cursor: pointer;" width="575"></p> <p style="margin-bottom: 15px;color: rgba(0, 0, 0, 0.8);font-family: "PingFang SC", "Hiragino Sans GB", "Microsoft YaHei", STHeiti, "WenQuanYi Micro Hei", Helvetica, Arial, sans-serif;white-space: normal;background-color: rgb(255, 255, 255);"><img class="aligncenter size-full wp-image-160835" data-ratio="0.738255033557047" src="/upload/3c85767362df2394751dc6ba773057a8.null" data-type="png" data-w="596" height="440" sizes="(max-width: 596px) 100vw, 596px" style="border-style: none;margin-left: auto;margin-right: auto;display: block;cursor: pointer;" width="596"></p> <p style="margin-bottom: 15px;color: rgba(0, 0, 0, 0.8);font-family: "PingFang SC", "Hiragino Sans GB", "Microsoft YaHei", STHeiti, "WenQuanYi Micro Hei", Helvetica, Arial, sans-serif;white-space: normal;background-color: rgb(255, 255, 255);"><img class="aligncenter size-full wp-image-160836" data-ratio="0.7491638795986622" src="/upload/e92a251d6bd56f4c7d5db21f373ca706.null" data-type="png" data-w="598" height="448" sizes="(max-width: 598px) 100vw, 598px" style="border-style: none;margin-left: auto;margin-right: auto;display: block;cursor: pointer;" width="598"></p> <p style="margin-bottom: 15px;color: rgba(0, 0, 0, 0.8);font-family: "PingFang SC", "Hiragino Sans GB", "Microsoft YaHei", STHeiti, "WenQuanYi Micro Hei", Helvetica, Arial, sans-serif;white-space: normal;background-color: rgb(255, 255, 255);"><img class="aligncenter size-full wp-image-160837" data-ratio="0.711864406779661" src="/upload/845411f1304bb08d982b7a64947518c8.null" data-type="png" data-w="590" height="420" sizes="(max-width: 590px) 100vw, 590px" style="border-style: none;margin-left: auto;margin-right: auto;display: block;cursor: pointer;" width="590"></p> <p style="margin-bottom: 15px;color: rgba(0, 0, 0, 0.8);font-family: "PingFang SC", "Hiragino Sans GB", "Microsoft YaHei", STHeiti, "WenQuanYi Micro Hei", Helvetica, Arial, sans-serif;white-space: normal;background-color: rgb(255, 255, 255);"><img class="aligncenter size-full wp-image-160838" data-ratio="0.7993019197207679" src="/upload/aef2e68a82e9c1ec0533d21ecb7e74df.null" data-type="png" data-w="573" height="458" sizes="(max-width: 573px) 100vw, 573px" style="border-style: none;margin-left: auto;margin-right: auto;display: block;cursor: pointer;" width="573"></p> <p style="margin-bottom: 15px;color: rgba(0, 0, 0, 0.8);font-family: "PingFang SC", "Hiragino Sans GB", "Microsoft YaHei", STHeiti, "WenQuanYi Micro Hei", Helvetica, Arial, sans-serif;white-space: normal;background-color: rgb(255, 255, 255);"><img class="aligncenter size-full wp-image-160839" data-ratio="0.7325174825174825" src="/upload/30517936cd9671bfa3b391bc002ed0ea.null" data-type="png" data-w="572" height="419" sizes="(max-width: 572px) 100vw, 572px" style="border-style: none;margin-left: auto;margin-right: auto;display: block;cursor: pointer;" width="572"></p> <p style="margin-bottom: 15px;color: rgba(0, 0, 0, 0.8);font-family: "PingFang SC", "Hiragino Sans GB", "Microsoft YaHei", STHeiti, "WenQuanYi Micro Hei", Helvetica, Arial, sans-serif;white-space: normal;background-color: rgb(255, 255, 255);"><img class="aligncenter size-full wp-image-160840" data-ratio="0.7044247787610619" src="/upload/511d67d4f72d871e5c2de4f67bba2e6.null" data-type="png" data-w="565" height="398" sizes="(max-width: 565px) 100vw, 565px" style="border-style: none;margin-left: auto;margin-right: auto;display: block;cursor: pointer;" width="565"></p> <h3 style="padding-bottom: 5px;border-bottom: 1px solid rgb(233, 233, 233);font-size: 18px;font-weight: 600;margin-top: 30px;margin-bottom: 10px;line-height: 1.6;color: rgba(0, 0, 0, 0.8);font-family: "PingFang SC", "Hiragino Sans GB", "Microsoft YaHei", STHeiti, "WenQuanYi Micro Hei", Helvetica, Arial, sans-serif;white-space: normal;background-color: rgb(255, 255, 255);"><span style="font-weight: bolder;font-size: 20px;color: rgb(249, 3, 21);">支付宝的开源分布式消息中间件–Metamorphosis(MetaQ)</span></h3> <p style="margin-bottom: 15px;color: rgba(0, 0, 0, 0.8);font-family: "PingFang SC", "Hiragino Sans GB", "Microsoft YaHei", STHeiti, "WenQuanYi Micro Hei", Helvetica, Arial, sans-serif;white-space: normal;background-color: rgb(255, 255, 255);">Metamorphosis (MetaQ) 是一个高性能、高可用、可扩展的分布式消息中间件,类似于LinkedIn的Kafka,具有消息存储顺序写、吞吐量大和支持本地和XA事务等特性,适用 于大吞吐量、顺序消息、广播和日志数据传输等场景,在淘宝和支付宝有着广泛的应用,现已开源。</p> <p style="margin-bottom: 15px;color: rgba(0, 0, 0, 0.8);font-family: "PingFang SC", "Hiragino Sans GB", "Microsoft YaHei", STHeiti, "WenQuanYi Micro Hei", Helvetica, Arial, sans-serif;white-space: normal;background-color: rgb(255, 255, 255);">Metamorphosis是淘宝开源的一个Java消息中间件。关于消息中间件,你应该听说过JMS规范,以及一些开源实现,如ActiveMQ和HornetQ等。Metamorphosis也是其中之一。</p> <p style="margin-bottom: 15px;color: rgba(0, 0, 0, 0.8);font-family: "PingFang SC", "Hiragino Sans GB", "Microsoft YaHei", STHeiti, "WenQuanYi Micro Hei", Helvetica, Arial, sans-serif;white-space: normal;background-color: rgb(255, 255, 255);">Metamorphosis 的起源是我从对linkedin的开源MQ–现在转移到apache的kafka的学习开始的,这是一个设计很独特的MQ系统,它采用pull机制,而 不是一般MQ的push模型,它大量利用了zookeeper做服务发现和offset存储,它的设计理念我非常欣赏并赞同,强烈建议你阅读一下它的设计 文档,总体上说metamorphosis的设计跟它是完全一致的。但是为什么还需要meta呢?</p> <h3 style="padding-bottom: 5px;border-bottom: 1px solid rgb(233, 233, 233);font-size: 18px;font-weight: 600;margin-top: 30px;margin-bottom: 10px;line-height: 1.6;color: rgba(0, 0, 0, 0.8);font-family: "PingFang SC", "Hiragino Sans GB", "Microsoft YaHei", STHeiti, "WenQuanYi Micro Hei", Helvetica, Arial, sans-serif;white-space: normal;background-color: rgb(255, 255, 255);"><span style="font-weight: bolder;font-size: 20px;color: rgb(249, 3, 21);">简单概括下我重新写出meta的原因:</span></h3> <p style="margin-bottom: 15px;color: rgba(0, 0, 0, 0.8);font-family: "PingFang SC", "Hiragino Sans GB", "Microsoft YaHei", STHeiti, "WenQuanYi Micro Hei", Helvetica, Arial, sans-serif;white-space: normal;background-color: rgb(255, 255, 255);">1.Kafka是scala写,我对scala不熟悉,并且kafka整个社区的发展太缓慢了。</p> <p style="margin-bottom: 15px;color: rgba(0, 0, 0, 0.8);font-family: "PingFang SC", "Hiragino Sans GB", "Microsoft YaHei", STHeiti, "WenQuanYi Micro Hei", Helvetica, Arial, sans-serif;white-space: normal;background-color: rgb(255, 255, 255);">2.有一些功能是kakfa没有实现,但是我们却需要:事务、多种offset存储、高可用方案(HA)等</p> <p style="margin-bottom: 15px;color: rgba(0, 0, 0, 0.8);font-family: "PingFang SC", "Hiragino Sans GB", "Microsoft YaHei", STHeiti, "WenQuanYi Micro Hei", Helvetica, Arial, sans-serif;white-space: normal;background-color: rgb(255, 255, 255);">3.Meta相对于kafka特有的一些功能:</p> <ul class=" list-paddingleft-2" style="list-style-type: disc;"> <li><p>文本协议设计,非常透明,支持类似memcached stats的协议来监控broker</p></li> <li><p>纯Java实现,从通讯到存储,从client到server都是重新实现。</p></li> <li><p>提供事务支持,包括本地事务和XA分布式事务</p></li> <li><p>支持HA复制,包括异步复制和同步复制,保证消息的可靠性</p></li> <li><p>支持异步发送消息</p></li> <li><p>消费消息失败,支持本地恢复</p></li> <li><p>多种offset存储支持,数据库、磁盘、zookeeper,可自定义实现支持group commit,提升数据可靠性和吞吐量。</p></li> <li><p>支持消息广播模式</p></li> <li><p>一系列配套项目:python客户端、twitter storm的spout、tail4j等。</p></li> </ul> <p><br></p> <p style="margin-bottom: 15px;color: rgba(0, 0, 0, 0.8);font-family: "PingFang SC", "Hiragino Sans GB", "Microsoft YaHei", STHeiti, "WenQuanYi Micro Hei", Helvetica, Arial, sans-serif;white-space: normal;background-color: rgb(255, 255, 255);">因此meta相比于kafka的提升是巨大的。meta在淘宝和支付宝都得到了广泛应用,现在每天支付宝每天经由meta路由的消息达到120亿,淘宝也有每天也有上亿的消息量。</p> <h3 style="padding-bottom: 5px;border-bottom: 1px solid rgb(233, 233, 233);font-size: 18px;font-weight: 600;margin-top: 30px;margin-bottom: 10px;line-height: 1.6;color: rgba(0, 0, 0, 0.8);font-family: "PingFang SC", "Hiragino Sans GB", "Microsoft YaHei", STHeiti, "WenQuanYi Micro Hei", Helvetica, Arial, sans-serif;white-space: normal;background-color: rgb(255, 255, 255);"><span style="font-weight: bolder;font-size: 20px;color: rgb(249, 3, 21);">Meta适合的应用</span></h3> <ul class=" list-paddingleft-2" style="list-style-type: disc;"> <li><p>日志传输,高吞吐量的日志传输本来就是kafka的强项;</p></li> <li><p>消息广播功能,如广播缓存配置失效;</p></li> <li><p>数据的顺序同步功能,如mysql binlog复制;</p></li> <li><p>分布式环境下(broker,producer,consumer都为集群)的消息路由,对顺序和可靠性有极高要求的场景;</p></li> <li><p>作为一般MQ来使用的其他功能。</p></li> </ul> <p><br></p> <p style="margin-bottom: 15px;color: rgba(0, 0, 0, 0.8);font-family: "PingFang SC", "Hiragino Sans GB", "Microsoft YaHei", STHeiti, "WenQuanYi Micro Hei", Helvetica, Arial, sans-serif;white-space: normal;background-color: rgb(255, 255, 255);"><img class="aligncenter size-full wp-image-160841" data-ratio="0.5269784172661871" src="/upload/74fb2ba413cddda7163e2cb80f97ae0e.null" data-type="png" data-w="556" height="293" sizes="(max-width: 556px) 100vw, 556px" style="border-style: none;margin-left: auto;margin-right: auto;display: block;cursor: pointer;" width="556"></p> <p style="margin-bottom: 15px;color: rgba(0, 0, 0, 0.8);font-family: "PingFang SC", "Hiragino Sans GB", "Microsoft YaHei", STHeiti, "WenQuanYi Micro Hei", Helvetica, Arial, sans-serif;white-space: normal;background-color: rgb(255, 255, 255);"><img class="aligncenter size-full wp-image-160842" data-ratio="0.6291739894551845" src="/upload/28fcf8f5963e22c78c196a74e91611eb.null" data-type="png" data-w="569" height="358" sizes="(max-width: 569px) 100vw, 569px" style="border-style: none;margin-left: auto;margin-right: auto;display: block;cursor: pointer;" width="569"></p> <p><strong style="color: rgb(51, 51, 51);font-family: -apple-system-font, BlinkMacSystemFont, "Helvetica Neue", "PingFang SC", "Hiragino Sans GB", "Microsoft YaHei UI", "Microsoft YaHei", Arial, sans-serif;font-size: 17px;letter-spacing: 0.544px;text-align: justify;white-space: normal;background-color: rgb(255, 255, 255);"><span style="color: rgb(255, 76, 0);letter-spacing: 2px;font-size: 15px;">PS:如果觉得我的分享不错,欢迎大家随手点赞、转发。</span></strong></p> <p><br></p> <section class="_editor"> <section data-width="100%" style="display:inline-block;width:100%;vertical-align:top;background-image:url("https://mmbiz.qpic.cn/mmbiz_gif/6zIV1e6ocLAnlhiaKJrTCBqBd5ma41ib3j2J61E26hgBkgdENtqgCuJ6MlXEfS0icIt8vSYSGAptNa8Y1ibwCBuMVw/640?wx_fmt=gif");background-attachment:scroll;background-size:13.8587%;background-position:0% 0%;background-repeat:repeat;"> <section style="margin:20px 0%;text-align:center;transform: translate3d(0px, 0px, 0px);-webkit-transform: translate3d(0px, 0px, 0px);-moz-transform: translate3d(0px, 0px, 0px);-ms-transform: translate3d(0px, 0px, 0px);-o-transform: translate3d(0px, 0px, 0px);"> <section style="display: inline-block;width: 90%;border-width: 1px;border-style: solid;border-color: transparent;padding: 5px;box-shadow: rgb(170, 170, 170) 0px 0px 10px;background-color: rgb(254, 255, 255);" data-width="90%"> <section style="display:inline-block;vertical-align:top;" data-width=""> <section style="overflow: hidden;margin-right: auto;margin-left: auto;"> <section style="margin-bottom: 0.5em;color: rgb(35, 21, 10);overflow: hidden;display: inline-block;vertical-align: bottom;"> <section style="font-size: 2em;vertical-align: top;"> <p><strong><span style="font-size: 16px;color: rgb(255, 0, 0);">Java团长</span></strong></p> </section> <section style="padding-top: 0.3em;border-top: 1px dashed rgb(168, 164, 171);display: inline-block;"> <p><span style="font-size: 14px;color: rgb(0, 176, 80);">专注于Java干货分享</span></p> <section style="display:inline-block;width:111.297px;"> <img border="0" class="" data-ratio="1" src="/upload/b815c7461d118770627b3ea6bb7bc359.null" data-type="jpeg" data-w="258" height="auto" style="border-radius: 5px;border-width: 1px;border-style: dashed;border-color: rgb(168, 164, 171);box-shadow: rgba(0, 0, 0, 0.329412) 6px 6px 5px 0px;margin-bottom: 1.4px;visibility: visible !important;width: 111.297px !important;"> </section> <p><span style="font-size: 10px;color: #7030a0;">扫描上方二维码获取更多Java干货</span></p> </section> </section> </section> </section> </section> </section> </section> </section>
作者:じ☆ve宝贝
## 17.责任链模式 接下来我们将要谈谈责任链模式,有多个对象,每个对象持有对下一个对象的引用,这样就会形成一条链,请求在这条链上传递,直到某一对象决定处理该请求。但是发出者并不清楚到底最终那个对象会处理该请求,所以,责任链模式可以实现在隐瞒客户端的情况下,对系统进行动态的调整。先看看关系图:  Abstracthandler类提供了get和set方法,方便MyHandle类设置和修改引用对象,MyHandle类是核心,实例化后生成一系列相互持有的对象,构成一条链。 ``` public interface Handler { public void operator(); } ``` ``` public abstract class AbstractHandler { private Handler handler; public Handler getHandler() { return handler; } public void setHandler(Handler handler) { this.handler = handler; } } ``` ``` public class MyHandler extends AbstractHandler implements Handler { private String name; public MyHandler(String name) { this.name = name; } @Override public void operator() { System.out.println(name+"deal!"); if(getHandler()!=null){ getHandler().operator(); } } } ``` 测试类: ``` public class Test { public static void main(String[] args) { MyHandler h1 = new MyHandler("h1"); MyHandler h2 = new MyHandler("h2"); MyHandler h3 = new MyHandler("h3"); h1.setHandler(h2); h2.setHandler(h3); h1.operator(); } } ``` 输出: h1deal! h2deal! h3deal! 此处强调一点就是,链接上的请求可以是一条链,可以是一个树,还可以是一个环,模式本身不约束这个,需要我们自己去实现,同时,在一个时刻,命令只允许由一个对象传给另一个对象,而不允许传给多个对象。
作者:じ☆ve宝贝
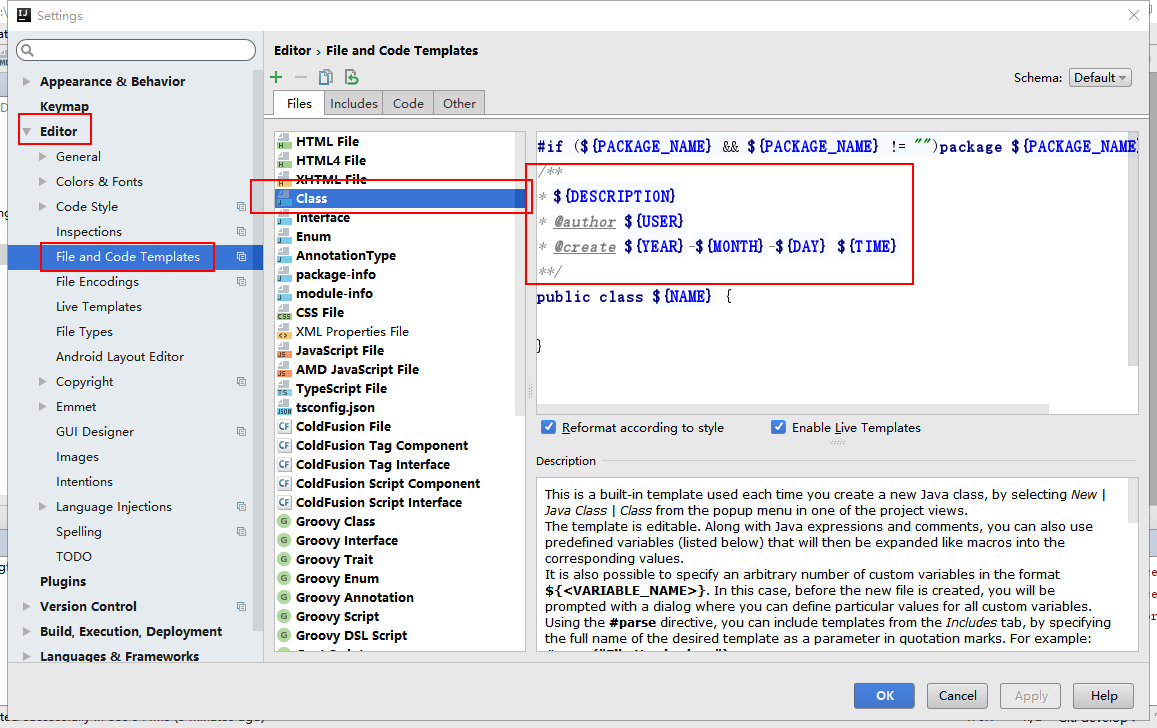 ``` #if (${PACKAGE_NAME} && ${PACKAGE_NAME} != "")package ${PACKAGE_NAME};#end /** * ${DESCRIPTION} * @author ${USER} * @create ${YEAR}-${MONTH}-${DAY} ${TIME} **/ public class ${NAME} { } ```
作者:微信小助手
<section style="box-sizing: border-box;font-size: 16px;"> <section style="box-sizing: border-box;" powered-by="xiumi.us"> <section style="margin-top: 10px;margin-bottom: 10px;box-sizing: border-box;"> <section style="padding-top: 10px;padding-right: 10px;padding-left: 10px;box-sizing: border-box;background-color: rgb(239, 239, 239);"> <span style="display: inline-block;width: 5%;line-height: 0.8;font-weight: bolder;font-size: 48px;box-sizing: border-box;"> <section style="box-sizing: border-box;"> “ </section></span> <section style="display: inline-block;vertical-align: top;float: right;width: 90%;line-height: 1.5;font-size: 15px;color: rgb(89, 89, 89);box-sizing: border-box;"> <p style="box-sizing: border-box;"><span style="letter-spacing: 1px;">最近又收到了运维报警:表示有些服务器负载非常高,让我们定位问题。</span></p> </section> <section style="clear: both;box-sizing: border-box;"></section> </section> </section> </section> </section> <p style="line-height: 1.75em;"><br></p> <p style="text-align: center;margin-left: 8px;margin-right: 8px;margin-bottom: 5px;"><img class="rich_pages" data-copyright="0" data-ratio="0.5263157894736842" data-s="300,640" src="/upload/5e91f91ffddd4d7ccc45a304482020f6.png" data-type="png" data-w="684" style=""></p> <p style="text-align: justify;margin-left: 8px;margin-right: 8px;line-height: 1.75em;"><span style="font-size: 15px;color: rgb(89, 89, 89);letter-spacing: 1px;">还真是想什么来什么,前些天还故意把某些服务器的负载提高(<a href="http://mp.weixin.qq.com/s?__biz=MjM5ODI5Njc2MA==&mid=2655821605&idx=1&sn=c195b055f52037dea128a712e6a93b43&chksm=bd74d2f28a035be4a913d92281f6e9e6e13f26a84d930e172499821f2ea89a678f7cb3ad6374&scene=21#wechat_redirect" target="_blank" data-itemshowtype="0" data-linktype="2">没错,老板让我写个 Bug!</a>),不过还好是不同的环境,互相没有影响。</span></p> <p style="line-height: normal;"><br></p> <section style="box-sizing: border-box;font-size: 16px;"> <section style="box-sizing: border-box;" powered-by="xiumi.us"> <section style="border-bottom-width: 1px;border-bottom-style: solid;border-bottom-color: black;margin-top: 0.5em;margin-bottom: 0.5em;line-height: 1.2;box-sizing: border-box;"> <section style="display: inline-block;border-bottom-width: 6px;border-bottom-style: solid;border-color: rgb(89, 89, 89);margin-bottom: -1px;font-size: 20px;color: rgb(89, 89, 89);box-sizing: border-box;"> <p style="box-sizing: border-box;">定位问题</p> </section> </section> </section> </section> <p style="line-height: normal;"><br></p> <p style="text-align: justify;margin-left: 8px;margin-right: 8px;line-height: 1.75em;"><span style="font-size: 15px;color: rgb(89, 89, 89);letter-spacing: 1px;">拿到问题后首先去服务器上看了看,发现运行的只有我们的 Java 应用。于是先用 PS 命令拿到了应用的 PID。</span></p> <p style="line-height: normal;"><br></p> <p style="text-align: justify;margin-left: 8px;margin-right: 8px;line-height: 1.75em;margin-bottom: 5px;"><span style="font-size: 15px;color: rgb(89, 89, 89);letter-spacing: 1px;">接着使用 top -Hp pid 将这个进程的线程显示出来。输入大写的 P 可以将线程按照 CPU 使用比例排序,</span><span style="font-size: 15px;letter-spacing: 1px;color: rgb(71, 193, 168);">于是得到以下结果:</span><span style="font-size: 15px;color: rgb(89, 89, 89);letter-spacing: 1px;"></span></p> <p style="text-align: center;margin-left: 8px;margin-right: 8px;line-height: 1.75em;margin-bottom: 5px;"><img class="rich_pages" data-copyright="0" data-ratio="0.8300395256916996" data-s="300,640" src="/upload/9866982178e019e81b930050fcdab64b.jpg" data-type="jpeg" data-w="1012" style=""></p> <p style="text-align: justify;margin-left: 8px;margin-right: 8px;line-height: 1.75em;"><span style="font-size: 15px;color: rgb(89, 89, 89);letter-spacing: 1px;">果然某些线程的 CPU 使用率非常高。</span><span style="font-size: 15px;line-height: 1.6;color: rgb(89, 89, 89);letter-spacing: 1px;">为了方便定位问题我立马使用 jstack pid > pid.log 将线程栈 Dump 到日志文件中。</span></p> <p style="line-height: normal;"><br></p> <p style="text-align: justify;margin-left: 8px;margin-right: 8px;line-height: 1.75em;margin-bottom: 5px;"><span style="font-size: 15px;color: rgb(89, 89, 89);letter-spacing: 1px;">我在上面 100% 的线程中随机选了一个 pid=194283 转换为 16 进制(2f6eb)后在线程快照中查询,因为线程快照中线程 ID 都是 16 进制存放。</span></p> <p style="text-align: center;margin-left: 8px;margin-right: 8px;line-height: 1.75em;margin-bottom: 5px;"><img class="rich_pages" data-copyright="0" data-ratio="0.19766206163655686" data-s="300,640" src="/upload/deb0d824e752ab9e88ff4d5fa979251e.jpg" data-type="jpeg" data-w="941" style=""></p> <p style="text-align: justify;margin-left: 8px;margin-right: 8px;line-height: 1.75em;"><span style="letter-spacing: 1px;"><span style="letter-spacing: 1px;font-size: 15px;color: rgb(89, 89, 89);">发现这是 Disruptor 的一个堆栈,前段时间正好解决过一个由于 Disruptor 队列引起的一次 OOM,<span style="letter-spacing: 1px;color: rgb(89, 89, 89);font-size: 15px;line-height: 1.6;">没想到又来一出。</span></span><span style="letter-spacing: 1px;line-height: 1.6;font-size: 15px;color: rgb(89, 89, 89);"></span></span></p> <p style="line-height: normal;"><br></p> <p style="text-align: justify;margin-left: 8px;margin-right: 8px;line-height: 1.75em;margin-bottom: 5px;"><span style="font-size: 15px;color: rgb(89, 89, 89);letter-spacing: 1px;">为了更加直观的查看线程的状态信息,我将快照信息上传到专门分析的平台上:http://fastthread.io/</span></p> <p style="text-align: center;margin-left: 8px;margin-right: 8px;line-height: 1.75em;margin-bottom: 5px;"><img class="rich_pages" data-copyright="0" data-ratio="0.6921875" data-s="300,640" src="/upload/8c78a2f2665a95c8db01afb812fd657e.jpg" data-type="jpeg" data-w="1280" style=""></p> <p style="text-align: justify;margin-left: 8px;margin-right: 8px;line-height: 1.75em;"><span style="font-size: 15px;color: rgb(89, 89, 89);letter-spacing: 1px;">其中有一项菜单展示了所有消耗 CPU 的线程,我仔细看了下发现几乎都是和上面的堆栈一样。</span></p> <p style="line-height: normal;"><br></p> <p style="text-align: justify;margin-left: 8px;margin-right: 8px;line-height: 1.75em;"><span style="font-size: 15px;color: rgb(89, 89, 89);letter-spacing: 1px;">也就是说都是 Disruptor 队列的堆栈,同时都在执行 java.lang.Thread.yield 函数。</span></p> <p style="line-height: normal;"><br></p> <p style="text-align: justify;margin-left: 8px;margin-right: 8px;line-height: 1.75em;"><span style="font-size: 15px;color: rgb(89, 89, 89);letter-spacing: 1px;">众所周知 yield 函数会让当前线程让出 CPU 资源,再让其他线程来竞争。</span></p> <p style="line-height: normal;"><br></p> <p style="text-align: justify;margin-left: 8px;margin-right: 8px;line-height: 1.75em;"><span style="font-size: 15px;color: rgb(89, 89, 89);letter-spacing: 1px;">根据刚才的线程快照发现处于 Runnable 状态并且都在执行 yield 函数的线程大概有 30 几个。</span></p> <p style="line-height: normal;"><br></p> <p style="text-align: justify;margin-left: 8px;margin-right: 8px;line-height: 1.75em;"><span style="font-size: 15px;color: rgb(89, 89, 89);letter-spacing: 1px;">因此初步判断为大量线程执行 yield 函数之后互相竞争导致 CPU 使用率增高,而通过对堆栈发现是和使用 Disruptor 有关。</span></p> <p style="line-height: normal;"><br></p> <section style="box-sizing: border-box;font-size: 16px;"> <section style="box-sizing: border-box;" powered-by="xiumi.us"> <section style="border-bottom-width: 1px;border-bottom-style: solid;border-bottom-color: black;margin-top: 0.5em;margin-bottom: 0.5em;line-height: 1.2;box-sizing: border-box;"> <section style="display: inline-block;border-bottom-width: 6px;border-bottom-style: solid;border-color: rgb(89, 89, 89);margin-bottom: -1px;font-size: 20px;color: rgb(89, 89, 89);box-sizing: border-box;"> <p style="box-sizing: border-box;">解决问题</p> </section> </section> </section> </section> <p style="line-height: normal;"><br></p> <p style="text-align: justify;margin-left: 8px;margin-right: 8px;line-height: 1.75em;"><span style="font-size: 15px;color: rgb(89, 89, 89);letter-spacing: 1px;">而后我查看了代码,发现是根据每一个业务场景在内部都会使用 2 个 Disruptor 队列来解耦。</span></p> <p style="line-height: normal;"><br></p> <p style="text-align: justify;margin-left: 8px;margin-right: 8px;line-height: 1.75em;"><span style="font-size: 15px;color: rgb(89, 89, 89);letter-spacing: 1px;">假设现在有 7 个业务类型,那就等于是创建 2*7=14 个 Disruptor 队列,同时每个队列有一个消费者,也就是总共有 14 个消费者(生产环境更多)。</span></p> <p style="line-height: normal;"><br></p> <p style="text-align: justify;margin-left: 8px;margin-right: 8px;line-height: 1.75em;"><span style="font-size: 15px;color: rgb(89, 89, 89);letter-spacing: 1px;">同时发现配置的消费等待策略为 YieldingWaitStrategy 这种等待策略确实会执行 yield 来让出 CPU。</span></p> <p style="line-height: normal;"><br></p> <p style="text-align: justify;margin-left: 8px;margin-right: 8px;line-height: 1.75em;margin-bottom: 5px;"><span style="font-size: 15px;letter-spacing: 1px;color: rgb(71, 193, 168);">代码如下:</span><span style="font-size: 15px;color: rgb(89, 89, 89);letter-spacing: 1px;"></span></p> <p style="text-align: center;margin-left: 8px;margin-right: 8px;line-height: 1.75em;margin-bottom: 5px;"><img class="rich_pages" data-copyright="0" data-ratio="0.9813736903376019" data-s="300,640" src="/upload/1fd84e3fea757d58d8db04bbbc1f994a.jpg" data-type="jpeg" data-w="859" style=""></p> <p style="text-align: justify;margin-left: 8px;margin-right: 8px;line-height: 1.75em;"><span style="font-size: 15px;color: rgb(89, 89, 89);letter-spacing: 1px;">初步看来和这个等待策略有很大的关系。</span></p> <p style="line-height: normal;"><br></p> <section style="box-sizing: border-box;font-size: 16px;"> <section style="box-sizing: border-box;" powered-by="xiumi.us"> <section style="border-bottom-width: 1px;border-bottom-style: solid;border-bottom-color: black;margin-top: 0.5em;margin-bottom: 0.5em;line-height: 1.2;box-sizing: border-box;"> <section style="display: inline-block;border-bottom-width: 6px;border-bottom-style: solid;border-color: rgb(89, 89, 89);margin-bottom: -1px;font-size: 20px;color: rgb(89, 89, 89);box-sizing: border-box;"> <p style="box-sizing: border-box;">本地模拟</p> </section> </section> </section> </section> <p style="line-height: normal;"><br></p> <p style="text-align: justify;margin-left: 8px;margin-right: 8px;line-height: 1.75em;margin-bottom: 5px;"><span style="font-size: 15px;color: rgb(89, 89, 89);letter-spacing: 1px;">为了验证,我在本地创建了 15 个 Disruptor 队列同时结合监控观察 CPU 的使用情况。</span></p> <p style="text-align: center;margin-left: 8px;margin-right: 8px;line-height: 1.75em;"><img class="" data-copyright="0" data-ratio="0.42021803766105054" data-s="300,640" src="/upload/1699328bad5aa6a7fd4114b1747140a2.jpg" data-type="jpeg" data-w="1009" style=""></p> <p style="text-align: center;margin-left: 8px;margin-right: 8px;line-height: 1.75em;margin-bottom: 5px;"><img class="" data-copyright="0" data-ratio="0.15476190476190477" data-s="300,640" src="/upload/f10fd3c19cc97bc61b249319d2635f47.jpg" data-type="jpeg" data-w="924" style=""></p> <p style="text-align: justify;margin-left: 8px;margin-right: 8px;line-height: 1.75em;"><span style="font-size: 15px;color: rgb(89, 89, 89);letter-spacing: 1px;">创建了 15 个 Disruptor 队列,同时每个队列都用线程池来往 Disruptor 队列里面发送 100W 条数据。</span></p> <p style="line-height: normal;"><br></p> <p style="text-align: justify;margin-left: 8px;margin-right: 8px;line-height: 1.75em;margin-bottom: 5px;"><span style="font-size: 15px;letter-spacing: 1px;color: rgb(71, 193, 168);">消费程序仅仅只是打印一下:</span></p> <p style="text-align: center;margin-left: 8px;margin-right: 8px;line-height: 1.75em;margin-bottom: 5px;"><img class="rich_pages" data-copyright="0" data-ratio="0.4794520547945205" data-s="300,640" src="/upload/b59e94ed576b2775389e2dd32c8721ab.jpg" data-type="jpeg" data-w="511" style=""></p> <p style="text-align: justify;margin-left: 8px;margin-right: 8px;line-height: 1.75em;margin-bottom: 5px;"><span style="font-size: 15px;color: rgb(89, 89, 89);letter-spacing: 1px;">跑了一段时间发现 CPU 使用率确实很高:</span></p> <p style="text-align: center;margin-left: 8px;margin-right: 8px;line-height: 1.75em;margin-bottom: 5px;"><img class="rich_pages" data-copyright="0" data-ratio="0.34140625" data-s="300,640" src="/upload/e96e7e97751e996e5e93ed7c3cbd8fcc.jpg" data-type="jpeg" data-w="1280" style=""></p> <p style="text-align: justify;margin-left: 8px;margin-right: 8px;line-height: 1.75em;"><span style="font-size: 15px;color: rgb(89, 89, 89);letter-spacing: 1px;">同时 Dump 线程发现和生产的现象也是一致的:消费线程都处于 Runnable 状态,同时都在执行 yield。</span></p> <p style="line-height: normal;"><br></p> <p style="text-align: justify;margin-left: 8px;margin-right: 8px;line-height: 1.75em;margin-bottom: 5px;"><span style="font-size: 15px;letter-spacing: 1px;color: rgb(71, 193, 168);">通过查询 Disruptor 官方文档发现:</span><span style="font-size: 15px;color: rgb(89, 89, 89);letter-spacing: 1px;"></span></p> <p style="text-align: center;margin-left: 8px;margin-right: 8px;line-height: 1.75em;margin-bottom: 5px;"><img class="rich_pages" data-copyright="0" data-ratio="0.29722589167767505" data-s="300,640" src="/upload/7e8f0fb3c74cc6d5dc57882d230215a5.jpg" data-type="jpeg" data-w="757" style=""></p> <p style="text-align: justify;margin-left: 8px;margin-right: 8px;line-height: 1.75em;"><span style="font-size: 15px;color: rgb(89, 89, 89);letter-spacing: 1px;">YieldingWaitStrategy 是一种充分压榨 CPU 的策略,使用自旋 + yield 的方式来提高性能。</span></p> <p style="line-height: normal;"><br></p> <p style="text-align: justify;margin-left: 8px;margin-right: 8px;line-height: 1.75em;margin-bottom: 5px;"><span style="font-size: 15px;color: rgb(89, 89, 89);letter-spacing: 1px;">当消费线程(Event Handler threads)的数量小于 CPU 核心数时推荐使用该策略。</span></p> <p style="text-align: center;margin-left: 8px;margin-right: 8px;line-height: 1.75em;margin-bottom: 5px;"><img class="rich_pages" data-copyright="0" data-ratio="0.220795892169448" data-s="300,640" src="/upload/f4427fb96af9d5ee86e64a6567b5ee25.jpg" data-type="jpeg" data-w="779" style=""></p> <p style="text-align: justify;margin-left: 8px;margin-right: 8px;line-height: 1.75em;"><span style="font-size: 15px;color: rgb(89, 89, 89);letter-spacing: 1px;">同时查阅到其他的等待策略 BlockingWaitStrategy (也是默认的策略),它使用的是锁的机制,对 CPU 的使用率不高。</span></p> <p style="line-height: normal;"><br></p> <p style="text-align: justify;margin-left: 8px;margin-right: 8px;line-height: 1.75em;margin-bottom: 5px;"><span style="font-size: 15px;color: rgb(89, 89, 89);letter-spacing: 1px;">于是在和之前同样的条件下将等待策略换为 BlockingWaitStrategy。</span></p> <p style="text-align: center;margin-left: 8px;margin-right: 8px;line-height: 1.75em;margin-bottom: 5px;"><img class="" data-copyright="0" data-ratio="0.4592833876221498" data-s="300,640" src="/upload/4312770fcc4689015e906fe4406c3c3c.jpg" data-type="jpeg" data-w="921" style=""></p> <p style="text-align: center;margin-left: 8px;margin-right: 8px;line-height: 1.75em;margin-bottom: 5px;"><img class="" data-copyright="0" data-ratio="0.37450980392156863" data-s="300,640" src="/upload/e22a63972ae5b5501a6ec9b919a47920.jpg" data-type="jpeg" data-w="510" style=""></p> <p style="text-align: center;margin-left: 8px;margin-right: 8px;line-height: 1.75em;margin-bottom: 5px;"><img class="" data-copyright="0" data-ratio="0.24571428571428572" data-s="300,640" src="/upload/cbb10b64b7cabdaf87287916b0463545.jpg" data-type="jpeg" data-w="1050" style=""></p> <p style="text-align: justify;margin-left: 8px;margin-right: 8px;line-height: 1.75em;"><span style="font-size: 15px;color: rgb(89, 89, 89);letter-spacing: 1px;">和刚才的 CPU 对比会发现到后面使用率会有明显的降低;同时 Dump 线程后会发现大部分线程都处于 Waiting 状态。</span></p> <p style="line-height: normal;"><br></p> <section style="box-sizing: border-box;font-size: 16px;"> <section style="box-sizing: border-box;" powered-by="xiumi.us"> <section style="border-bottom-width: 1px;border-bottom-style: solid;border-bottom-color: black;margin-top: 0.5em;margin-bottom: 0.5em;line-height: 1.2;box-sizing: border-box;"> <section style="display: inline-block;border-bottom-width: 6px;border-bottom-style: solid;border-color: rgb(89, 89, 89);margin-bottom: -1px;font-size: 20px;color: rgb(89, 89, 89);box-sizing: border-box;"> <p style="box-sizing: border-box;">优化解决</p> </section> </section> </section> </section> <p style="line-height: normal;"><br></p> <p style="text-align: justify;margin-left: 8px;margin-right: 8px;line-height: 1.75em;"><span style="font-size: 15px;color: rgb(89, 89, 89);letter-spacing: 1px;">看样子将等待策略换为 BlockingWaitStrategy 可以减缓 CPU 的使用。</span></p> <p style="line-height: normal;"><br></p> <p style="text-align: justify;margin-left: 8px;margin-right: 8px;line-height: 1.75em;"><span style="font-size: 15px;color: rgb(89, 89, 89);letter-spacing: 1px;">但留意到官方对 YieldingWaitStrategy 的描述里谈到:当消费线程(Event Handler threads)的数量小于 CPU 核心数时推荐使用该策略。</span></p> <p style="line-height: normal;"><br></p> <p style="text-align: justify;margin-left: 8px;margin-right: 8px;line-height: 1.75em;margin-bottom: 5px;"><span style="font-size: 15px;color: rgb(89, 89, 89);letter-spacing: 1px;">而现有的使用场景很明显消费线程数已经大大的超过了核心 CPU 数了,因为我的使用方式是一个 Disruptor 队列一个消费者,所以我将队列调整为只有 1 个再试试(策略依然是 YieldingWaitStrategy)。</span></p> <p style="text-align: center;margin-left: 8px;margin-right: 8px;line-height: 1.75em;margin-bottom: 5px;"><img class="" data-copyright="0" data-ratio="0.4" data-s="300,640" src="/upload/6586f0b8d87b5b996d9a2d0c8794509a.jpg" data-type="jpeg" data-w="960" style=""></p> <p style="text-align: center;margin-left: 8px;margin-right: 8px;line-height: 1.75em;margin-bottom: 5px;"><img class="" data-copyright="0" data-ratio="0.5296442687747036" data-s="300,640" src="/upload/657d91c40b6db0945ddf3aa858c07583.jpg" data-type="jpeg" data-w="506" style=""></p> <p style="text-align: justify;margin-left: 8px;margin-right: 8px;line-height: 1.75em;"><span style="font-size: 15px;color: rgb(89, 89, 89);letter-spacing: 1px;">跑了一分钟,发现 CPU 的使用率一直都比较平稳而且不高。</span></p> <p style="line-height: normal;"><br></p> <section style="box-sizing: border-box;font-size: 16px;"> <section style="box-sizing: border-box;" powered-by="xiumi.us"> <section style="border-bottom-width: 1px;border-bottom-style: solid;border-bottom-color: black;margin-top: 0.5em;margin-bottom: 0.5em;line-height: 1.2;box-sizing: border-box;"> <section style="display: inline-block;border-bottom-width: 6px;border-bottom-style: solid;border-color: rgb(89, 89, 89);margin-bottom: -1px;font-size: 20px;color: rgb(89, 89, 89);box-sizing: border-box;"> <p style="box-sizing: border-box;">总结</p> </section> </section> </section> </section> <p style="line-height: normal;"><br></p> <p style="text-align: justify;margin-left: 8px;margin-right: 8px;line-height: 1.75em;"><span style="font-size: 15px;color: rgb(89, 89, 89);letter-spacing: 1px;">所以排查到此可以有一个结论了,想要根本解决这个问题需要将我们现有的业务拆分;现在是一个应用里同时处理了 N 个业务,每个业务都会使用好几个 Disruptor 队列。</span></p> <p style="line-height: normal;"><br></p> <p style="text-align: justify;margin-left: 8px;margin-right: 8px;line-height: 1.75em;"><span style="font-size: 15px;color: rgb(89, 89, 89);letter-spacing: 1px;">由于是在一台服务器上运行,所以 CPU 资源都是共享的,这就会导致 CPU 的使用率居高不下。</span></p> <p style="line-height: normal;"><br></p> <p style="text-align: justify;margin-left: 8px;margin-right: 8px;line-height: 1.75em;"><span style="font-size: 15px;letter-spacing: 1px;color: rgb(71, 193, 168);">所以我们的调整方式如下:</span><span style="font-size: 15px;color: rgb(89, 89, 89);letter-spacing: 1px;"></span></p> <ul class=" list-paddingleft-2" style="list-style-type: disc;"> <li><p style="text-align: justify;line-height: 1.75em;"><span style="font-size: 15px;color: rgb(89, 89, 89);letter-spacing: 1px;">为了快速缓解这个问题,先将等待策略换为 BlockingWaitStrategy,可以有效降低 CPU 的使用率(业务上也还能接受)。</span></p></li> <li><p style="text-align: justify;line-height: 1.75em;"><span style="font-size: 15px;color: rgb(89, 89, 89);letter-spacing: 1px;">第二步就需要将应用拆分(上文模拟的一个 Disruptor 队列),一个应用处理一种业务类型;然后分别单独部署,这样也可以互相隔离互不影响。</span></p></li> </ul> <p style="line-height: normal;"><br></p> <p style="text-align: justify;margin-left: 8px;margin-right: 8px;line-height: 1.75em;"><span style="font-size: 15px;color: rgb(89, 89, 89);letter-spacing: 1px;">当然还有其他的一些优化,因为这也是一个老系统了,这次 Dump 线程居然发现创建了 800+ 的线程。</span></p> <p style="line-height: normal;"><br></p> <p style="text-align: justify;margin-left: 8px;margin-right: 8px;line-height: 1.75em;"><span style="font-size: 15px;color: rgb(89, 89, 89);letter-spacing: 1px;">创建线程池的方式也是核心线程数、最大线程数是一样的,导致一些空闲的线程也得不到回收;这样会有很多无意义的资源消耗。</span></p> <p style="line-height: normal;"><br></p> <p style="text-align: justify;margin-left: 8px;margin-right: 8px;line-height: 1.75em;"><span style="font-size: 15px;color: rgb(89, 89, 89);letter-spacing: 1px;">所以也会结合业务将创建线程池的方式调整一下,将线程数降下来,尽量的物尽其用。</span></p> <p style="line-height: normal;"><br></p> <p style="white-space: normal;line-height: 1.75em;"><span style="color: rgb(89, 89, 89);letter-spacing: 1px;"><em><span style="font-size: 14px;">作者:</span></em></span><span style="color: rgb(89, 89, 89);letter-spacing: 1px;font-size: 14px;"><em><span style="line-height: 27.2px;">crossoverJie</span></em></span></p> <p style="white-space: normal;line-height: 1.75em;"><span style="color: rgb(89, 89, 89);letter-spacing: 1px;"><em><span style="font-size: 14px;">编辑:陶家龙、孙淑娟</span></em></span><br></p> <p style="text-align: justify;line-height: 1.75em;"><span style="font-size: 14px;"><em><span style="color: rgb(89, 89, 89);letter-spacing: 1px;">出处:</span></em></span><span style="font-size: 14px;"><em><span style="font-size: 14px;color: rgb(89, 89, 89);letter-spacing: 1px;">转载自微信公众号crossoverJie</span></em></span></p> <p style="text-align: justify;line-height: 1.75em;margin-bottom: 5px;"><span style="font-size: 14px;"><em><span style="font-size: 14px;color: rgb(89, 89, 89);letter-spacing: 1px;">源码:</span></em></span><span style="font-size: 14px;"><em><span style="font-size: 14px;color: rgb(89, 89, 89);letter-spacing: 1px;">https://github.com/crossoverJie/JCSprout</span></em></span></p> <p style="text-align: center;"><img class="rich_pages" data-copyright="0" data-ratio="0.3939393939393939" src="/upload/58a14061a632a0fe87d40beb73c1aa.gif" data-type="gif" data-w="660" style=""></p> <p style="text-align: justify;margin-left: 8px;margin-right: 8px;line-height: 1.75em;"><span style="font-size: 15px;color: rgb(89, 89, 89);letter-spacing: 1px;"></span></p> <section style="box-sizing: border-box;font-size: 16px;"> <section style="box-sizing: border-box;" powered-by="xiumi.us"> <section style="margin-top: 0.5em;margin-bottom: 0.5em;box-sizing: border-box;"> <section style="font-size: 15px;border-style: solid;border-width: 0px 0px 1px;color: rgb(89, 89, 89);border-bottom-color: rgba(215, 215, 215, 0.960784);box-sizing: border-box;"> <p style="box-sizing: border-box;"><span style="letter-spacing: 1px;"><strong>精彩文章推荐:</strong></span></p> </section> </section> </section> </section> <p style="line-height: 2em;"><a href="http://mp.weixin.qq.com/s?__biz=MjM5ODI5Njc2MA==&mid=2655823785&idx=1&sn=1e9017782ec65e750112c329c2338fd0&chksm=bd74ea7e8a0363680ebb5d1828aab979df3563d89a3219f57d014807f190c7d304ff3c337d1b&scene=21#wechat_redirect" target="_blank" data-itemshowtype="0" style="font-size: 14px;color: rgb(89, 89, 89);letter-spacing: 1px;text-decoration: none;" data-linktype="2"><span style="font-size: 14px;color: rgb(89, 89, 89);letter-spacing: 1px;">一个百亿级日志系统是怎么设计出来的?</span></a><br></p> <p style="line-height: 2em;"><a href="http://mp.weixin.qq.com/s?__biz=MjM5ODI5Njc2MA==&mid=2655823816&idx=1&sn=eb2fe7b76c8d323255db27b7f472440f&chksm=bd74ea1f8a036309d376eadcf5aedd7221c5dc7d49937fa123a8d4c3ee78a0d9d2807a5608ff&scene=21#wechat_redirect" target="_blank" data-itemshowtype="0" style="font-size: 14px;color: rgb(89, 89, 89);letter-spacing: 1px;text-decoration: none;" data-linktype="2"><span style="font-size: 14px;color: rgb(89, 89, 89);letter-spacing: 1px;">重新定义“人货场”:淘宝情景计算探索实践</span></a><br></p> <p style="line-height: 2em;"><a href="http://mp.weixin.qq.com/s?__biz=MjM5ODI5Njc2MA==&mid=2655823746&idx=1&sn=7596d7206ddf45c1cb7e1e37712a50d4&chksm=bd74ea558a036343db5891275be694f9cfcb89dcc7bf758571cc063036a3687d1c3042ddceb2&scene=21#wechat_redirect" target="_blank" data-itemshowtype="0" style="font-size: 14px;color: rgb(89, 89, 89);letter-spacing: 1px;text-decoration: none;" data-linktype="2"><span style="font-size: 14px;color: rgb(89, 89, 89);letter-spacing: 1px;">如何从单个服务器扩展到百万用户的系统?</span></a><br></p>
作者:若是有缘何须誓言
Android 异步消息处理机制 让你深入理解 Looper、Handler、Message三者关系 很多人面试肯定都被问到过,请问Android中的Looper , Handler , Message有什么关系?本篇博客目的首先为大家从源码角度介绍3者关系,然后给出一个容易记忆的结论。 #### 1、 概述 Handler 、 Looper 、Message 这三者都与Android异步消息处理线程相关的概念。那么什么叫异步消息处理线程呢? 异步消息处理线程启动后会进入一个无限的循环体之中,每循环一次,从其内部的消息队列中取出一个消息,然后回调相应的消息处理函数,执行完成一个消息后则继续循环。若消息队列为空,线程则会阻塞等待。 说了这一堆,那么和Handler 、 Looper 、Message有啥关系?其实Looper负责的就是创建一个MessageQueue,然后进入一个无限循环体不断从该MessageQueue中读取消息,而消息的创建者就是一个或多个Handler 。 #### 2、 源码解析 ##### 1、Looper 对于Looper主要是prepare()和loop()两个方法。 首先看prepare()方法 ``` public static final void prepare() { if (sThreadLocal.get() != null) { throw new RuntimeException("Only one Looper may be created per thread"); } sThreadLocal.set(new Looper(true)); } ``` sThreadLocal是一个ThreadLocal对象,可以在一个线程中存储变量。可以看到,在第5行,将一个Looper的实例放入了ThreadLocal,并且2-4行判断了sThreadLocal是否为null,否则抛出异常。这也就说明了Looper.prepare()方法不能被调用两次,同时也保证了一个线程中只有一个Looper实例~相信有些哥们一定遇到这个错误。 下面看Looper的构造方法: ``` private Looper(boolean quitAllowed) { mQueue = new MessageQueue(quitAllowed); mRun = true; mThread = Thread.currentThread(); } ``` 在构造方法中,创建了一个MessageQueue(消息队列)。 然后我们看loop()方法: ``` public static void loop() { final Looper me = myLooper(); if (me == null) { throw new RuntimeException("No Looper; Looper.prepare() wasn't called on this thread."); } final MessageQueue queue = me.mQueue; // Make sure the identity of this thread is that of the local process, // and keep track of what that identity token actually is. Binder.clearCallingIdentity(); final long ident = Binder.clearCallingIdentity(); for (;;) { Message msg = queue.next(); // might block if (msg == null) { // No message indicates that the message queue is quitting. return; } // This must be in a local variable, in case a UI event sets the logger Printer logging = me.mLogging; if (logging != null) { logging.println(">>>>> Dispatching to " + msg.target + " " + msg.callback + ": " + msg.what); } msg.target.dispatchMessage(msg); if (logging != null) { logging.println("<<<<< Finished to " + msg.target + " " + msg.callback); } // Make sure that during the course of dispatching the // identity of the thread wasn't corrupted. final long newIdent = Binder.clearCallingIdentity(); if (ident != newIdent) { Log.wtf(TAG, "Thread identity changed from 0x" + Long.toHexString(ident) + " to 0x" + Long.toHexString(newIdent) + " while dispatching to " + msg.target.getClass().getName() + " " + msg.callback + " what=" + msg.what); } msg.recycle(); } } ``` 第2行: ``` public static Looper myLooper() { return sThreadLocal.get(); } ``` 方法直接返回了sThreadLocal存储的Looper实例,如果me为null则抛出异常,也就是说looper方法必须在prepare方法之后运行。 第6行:拿到该looper实例中的mQueue(消息队列) 13到45行:就进入了我们所说的无限循环。 14行:取出一条消息,如果没有消息则阻塞。 27行:使用调用 msg.target.dispatchMessage(msg);把消息交给msg的target的dispatchMessage方法去处理。Msg的target是什么呢?其实就是handler对象,下面会进行分析。 44行:释放消息占据的资源。 Looper主要作用: 1、 与当前线程绑定,保证一个线程只会有一个Looper实例,同时一个Looper实例也只有一个MessageQueue。 2、 loop()方法,不断从MessageQueue中去取消息,交给消息的target属性的dispatchMessage去处理。 好了,我们的异步消息处理线程已经有了消息队列(MessageQueue),也有了在无限循环体中取出消息的哥们,现在缺的就是发送消息的对象了,于是乎:Handler登场了。 ##### 2、Handler 使用Handler之前,我们都是初始化一个实例,比如用于更新UI线程,我们会在声明的时候直接初始化,或者在onCreate中初始化Handler实例。所以我们首先看Handler的构造方法,看其如何与MessageQueue联系上的,它在子线程中发送的消息(一般发送消息都在非UI线程)怎么发送到MessageQueue中的。 ``` public Handler() { this(null, false); } public Handler(Callback callback, boolean async) { if (FIND_POTENTIAL_LEAKS) { final Class<? extends Handler> klass = getClass(); if ((klass.isAnonymousClass() || klass.isMemberClass() || klass.isLocalClass()) && (klass.getModifiers() & Modifier.STATIC) == 0) { Log.w(TAG, "The following Handler class should be static or leaks might occur: " + klass.getCanonicalName()); } } mLooper = Looper.myLooper(); if (mLooper == null) { throw new RuntimeException( "Can't create handler inside thread that has not called Looper.prepare()"); } mQueue = mLooper.mQueue; mCallback = callback; mAsynchronous = async; } ``` 14行:通过Looper.myLooper()获取了当前线程保存的Looper实例,然后在19行又获取了这个Looper实例中保存的MessageQueue(消息队列),这样就保证了handler的实例与我们Looper实例中MessageQueue关联上了。 然后看我们最常用的sendMessage方法 ``` public final boolean sendMessage(Message msg) { return sendMessageDelayed(msg, 0); } ``` ``` public final boolean sendEmptyMessageDelayed(int what, long delayMillis) { Message msg = Message.obtain(); msg.what = what; return sendMessageDelayed(msg, delayMillis); } ``` ``` public final boolean sendMessageDelayed(Message msg, long delayMillis) { if (delayMillis < 0) { delayMillis = 0; } return sendMessageAtTime(msg, SystemClock.uptimeMillis() + delayMillis); } ``` ``` public boolean sendMessageAtTime(Message msg, long uptimeMillis) { MessageQueue queue = mQueue; if (queue == null) { RuntimeException e = new RuntimeException( this + " sendMessageAtTime() called with no mQueue"); Log.w("Looper", e.getMessage(), e); return false; } return enqueueMessage(queue, msg, uptimeMillis); } ``` 辗转反则最后调用了sendMessageAtTime,在此方法内部有直接获取MessageQueue然后调用了enqueueMessage方法,我们再来看看此方法: ``` private boolean enqueueMessage(MessageQueue queue, Message msg, long uptimeMillis) { msg.target = this; if (mAsynchronous) { msg.setAsynchronous(true); } return queue.enqueueMessage(msg, uptimeMillis); } ``` enqueueMessage中首先为meg.target赋值为this,【如果大家还记得Looper的loop方法会取出每个msg然后交给msg,target.dispatchMessage(msg)去处理消息】,也就是把当前的handler作为msg的target属性。最终会调用queue的enqueueMessage的方法,也就是说handler发出的消息,最终会保存到消息队列中去。 现在已经很清楚了Looper会调用prepare()和loop()方法,在当前执行的线程中保存一个Looper实例,这个实例会保存一个MessageQueue对象,然后当前线程进入一个无限循环中去,不断从MessageQueue中读取Handler发来的消息。然后再回调创建这个消息的handler中的dispathMessage方法,下面我们赶快去看一看这个方法: ``` public void dispatchMessage(Message msg) { if (msg.callback != null) { handleCallback(msg); } else { if (mCallback != null) { if (mCallback.handleMessage(msg)) { return; } } handleMessage(msg); } } ``` 可以看到,第10行,调用了handleMessage方法,下面我们去看这个方法: ``` /** * Subclasses must implement this to receive messages. */ public void handleMessage(Message msg) { } ``` 可以看到这是一个空方法,为什么呢,因为消息的最终回调是由我们控制的,我们在创建handler的时候都是复写handleMessage方法,然后根据msg.what进行消息处理。 例如: ``` private Handler mHandler = new Handler() { public void handleMessage(android.os.Message msg) { switch (msg.what) { case value: break; default: break; } }; }; ``` 到此,这个流程已经解释完毕,让我们首先总结一下 1、首先Looper.prepare()在本线程中保存一个Looper实例,然后该实例中保存一个MessageQueue对象;因为Looper.prepare()在一个线程中只能调用一次,所以MessageQueue在一个线程中只会存在一个。 2、Looper.loop()会让当前线程进入一个无限循环,不端从MessageQueue的实例中读取消息,然后回调msg.target.dispatchMessage(msg)方法。 3、Handler的构造方法,会首先得到当前线程中保存的Looper实例,进而与Looper实例中的MessageQueue想关联。 4、Handler的sendMessage方法,会给msg的target赋值为handler自身,然后加入MessageQueue中。 5、在构造Handler实例时,我们会重写handleMessage方法,也就是msg.target.dispatchMessage(msg)最终调用的方法。 好了,总结完成,大家可能还会问,那么在Activity中,我们并没有显示的调用Looper.prepare()和Looper.loop()方法,为啥Handler可以成功创建呢,这是因为在Activity的启动代码中,已经在当前UI线程调用了Looper.prepare()和Looper.loop()方法。 #### 3、Handler post 今天有人问我,你说Handler的post方法创建的线程和UI线程有什么关系? 其实这个问题也是出现这篇博客的原因之一;这里需要说明,有时候为了方便,我们会直接写如下代码: ``` mHandler.post(new Runnable() { @Override public void run() { Log.e("TAG", Thread.currentThread().getName()); mTxt.setText("yoxi"); } }); ``` 然后run方法中可以写更新UI的代码,其实这个Runnable并没有创建什么线程,而是发送了一条消息,下面看源码: ``` public final boolean post(Runnable r) { return sendMessageDelayed(getPostMessage(r), 0); } ``` ``` private static Message getPostMessage(Runnable r) { Message m = Message.obtain(); m.callback = r; return m; } ``` 可以看到,在getPostMessage中,得到了一个Message对象,然后将我们创建的Runable对象作为callback属性,赋值给了此message. 注:产生一个Message对象,可以new ,也可以使用Message.obtain()方法;两者都可以,但是更建议使用obtain方法,因为Message内部维护了一个Message池用于Message的复用,避免使用new 重新分配内存。 ``` public final boolean sendMessageDelayed(Message msg, long delayMillis) { if (delayMillis < 0) { delayMillis = 0; } return sendMessageAtTime(msg, SystemClock.uptimeMillis() + delayMillis); } ``` ``` public boolean sendMessageAtTime(Message msg, long uptimeMillis) { MessageQueue queue = mQueue; if (queue == null) { RuntimeException e = new RuntimeException( this + " sendMessageAtTime() called with no mQueue"); Log.w("Looper", e.getMessage(), e); return false; } return enqueueMessage(queue, msg, uptimeMillis); } ``` 最终和handler.sendMessage一样,调用了sendMessageAtTime,然后调用了enqueueMessage方法,给msg.target赋值为handler,最终加入MessagQueue. 可以看到,这里msg的callback和target都有值,那么会执行哪个呢? 其实上面已经贴过代码,就是dispatchMessage方法: ``` public void dispatchMessage(Message msg) { if (msg.callback != null) { handleCallback(msg); } else { if (mCallback != null) { if (mCallback.handleMessage(msg)) { return; } } handleMessage(msg); } } ``` 第2行,如果不为null,则执行callback回调,也就是我们的Runnable对象。 好了,关于Looper , Handler , Message 这三者关系上面已经叙述的非常清楚了。 最后来张图解:  希望图片可以更好的帮助大家的记忆~~ #### 4、后话 其实Handler不仅可以更新UI,你完全可以在一个子线程中去创建一个Handler,然后使用这个handler实例在任何其他线程中发送消息,最终处理消息的代码都会在你创建Handler实例的线程中运行。 ``` new Thread() { private Handler handler; public void run() { Looper.prepare(); handler = new Handler() { public void handleMessage(android.os.Message msg) { Log.e("TAG",Thread.currentThread().getName()); }; };<pre code_snippet_id="445431" snippet_file_name="blog_20140808_19_1943618" name="code" class="java"> Looper.loop(); } </pre> ``` Android不仅给我们提供了异步消息处理机制让我们更好的完成UI的更新,其实也为我们提供了异步消息处理机制代码的参考~~不仅能够知道原理,最好还可以将此设计用到其他的非Android项目中去~~
作者:微信小助手
<section class="xmteditor" style="display:none;" data-tools="新媒体管家" data-label="powered by xmt.cn"></section> <p style="margin: 5px 16px;white-space: normal;letter-spacing: 0.544px;background-color: rgb(255, 255, 255);caret-color: rgb(51, 51, 51);word-spacing: 2px;text-align: center;line-height: normal;" data-mpa-powered-by="yiban.io"><br></p> <section class="mpa-template" data-mpa-template-id="1562268" data-mpa-color="null" data-mpa-category="收藏"> <section> <section class="layout"> <section style="margin: 1em 0px;color: rgb(51, 51, 51);box-sizing: border-box;border-bottom: 2px solid rgb(236, 68, 68);clear: both;"> <section style="display: inline-block;padding: 3px 10px 0px;color: rgb(255, 255, 255);box-sizing: border-box;border-top-left-radius: 3px;border-top-right-radius: 3px;height: 28px;background-color: rgb(236, 68, 68);"> <span style="font-size: 16px;">一、前言</span> </section> <section style="box-sizing: border-box;border-top: 28px solid transparent;border-right-color: rgb(206, 206, 206);border-bottom: 0px solid transparent;border-left: 15px solid rgb(206, 206, 206);display: inline-block;margin-left: 2px;vertical-align: top;"></section> </section> </section> </section> </section> <p style="margin-top: 15px;margin-bottom: 15px;line-height: 2em;"><span style="font-size: 16px;">本文主要讲了 Redis 的持久化相关功能,持久化一直是影响 Redis 性能的高发地,也是面试中经常被问到的。</span></p> <p style="margin-top: 15px;margin-bottom: 15px;line-height: 2em;"><span style="font-size: 16px;">包括 RDB 相关的特定和优缺点,AOF 的优缺点,事实上,由于 RDB 的数据实时性问题,目前用 AOF 比较多了,而持久化恢复也是优先 AOF。</span></p> <p style="margin-top: 15px;margin-bottom: 15px;line-height: 2em;"><span style="font-size: 16px;">RDB 是旧的模式,现在基本上都使用 AOF,当然,今天两个都会一起聊聊。</span></p> <section class="mpa-template" data-mpa-template-id="1562268" data-mpa-color="null" data-mpa-category="收藏"> <section> <section class="layout"> <section style="margin: 1em 0px;color: rgb(51, 51, 51);box-sizing: border-box;border-bottom: 2px solid rgb(236, 68, 68);clear: both;"> <section style="display: inline-block;padding: 3px 10px 0px;color: rgb(255, 255, 255);box-sizing: border-box;border-top-left-radius: 3px;border-top-right-radius: 3px;height: 28px;background-color: rgb(236, 68, 68);"> <span style="font-size: 16px;">二、RDB</span> </section> <section style="box-sizing: border-box;border-top: 28px solid transparent;border-right-color: rgb(206, 206, 206);border-bottom: 0px solid transparent;border-left: 15px solid rgb(206, 206, 206);display: inline-block;margin-left: 2px;vertical-align: top;"></section> </section> </section> </section> </section> <p style="margin-top: 15px;margin-bottom: 15px;line-height: 2em;"><span style="font-size: 16px;">RDB 流程图:</span></p> <p><img class="" data-backh="373" data-backw="556" data-before-oversubscription-url="https://mmbiz.qpic.cn/mmbiz_jpg/SJm51egHPPE7w5xN9kVnRukpuNApuzh4mRuXoVIF8hxGGdETC9NVJnqBdv0KqW6IzlRk3HV9xlmPTibWd0syUeg/0?wx_fmt=jpeg" data-copyright="0" data-cropselx1="0" data-cropselx2="556" data-cropsely1="0" data-cropsely2="373" data-ratio="0.6710743801652893" src="/upload/c830a4372b00054c0db3f95b3499a1e7.jpg" data-type="jpeg" data-w="605" style="-webkit-tap-highlight-color: transparent;border-style: none;display: block;margin: 10px auto;width: 100%;height: auto;"></p> <p style="margin-top: 15px;margin-bottom: 15px;line-height: 2em;"><strong><span style="font-size: 16px;">RDB 特点:</span></strong></p> <p style="margin-top: 15px;margin-bottom: 15px;line-height: 2em;"><span style="font-size: 16px;">1、RDB 是一种快照模式,即——保存的是 key value 数据内容。</span></p> <p style="margin-top: 15px;margin-bottom: 15px;line-height: 2em;"><span style="font-size: 16px;">2、RDB 有 2 种持久方式,同步 save 模式和异步 bgsave 模式。由于 save 是同步的,所以可以保证数据一致性,而 bgsave 则不能。</span></p> <p style="margin-top: 15px;margin-bottom: 15px;line-height: 2em;"><span style="font-size: 16px;">3、save 可以在客户端显式触发,也可以在 shutdown 时自动触发;bgsave 可以在客户端显式触发,也可以通过配置由定时任务触发,也可以在 slave 节点触发。</span></p> <p style="margin-top: 15px;margin-bottom: 15px;line-height: 2em;"><span style="font-size: 16px;">4、save 导致 redis 同步阻塞,基本已经废弃。bgsave 则不会导致阻塞,但也有缺点:在 fork 时,需要增加内存服务器开销,因为当内存不够时,将使用虚拟内存,导致阻塞 Redis 运行。所以,需要保证空闲内存足够。</span></p> <p style="margin-top: 15px;margin-bottom: 15px;line-height: 2em;"><span style="font-size: 16px;">5、默认执行 shutdown 时,如果没有开启 AOF,则自动执行 bgsave。</span></p> <p style="margin-top: 15px;margin-bottom: 15px;line-height: 2em;"><span style="font-size: 16px;">6、每次的 RDB 文件都是替换的。</span></p> <p style="margin-top: 15px;margin-bottom: 15px;line-height: 2em;"><strong><span style="font-size: 16px;">关于优化:</span></strong></p> <p style="margin-top: 15px;margin-bottom: 15px;line-height: 2em;"><span style="font-size: 16px;">Redis 会压缩 RDB 文件,使用 LZF 算法,让最终的 RDB 文件远小于内存大小,默认开启。但会消耗 CPU。</span></p> <p style="margin-top: 15px;margin-bottom: 15px;line-height: 2em;"><strong><span style="font-size: 16px;">RDB 缺点:</span></strong></p> <p style="margin-top: 15px;margin-bottom: 15px;line-height: 2em;"><span style="font-size: 16px;">1、无法秒级持久化。</span></p> <p style="margin-top: 15px;margin-bottom: 15px;line-height: 2em;"><span style="font-size: 16px;">2、老版本 Redis 无法兼容新版本 RDB。</span></p> <p style="margin-top: 15px;margin-bottom: 15px;line-height: 2em;"><strong><span style="font-size: 16px;">RDB 优点:</span></strong></p> <p style="margin-top: 15px;margin-bottom: 15px;line-height: 2em;"><span style="font-size: 16px;">1、文件紧凑,适合备份,全量复制场景。例如每 6 小时执行 bgsave,保存到文件系统之类的。</span></p> <p style="margin-top: 15px;margin-bottom: 15px;line-height: 2em;"><span style="font-size: 16px;">2、Redis 加载 RDB 恢复数据远远快于 AOF。</span></p> <section class="mpa-template" data-mpa-template-id="1562268" data-mpa-color="null" data-mpa-category="收藏"> <section> <section class="layout"> <section style="margin: 1em 0px;color: rgb(51, 51, 51);box-sizing: border-box;border-bottom: 2px solid rgb(236, 68, 68);clear: both;"> <section style="display: inline-block;padding: 3px 10px 0px;color: rgb(255, 255, 255);box-sizing: border-box;border-top-left-radius: 3px;border-top-right-radius: 3px;height: 28px;background-color: rgb(236, 68, 68);"> <span style="font-size: 16px;">三、AOF</span> </section> <section style="box-sizing: border-box;border-top: 28px solid transparent;border-right-color: rgb(206, 206, 206);border-bottom: 0px solid transparent;border-left: 15px solid rgb(206, 206, 206);display: inline-block;margin-left: 2px;vertical-align: top;"></section> </section> </section> </section> </section> <p style="margin-top: 15px;margin-bottom: 15px;line-height: 2em;"><span style="font-size: 16px;">由于 RDB 的数据实时性问题,AOF(append only file) 是目前 Redis 持久化的主流方式。</span></p> <p style="margin-top: 15px;margin-bottom: 15px;line-height: 2em;"><strong><span style="font-size: 16px;">AOF 特点:</span></strong></p> <p style="margin-top: 15px;margin-bottom: 15px;line-height: 2em;"><span style="font-size: 16px;">1、默认文件名是 appendonly.aof。和 RDB 一样,保存在配置中 dir 目录下。</span></p> <p style="margin-top: 15px;margin-bottom: 15px;line-height: 2em;"><span style="font-size: 16px;">2、AOF 相比较于 RDB,每次都会保存写命令,数据实时性更高。</span></p> <p style="margin-top: 15px;margin-bottom: 15px;line-height: 2em;"><span style="font-size: 16px;">3、AOF 由于每次都会记录写命令,文件会很大,因此需要进行优化,称之为“重写机制”(下面详细说)。</span></p> <p style="margin-top: 15px;margin-bottom: 15px;line-height: 2em;"><span style="font-size: 16px;">4、AOF 每次保存的写命令都放在一个缓冲区,根据不同的策略(下面详细说)同步到磁盘。</span></p> <p style="margin-top: 15px;margin-bottom: 15px;line-height: 2em;"><strong><span style="font-size: 16px;">“重写机制” 细节:</span></strong></p> <p style="margin-top: 15px;margin-bottom: 15px;line-height: 2em;"><span style="font-size: 16px;">1、fork 子进程(类似 bgsave)</span></p> <p style="margin-top: 15px;margin-bottom: 15px;line-height: 2em;"><span style="font-size: 16px;">2、主进程会写到2个缓冲区,一个是原有的 “AOF 缓存区”,一个是专门为子进程准备的 “AOF 重写缓冲区”;</span></p> <p style="margin-top: 15px;margin-bottom: 15px;line-height: 2em;"><span style="font-size: 16px;">3、子进程写到到新的 AOF 文件中,批量的,默认 32m;写完后通知主进程。</span></p> <p style="margin-top: 15px;margin-bottom: 15px;line-height: 2em;"><span style="font-size: 16px;">4、主进程把“AOF 重写缓冲区”的数据写到新 AOF 文件中。</span></p> <p style="margin-top: 15px;margin-bottom: 15px;line-height: 2em;"><span style="font-size: 16px;">5、将新的 AOF 文件替换老文件。</span></p> <p style="margin-top: 15px;margin-bottom: 15px;line-height: 2em;"><span style="font-size: 16px;">重写流程图:</span></p> <p><img class="" data-backh="337" data-backw="556" data-before-oversubscription-url="/upload/d9f2c55a29618c30e72d41d39402e6a1.jpg" data-copyright="0" data-cropselx1="0" data-cropselx2="556" data-cropsely1="0" data-cropsely2="337" data-ratio="0.60625" src="/upload/d9f2c55a29618c30e72d41d39402e6a1.jpg" data-type="jpeg" data-w="640" style="-webkit-tap-highlight-color: transparent;border-style: none;display: block;margin: 10px auto;width: 100%;height: auto;"></p> <p style="margin-top: 15px;margin-bottom: 15px;line-height: 2em;"><strong><span style="font-size: 16px;">缓冲区同步策略,由参数 appendfsync 控制,一共3种:</span></strong></p> <p style="margin-top: 15px;margin-bottom: 15px;line-height: 2em;"><span style="font-size: 16px;">1、always:调用系统 fsync 函数,直到同步到硬盘返回;严重影响redis性能。</span></p> <p style="margin-top: 15px;margin-bottom: 15px;line-height: 2em;"><span style="font-size: 16px;">2、everysec:先调用 OS write 函数, 写到缓冲区,然后 redis 每秒执行一次 OS fsync 函数。推荐使用这种方式。</span></p> <p style="margin-top: 15px;margin-bottom: 15px;line-height: 2em;"><span style="font-size: 16px;">3、no: 只执行 write OS 函数,具体同步硬盘策略由 OS 决定;不推荐,数据不安全,容易丢失数据。</span></p> <section class="mpa-template" data-mpa-template-id="1562268" data-mpa-color="null" data-mpa-category="收藏"> <section> <section class="layout"> <section style="margin: 1em 0px;color: rgb(51, 51, 51);box-sizing: border-box;border-bottom: 2px solid rgb(236, 68, 68);clear: both;"> <section style="display: inline-block;padding: 3px 10px 0px;color: rgb(255, 255, 255);box-sizing: border-box;border-top-left-radius: 3px;border-top-right-radius: 3px;height: 28px;background-color: rgb(236, 68, 68);"> <span style="font-size: 16px;">四、持久化恢复</span> </section> <section style="box-sizing: border-box;border-top: 28px solid transparent;border-right-color: rgb(206, 206, 206);border-bottom: 0px solid transparent;border-left: 15px solid rgb(206, 206, 206);display: inline-block;margin-left: 2px;vertical-align: top;"></section> </section> </section> </section> </section> <p style="margin-top: 15px;margin-bottom: 15px;line-height: 2em;"><span style="font-size: 16px;">AOF 和 RDB 文件都可以用于服务器重启时的数据恢复,具体流程如下图:</span></p> <p><img class="" data-backh="395" data-backw="556" data-before-oversubscription-url="http://mmbiz.qpic.cn/mmbiz_png/SJm51egHPPE7w5xN9kVnRukpuNApuzh4cdib7ibDWVvQwdaT3tOYlHZdmia1NKdjvMPFkUy3Gu8geMgmd1zcIuWug/0?wx_fmt=png" data-ratio="0.7112903225806452" data-s="300,640" src="/upload/580426bcab712beff0558c738d208a8c.png" data-type="png" data-w="620" style="text-align: center;width: 100%;height: auto;"><br></p> <p style="margin-top: 15px;margin-bottom: 15px;line-height: 2em;"><span style="font-size: 16px;">从图中可以看出优先加载 AOF,当没有 AOF 时才加载 RDB。当 AOF 或者 RDB 存在错误,则加载失败。</span></p> <section class="mpa-template" data-mpa-template-id="1562268" data-mpa-color="null" data-mpa-category="收藏"> <section> <section class="layout"> <section style="margin: 1em 0px;color: rgb(51, 51, 51);box-sizing: border-box;border-bottom: 2px solid rgb(236, 68, 68);clear: both;"> <section style="display: inline-block;padding: 3px 10px 0px;color: rgb(255, 255, 255);box-sizing: border-box;border-top-left-radius: 3px;border-top-right-radius: 3px;height: 28px;background-color: rgb(236, 68, 68);"> <span style="font-size: 16px;">五、问题排查和性能优化</span> </section> <section style="box-sizing: border-box;border-top: 28px solid transparent;border-right-color: rgb(206, 206, 206);border-bottom: 0px solid transparent;border-left: 15px solid rgb(206, 206, 206);display: inline-block;margin-left: 2px;vertical-align: top;"></section> </section> </section> </section> </section> <p style="margin-top: 15px;margin-bottom: 15px;line-height: 2em;"><span style="font-size: 16px;">Redis 持久化是影响 Redis 性能的高发地,也是面试中常问的问题。</span></p> <p style="margin-top: 15px;margin-bottom: 15px;line-height: 2em;"><span style="color: rgb(255, 76, 65);"><strong><span style="font-size: 16px;">1、fork 操作</span></strong></span></p> <p style="margin-top: 15px;margin-bottom: 15px;line-height: 2em;"><span style="font-size: 16px;">当 Redis 做 RDB 或者 AOF 重写时,必然要进行 fork 操作,对于 OS 来说,fork 都是一个重量级操作。而且,fork 还会拷贝一些数据,虽然不会拷贝主进程所有的物理空间,但会复制主进程的空间内存页表。对于 10GB 的 Redis 进程,需要复制大约 20MB 的内存页表,因此 fork 操作耗时跟进程总内存量息息相关,再加上,如果使用虚拟化技术,例如 Xen 虚拟机,fork 会更加耗时。</span></p> <p style="margin-top: 15px;margin-bottom: 15px;line-height: 2em;"><span style="font-size: 16px;">一个正常的 fork 耗时大概在 20毫秒左右。为什么呢,假设一个 Redis 实例的 OPS 在 5 万以上,如果 fork 操作耗时在秒级,那么僵拖慢几万条命令的执行,对生产环境影响明显。</span></p> <p style="margin-top: 15px;margin-bottom: 15px;line-height: 2em;"><span style="font-size: 16px;">我们可以在 Info stats 统计中查询 latestforkusec 指标获取最近一次 fork 操作耗时,单位微秒。</span></p> <p style="margin-top: 15px;margin-bottom: 15px;line-height: 2em;"><strong><span style="font-size: 16px;">如何优化:</span></strong></p> <p style="margin-top: 15px;margin-bottom: 15px;line-height: 2em;"><span style="font-size: 16px;">1) 优先使用物理机或者高效支持 fork 的虚拟化技术,避免使用 Xen。</span></p> <p style="margin-top: 15px;margin-bottom: 15px;line-height: 2em;"><span style="font-size: 16px;">2<span style="font-size: 16px;">) </span>控制 redis 实例最大内存,尽量控制在 10GB 以内。</span></p> <p style="margin-top: 15px;margin-bottom: 15px;line-height: 2em;"><span style="font-size: 16px;">3<span style="font-size: 16px;">) </span>合理配置 Linux 内存分配策略,避免内存不足导致 fork 失败。</span></p> <p style="margin-top: 15px;margin-bottom: 15px;line-height: 2em;"><span style="font-size: 16px;">4<span style="font-size: 16px;">) </span>降低 fork 的频率,如适度放宽 AOF 自动触发时机,避免不必要的全量复制。</span></p> <p style="margin-top: 15px;margin-bottom: 15px;line-height: 2em;"><span style="color: rgb(255, 76, 65);"><strong><span style="font-size: 16px;">2、子进程开销</span></strong></span></p> <p style="margin-top: 15px;margin-bottom: 15px;line-height: 2em;"><span style="font-size: 16px;">fork 完毕之后,会创建子进程,子进程负责 RDB 或者 AOF 重写,这部分过程主要涉及到 CPU,内存,硬盘三个地方的优化。</span></p> <p style="margin-top: 15px;margin-bottom: 15px;line-height: 2em;"><span style="font-size: 16px;">1<span style="font-size: 16px;">) </span>CPU 写入文件的过程是 CPU 密集的过程,通常子进程对单核 CPU 利用率接近 90%。如何优化呢?既然是 CPU 密集型操作,就不要绑定单核 CPU,因为这样会和父 CPU 进行竞争。同时,不要和其他 CPU 密集型服务不是在一个机器上。如果部署了多个 Redis 实例,尽力保证统一时刻只有一个子进程执行重写工作。</span></p> <p style="margin-top: 15px;margin-bottom: 15px;line-height: 2em;"><span style="font-size: 16px;">2<span style="font-size: 16px;">) </span>内存子进程通过 fork 操作产生,占用内存大小等同于父进程,理论上需要两倍的内存完成持久化操作,但 Linux 有 copy on write 机制,父子进程会共享相同的物理内存页,当父进程处理写操作时,会把要修改的页创建对应的副本,而子进程在 fork 操作过程中,共享整个父进程内存快照。即——如果重写过程中存在内存修改操作,父进程负责创建所修改内存页的副本。这里就是内存消耗的地方。如何优化呢?尽量保证同一时刻只有一个子进程在工作;避免大量写入时做重写操作。</span></p> <p style="margin-top: 15px;margin-bottom: 15px;line-height: 2em;"><span style="font-size: 16px;">3<span style="font-size: 16px;">) </span>硬盘 硬盘开销分析:子进程主要职责是将 RDB 或者 AOF 文件写入硬盘进行持久化,势必对硬盘造成压力,可通过工具例如 iostat,iotop 等,分析硬盘负载情况。</span></p> <p style="margin-top: 15px;margin-bottom: 15px;line-height: 2em;"><strong><span style="font-size: 16px;">如何优化:</span></strong></p> <p style="margin-top: 15px;margin-bottom: 15px;line-height: 2em;"><span style="font-size: 16px;">1<span style="font-size: 16px;">) </span>不要和其他高硬盘负载的服务放在一台机器上,例如 MQ,存储。</span></p> <p style="margin-top: 15px;margin-bottom: 15px;line-height: 2em;"><span style="font-size: 16px;">2<span style="font-size: 16px;">) </span>AOF 重写时会消耗大量硬盘 IO,可以开启配置 no-appendfsync-on-rewrite,默认关闭。表示在 AOF 重写期间不做 fsync 操作。</span></p> <p style="margin-top: 15px;margin-bottom: 15px;line-height: 2em;"><span style="font-size: 16px;">3<span style="font-size: 16px;">) </span>当开启 AOF 的 Redis 在高并发场景下,如果使用普通机械硬盘,每秒的写速率是 100MB左右,这时,Redis 的性能瓶颈在硬盘上,建议使用 SSD。</span></p> <p style="margin-top: 15px;margin-bottom: 15px;line-height: 2em;"><span style="font-size: 16px;">4<span style="font-size: 16px;">) </span>对于单机配置多个 Redis 实例的情况,可以配置不同实例分盘存储 AOF 文件,分摊硬盘压力。</span></p> <p style="margin-top: 15px;margin-bottom: 15px;line-height: 2em;"><span style="color: rgb(255, 76, 65);"><strong><span style="font-size: 16px;">3、AOF 追加阻塞</span></strong></span></p> <p style="margin-top: 15px;margin-bottom: 15px;line-height: 2em;"><span style="font-size: 16px;">当开启 AOF 持久化时,常用的同步硬盘的策略是“每秒同步” everysec,用于平衡性能和数据安全性,对于这种方式,redis 使用另一条线程每秒执行 fsync 同步硬盘,当系统资源繁忙时,将造成 Redis 主线程阻塞。</span></p> <p style="margin-top: 15px;margin-bottom: 15px;line-height: 2em;"><span style="font-size: 16px;">流程图如下:</span></p> <p style="text-align: center;"><img class="" data-backh="420" data-backw="556" data-before-oversubscription-url="http://mmbiz.qpic.cn/mmbiz_png/SJm51egHPPE7w5xN9kVnRukpuNApuzh4mtbkwmJfP1yusFBajaibiaSF3hia713IXIbwCJicfspXFQIknzfW7yApicA/0?wx_fmt=png" data-ratio="0.7555555555555555" data-s="300,640" src="/upload/837ddba9ff9e95caedf91e0843d149b4.png" data-type="png" data-w="1080" style="width: 100%;height: auto;"></p> <p style="margin-top: 15px;margin-bottom: 15px;line-height: 2em;"><span style="font-size: 16px;">通过上图可以发现:everysec 配置最多可能丢失 2 秒数据,不是 1 秒;如果系统 fsync 缓慢,将会导致 Redis 主线程阻塞影响效率。</span></p> <p style="margin-top: 15px;margin-bottom: 15px;line-height: 2em;"><strong><span style="font-size: 16px;">问题定位:</span></strong></p> <p style="margin-top: 15px;margin-bottom: 15px;line-height: 2em;"><span style="font-size: 16px;">1<span style="font-size: 16px;">) </span>发生 AOF 阻塞时,会输入日志。用于记录 AOF fsync 阻塞导致拖慢 Redis 服务的行为。</span></p> <p style="margin-top: 15px;margin-bottom: 15px;line-height: 2em;"><span style="font-size: 16px;">2<span style="font-size: 16px;">) </span>每当 AOF 追加阻塞事件发生时,在 info Persistence 统计中,aofdelayedfsync 指标会累加,查看这个指标方便定位 AOF 阻塞问题。</span></p> <p style="margin-top: 15px;margin-bottom: 15px;line-height: 2em;"><span style="font-size: 16px;">3<span style="font-size: 16px;">) </span>AOF 同步最多运行 2 秒的延迟,当延迟发生时说明硬盘存在性能问题,可通过监控工具 iotop 查看,定位消耗 IO 的进程。</span></p> <p style="margin-top: 15px;margin-bottom: 15px;line-height: 2em;"><span style="color: rgb(255, 76, 65);"><strong><span style="font-size: 16px;">4、单机多实例部署</span></strong></span></p> <p style="margin-top: 15px;margin-bottom: 15px;line-height: 2em;"><span style="font-size: 16px;">Redis 单线程架构无法充分利用多核CPU,通常的做法是一台机器上部署多个实例,当多个实例开启 AOF 后,彼此之间就会产生CPU 和 IO 的竞争。</span></p> <p style="margin-top: 15px;margin-bottom: 15px;line-height: 2em;"><span style="font-size: 16px;">如何解决这个问题呢?</span></p> <p style="margin-top: 15px;margin-bottom: 15px;line-height: 2em;"><span style="font-size: 16px;">让所有实例的 AOF 串行执行。</span></p> <p style="margin-top: 15px;margin-bottom: 15px;line-height: 2em;"><span style="font-size: 16px;">我们通过 info Persistence 中关于 AOF 的信息写出 Shell 脚本,然后串行执行实例的 AOF 持久化。</span></p> <p style="margin-top: 15px;margin-bottom: 15px;line-height: 2em;"><span style="font-size: 16px;">整个过程如图:</span></p> <p><img class="" data-backh="461" data-backw="556" data-before-oversubscription-url="https://mmbiz.qpic.cn/mmbiz_jpg/SJm51egHPPE7w5xN9kVnRukpuNApuzh47UyLNeDURVXjXLFfYE3GobHibchaXR1SGyh784LVIQhicgjDhJGjs9yQ/0?wx_fmt=jpeg" data-copyright="0" data-cropselx1="0" data-cropselx2="556" data-cropsely1="0" data-cropsely2="461" data-oversubscription-url="http://mmbiz.qpic.cn/mmbiz_jpg/SJm51egHPPE7w5xN9kVnRukpuNApuzh4IibJrSicKHoFSiaJe6WLyduYEmJLcPeYIIQqKNjGiaUMibonanXcnLictdqQ/0?wx_fmt=jpeg" data-ratio="0.8287841191066998" src="/upload/fa161b6bc8989284f9458da8e5c5f1ca.jpg" data-type="jpeg" data-w="403" style="-webkit-tap-highlight-color: transparent;border-style: none;display: block;margin: 10px auto;width: 100%;height: auto;"></p> <p style="margin-top: 15px;margin-bottom: 15px;line-height: 2em;"><span style="font-size: 16px;">通过不断判断 AOF 的状态,手动执行 AOF 重写,保证 AOF 不会存在竞争。具体的 Shell 编写以及 info 信息判断,可以查看下图:</span></p> <section class="mpa-template" data-mpa-template-id="1562268" data-mpa-color="null" data-mpa-category="收藏"> <section> <section class="layout"> <section style="margin: 1em 0px;color: rgb(51, 51, 51);box-sizing: border-box;border-bottom: 2px solid rgb(236, 68, 68);clear: both;"> <section style="display: inline-block;padding: 3px 10px 0px;color: rgb(255, 255, 255);box-sizing: border-box;border-top-left-radius: 3px;border-top-right-radius: 3px;height: 28px;background-color: rgb(236, 68, 68);"> <span style="font-size: 16px;">六、总结</span> </section> <section style="box-sizing: border-box;border-top: 28px solid transparent;border-right-color: rgb(206, 206, 206);border-bottom: 0px solid transparent;border-left: 15px solid rgb(206, 206, 206);display: inline-block;margin-left: 2px;vertical-align: top;"></section> </section> </section> </section> </section> <p style="margin-top: 15px;margin-bottom: 15px;line-height: 2em;"><span style="font-size: 16px;">本文主要讲了 Redis 的持久化相关功能,持久化一直是影响 Redis 性能的高发地,也是面试中经常被问到的。包括 RDB 相关的特定和优缺点,AOF 的优缺点,事实上,由于 RDB 的数据实时性问题,目前用 AOF 比较多了。而持久化恢复也是优先 AOF。</span></p> <p style="margin-top: 15px;margin-bottom: 15px;line-height: 2em;"><span style="font-size: 16px;">关于持久化的问题排查,就很麻烦了,但无非几个方面,fork 耗时,子进程的 CPU,内存,硬盘开销,AOF 的同步阻塞,单机多实例部署。</span></p> <p style="margin-top: 15px;margin-bottom: 15px;line-height: 2em;"><span style="font-size: 16px;">这些优化,可以通过前面写的分析进行排查。</span></p> <p style="margin-top: 10px;margin-bottom: 5px;white-space: normal;line-height: normal;"><br></p> <blockquote style="white-space: normal;"> <p style="text-align: left;"><span style="font-size: 14px;"><strong>作者:程序猿的内心独白</strong></span></p> <p style="text-align: left;"><span style="font-size: 14px;"><strong>原文链接:</strong></span></p> <p style="text-align: left;"><span style="font-size: 14px;">https://www.toutiao.com/i6660250022401016327/</span></p> </blockquote> <p style="margin-top: 15px;margin-bottom: 15px;white-space: normal;color: rgb(62, 62, 62);font-size: 16px;letter-spacing: 0.544px;background-color: rgb(255, 255, 255);widows: 1;line-height: normal;"><br></p> <p style="max-width: 100%;min-height: 1em;letter-spacing: 0.544px;white-space: normal;text-align: center;box-sizing: border-box !important;overflow-wrap: break-word !important;"><span style="max-width: 100%;font-size: 15px;box-sizing: border-box !important;overflow-wrap: break-word !important;">【推荐阅读】</span></p> <p style="max-width: 100%;min-height: 1em;letter-spacing: 0.544px;white-space: normal;text-align: center;box-sizing: border-box !important;overflow-wrap: break-word !important;"><br></p> <p style="text-align: center;"><a href="http://mp.weixin.qq.com/s?__biz=MzI4OTA3NDQ0Nw==&mid=2455546157&idx=1&sn=57cace67297a57eafa1d96dad5a7f33e&chksm=fb9cb54dcceb3c5b09814d12a2f23fd1a1672584c1d04591afa79435e20f155fd88bbfbd732f&token=1548915720&lang=zh_CN&scene=21#wechat_redirect" target="_blank" class="weui-desktop-mass-appmsg__title" data-linktype="2"><span style="font-size: 15px;">史上最全的 Linux Shell 文本处理工具集锦,快收藏!</span></a></p> <p style="max-width: 100%;min-height: 1em;letter-spacing: 0.544px;white-space: normal;text-align: center;box-sizing: border-box !important;overflow-wrap: break-word !important;"><a href="http://mp.weixin.qq.com/s?__biz=MzI4OTA3NDQ0Nw==&mid=2455546152&idx=1&sn=fd5163a0e538afee9135f1fd606009b6&chksm=fb9cb548cceb3c5e440eac9da6cdc2aaf96f9342652dcf3724bd90a870615056c1cda7eedbef&token=630292240&lang=zh_CN&scene=21#wechat_redirect" target="_blank" class="" data-linktype="2" style="-webkit-tap-highlight-color: rgba(0, 0, 0, 0);max-width: 100%;box-sizing: border-box !important;overflow-wrap: break-word !important;"><span style="max-width: 100%;font-size: 15px;box-sizing: border-box !important;overflow-wrap: break-word !important;">Mybatis源码解读-设计模式总结</span></a></p> <p style="max-width: 100%;min-height: 1em;letter-spacing: 0.544px;white-space: normal;text-align: center;box-sizing: border-box !important;overflow-wrap: break-word !important;"><a href="http://mp.weixin.qq.com/s?__biz=MzI4OTA3NDQ0Nw==&mid=2455546145&idx=1&sn=bd7d094047c50464d36eeb4096276f9d&chksm=fb9cb541cceb3c574ce5d278f1706db8c03ff812747dcd69e1f81c825c790bef2f4c5e050686&token=1706535001&lang=zh_CN&scene=21#wechat_redirect" target="_blank" class="" data-linktype="2" style="text-decoration: underline;-webkit-tap-highlight-color: rgba(0, 0, 0, 0);max-width: 100%;font-size: 15px;box-sizing: border-box !important;overflow-wrap: break-word !important;"><span style="max-width: 100%;box-sizing: border-box !important;overflow-wrap: break-word !important;">Lambda 表达式有何用处?</span></a></p> <p style="max-width: 100%;min-height: 1em;letter-spacing: 0.544px;white-space: normal;text-align: center;box-sizing: border-box !important;overflow-wrap: break-word !important;"><span style="max-width: 100%;text-decoration: underline;-webkit-tap-highlight-color: rgba(0, 0, 0, 0);font-size: 15px;box-sizing: border-box !important;overflow-wrap: break-word !important;"><a href="http://mp.weixin.qq.com/s?__biz=MzI4OTA3NDQ0Nw==&mid=2455546143&idx=1&sn=49e839f468ea94b80b8fc2b8450a9cf4&chksm=fb9cb57fcceb3c698abe3e8e971347bf5a103908d34db29ea0546d51ec14c34a5e6abea8a7d5&scene=21#wechat_redirect" target="_blank" class="" data-linktype="2" style="-webkit-tap-highlight-color: rgba(0, 0, 0, 0);max-width: 100%;box-sizing: border-box !important;overflow-wrap: break-word !important;">HashMap, ConcurrentHashMap 原理及源码,一次性讲清楚!</a></span></p> <p style="max-width: 100%;min-height: 1em;letter-spacing: 0.544px;white-space: normal;text-align: center;box-sizing: border-box !important;overflow-wrap: break-word !important;"><br style="max-width: 100%;box-sizing: border-box !important;overflow-wrap: break-word !important;"></p> <p style="max-width: 100%;min-height: 1em;white-space: normal;color: rgb(62, 62, 62);font-family: 微软雅黑;text-align: center;letter-spacing: 1px;box-sizing: border-box !important;overflow-wrap: break-word !important;"><span style="max-width: 100%;color: rgb(136, 136, 136);letter-spacing: 0.544px;font-size: 15px;box-sizing: border-box !important;overflow-wrap: break-word !important;">(完)</span></p> <p style="max-width: 100%;min-height: 1em;letter-spacing: 0.544px;white-space: normal;color: rgb(62, 62, 62);font-family: 微软雅黑;box-sizing: border-box !important;overflow-wrap: break-word !important;"><br style="max-width: 100%;box-sizing: border-box !important;overflow-wrap: break-word !important;"></p> <p style="max-width: 100%;min-height: 1em;white-space: normal;color: rgb(62, 62, 62);font-family: 微软雅黑;text-align: center;letter-spacing: 1px;box-sizing: border-box !important;overflow-wrap: break-word !important;"><img class="" data-copyright="0" data-ratio="1" data-s="300,640" src="/upload/527707c864e95245612811f99aa0972e.jpg" data-type="jpeg" data-w="258" style="box-shadow: rgb(170, 170, 170) 0px 0px 14px 0px;border-radius: 12px;box-sizing: border-box !important;overflow-wrap: break-word !important;visibility: visible !important;width: 195px !important;"></p> <p style="max-width: 100%;min-height: 1em;white-space: normal;color: rgb(62, 62, 62);font-family: 微软雅黑;text-align: center;letter-spacing: 1px;box-sizing: border-box !important;overflow-wrap: break-word !important;"><span style="max-width: 100%;font-size: 15px;box-sizing: border-box !important;overflow-wrap: break-word !important;">(<strong style="max-width: 100%;box-sizing: border-box !important;overflow-wrap: break-word !important;">java思维导图</strong>)</span></p> <p style="max-width: 100%;min-height: 1em;white-space: normal;color: rgb(62, 62, 62);font-family: 微软雅黑;text-align: center;letter-spacing: 1px;box-sizing: border-box !important;overflow-wrap: break-word !important;"><span style="max-width: 100%;font-size: 15px;box-sizing: border-box !important;overflow-wrap: break-word !important;"><span style="max-width: 100%;color: rgb(255, 41, 65);box-sizing: border-box !important;overflow-wrap: break-word !important;"><strong style="max-width: 100%;box-sizing: border-box !important;overflow-wrap: break-word !important;">长按关注</strong></span>,每天java一下,成就架构师</span></p>
作者:じ☆ve宝贝
> 最近要识别图表数据,最先使用腾讯的AI接口,正确率高,识别率高,但是有些需求不符合,因此需要再次调研图像识别工具。故寻找到TESSERACT-OCR和Tess4J。由于TESSERACT-OCR需要下载软件,在电脑上安装环境,移植性不高,使用Tess4J只需要下载相关Jar包,导入项目,再把项目封装好就可以处处运行了。 因此先尝试使用Tess4J来实验。 ## 下载Tess4J的相关资源官网: http://tess4j.sourceforge.net/codesample.html 资源下载:https://jaist.dl.sourceforge.net/project/tess4j/tess4j/3.4.8/Tess4J-3.4.8-src.zip ## 目录结构 lib文件夹下放的是需要用到的Jar包 tessdata下放的是语言库,默认的有英语库,中文库需要另外下载,下载地址:https://github.com/tesseract-ocr/tessdata/blob/master/chi_sim.traineddata。 src:项目源码 test:测试案例目录 ## 使用中文语言库 ``` instance.setLanguage("chi_sim"); ```
作者:微信小助手
<section class="xmteditor" style="display:none;" data-tools="新媒体管家" data-label="powered by xmt.cn"></section> <p style="text-align: center;"><img class="" data-croporisrc="/upload/8878f113f2fa576ad2870c73682da549.jpg" data-cropx1="0" data-cropx2="1280" data-cropy1="138.96024464831802" data-cropy2="792.6605504587155" data-ratio="0.51171875" data-s="300,640" src="https://mmbiz.qpic.cn/mmbiz_jpg/qdzZBE73hWsamXzVLZJ8tU4pN53dQtsiaicoKSuZk32On7qWU5j4Sf0EXia38smaYreUak0Wf1fiaDzBTEkUicpicdKQ/640?wx_fmt=jpeg" data-type="jpeg" data-w="1280" style="width: 654px;height: 334px;border-radius: 12px;"></p> <p style="text-align: right;"><span style="color: rgb(136, 136, 136);background-color: rgb(255, 255, 255);font-family: Avenir, -apple-system-font, 微软雅黑, sans-serif;letter-spacing: 0.544px;white-space: pre-line;text-align: justify;font-size: 14px;">✏️ Photo by Kelly Sikkema on Unsplash</span></p> <p style="text-align: justify;"><span style="background-color: rgb(255, 255, 255);color: rgb(74, 74, 74);font-family: Avenir, -apple-system-font, 微软雅黑, sans-serif;font-size: 15px;letter-spacing: 0.544px;white-space: pre-line;text-align: justify;"><br></span></p> <blockquote> <p style="text-align: justify;"><span style="background-color: rgb(255, 255, 255);color: rgb(74, 74, 74);font-family: Avenir, -apple-system-font, 微软雅黑, sans-serif;font-size: 15px;letter-spacing: 0.544px;white-space: pre-line;text-align: justify;">技术传播的价值,不仅仅体现在通过商业化产品和开源项目来缩短我们构建应用的路径,加速业务的上线速率,</span><span style="background-color: rgb(255, 255, 255);font-family: Avenir, -apple-system-font, 微软雅黑, sans-serif;font-size: 15px;letter-spacing: 0.544px;white-space: pre-line;text-align: justify;color: rgb(0, 122, 170);">也体现在优秀工程师在工作效率提升、产品性能优化和用户体验改善等经验方面的分享,以提高我们的专业能力。</span><br></p> </blockquote> <p style="text-align: justify;line-height: 1.75em;"><span style="color: rgb(74, 74, 74);font-family: Avenir, -apple-system-font, 微软雅黑, sans-serif;font-size: 15px;letter-spacing: 0.544px;white-space: pre-line;background-color: rgb(255, 255, 255);"><strong style="max-width: 100%;letter-spacing: 1.5px;white-space: normal;background-color: rgb(255, 255, 255);font-family: Optima-Regular, PingFangTC-light;font-size: 15px;text-align: center;box-sizing: border-box !important;overflow-wrap: break-word !important;"><br></strong></span></p> <p style="text-align: justify;line-height: 1.75em;"><span style="font-family: Avenir, -apple-system-font, 微软雅黑, sans-serif;font-size: 15px;letter-spacing: 0.544px;white-space: pre-line;background-color: rgb(255, 255, 255);color: rgb(136, 136, 136);">本文作者阿里巴巴技术专家三画,分享了自己和团队在画好架构图方面的理念和经验,首发于阿里内部技术分享平台,阿里巴巴中间件授权转载,梓敬、鹏升和余乐对此文亦有贡献。</span></p> <p><br></p> <p style="text-align: justify;line-height: 1.75em;"><span style="color: rgb(74, 74, 74);font-family: Avenir, -apple-system-font, 微软雅黑, sans-serif;font-size: 15px;letter-spacing: 0.544px;white-space: pre-line;background-color: rgb(255, 255, 255);">当我们想用一张或几张图来描述我们的系统时,是不是经常遇到以下情况:</span></p> <p style="text-align: justify;line-height: 1.75em;"><span style="color: rgb(74, 74, 74);font-family: Avenir, -apple-system-font, 微软雅黑, sans-serif;font-size: 15px;letter-spacing: 0.544px;white-space: pre-line;background-color: rgb(255, 255, 255);"><br></span></p> <ul class=" list-paddingleft-2" style="list-style-type: disc;"> <li><p style="text-align: justify;line-height: 1.75em;"><span style="color: rgb(74, 74, 74);font-family: Avenir, -apple-system-font, 微软雅黑, sans-serif;font-size: 15px;letter-spacing: 0.544px;white-space: pre-line;background-color: rgb(255, 255, 255);">对着画布无从下手、删了又来?</span></p></li> <li><p style="text-align: justify;line-height: 1.75em;"><span style="background-color: rgb(255, 255, 255);color: rgb(74, 74, 74);font-family: Avenir, -apple-system-font, 微软雅黑, sans-serif;font-size: 15px;letter-spacing: 0.544px;white-space: pre-line;">用一张图描述我的系统,并且让产品、运营、开发都能看明白?</span></p></li> <li><p style="text-align: justify;line-height: 1.75em;"><span style="background-color: rgb(255, 255, 255);color: rgb(74, 74, 74);font-family: Avenir, -apple-system-font, 微软雅黑, sans-serif;font-size: 15px;letter-spacing: 0.544px;white-space: pre-line;">画了一半的图还不清楚受众是谁?</span></p></li> <li><p style="text-align: justify;line-height: 1.75em;"><span style="background-color: rgb(255, 255, 255);color: rgb(74, 74, 74);font-family: Avenir, -apple-system-font, 微软雅黑, sans-serif;font-size: 15px;letter-spacing: 0.544px;white-space: pre-line;">画出来的图到底是产品图功能图还是技术图又或是大杂烩?</span></p></li> <li><p style="text-align: justify;line-height: 1.75em;"><span style="background-color: rgb(255, 255, 255);color: rgb(74, 74, 74);font-family: Avenir, -apple-system-font, 微软雅黑, sans-serif;font-size: 15px;letter-spacing: 0.544px;white-space: pre-line;">图上的框框有点少是不是要找点儿框框加进来?</span></p></li> <li><p style="text-align: justify;line-height: 1.75em;"><span style="background-color: rgb(255, 255, 255);color: rgb(74, 74, 74);font-family: Avenir, -apple-system-font, 微软雅黑, sans-serif;font-size: 15px;letter-spacing: 0.544px;white-space: pre-line;">布局怎么画都不满意……</span></p></li> </ul> <p style="text-align: justify;line-height: 1.75em;"><span style="color: rgb(74, 74, 74);font-family: Avenir, -apple-system-font, 微软雅黑, sans-serif;fon
作者:じ☆ve宝贝
## 22.中介者模式(Mediator) 中介者模式也是用来降低类类之间的耦合的,因为如果类类之间有依赖关系的话,不利于功能的拓展和维护,因为只要修改一个对象,其它关联的对象都得进行修改。如果使用中介者模式,只需关心和Mediator类的关系,具体类类之间的关系及调度交给Mediator就行,这有点像spring容器的作用。先看看图:  User类统一接口,User1和User2分别是不同的对象,二者之间有关联,如果不采用中介者模式,则需要二者相互持有引用,这样二者的耦合度很高,为了解耦,引入了Mediator类,提供统一接口,MyMediator为其实现类,里面持有User1和User2的实例,用来实现对User1和User2的控制。这样User1和User2两个对象相互独立,他们只需要保持好和Mediator之间的关系就行,剩下的全由MyMediator类来维护!基本实现: ``` public interface Mediator { public void createMediator(); public void workAll(); } ``` ``` public class MyMediator implements Mediator { private User user1; private User user2; public User getUser1() { return user1; } public User getUser2() { return user2; } @Override public void createMediator() { user1 = new User1(this); user2 = new User2(this); } @Override public void workAll() { user1.work(); user2.work(); } } ``` ``` public abstract class User { private Mediator mediator; public Mediator getMediator(){ return mediator; } public User(Mediator mediator) { this.mediator = mediator; } public abstract void work(); } ``` ``` public class User1 extends User { public User1(Mediator mediator){ super(mediator); } @Override public void work() { System.out.println("user1 exe!"); } } ``` ``` public class User2 extends User { public User2(Mediator mediator){ super(mediator); } @Override public void work() { System.out.println("user2 exe!"); } } ``` 测试: ``` public class Test { public static void main(String[] args) { Mediator mediator = new MyMediator(); mediator.createMediator(); mediator.workAll(); } } ``` 输出: user1 exe! user2 exe!