作者:じ☆ve宝贝
## 1.下载最新的 git 包 地址: https://git-scm.com/download/win 下载便携版 64,32 根据个人爱好 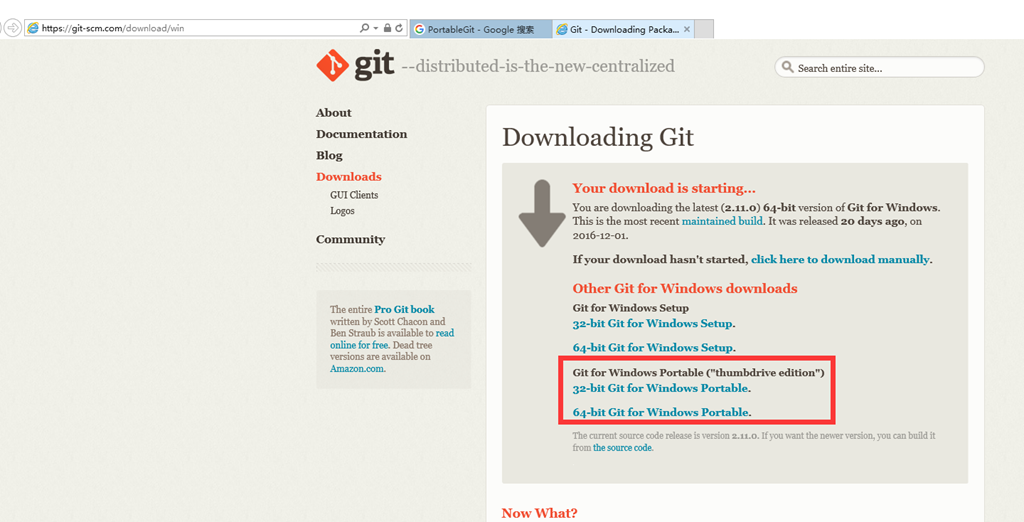 下载完成后安装到指定位置 ## 2.git设置 1. 打开安装目录 2. 运行git-cmd.exe 3.设置用户名:git config --global user.name "studyajva" 4.设置邮箱:git config --global user.mail "studyajva@studyajva.cn" 5.cd usr/bin 6.ssh-keygen -t rsa -C "studyajva@studyajva.cn" 7.连续**敲三次空格** 8.最后得到了两个文件:id_rsa和id_rsa.pub,文件保存路径一般为我的文档下的.ssh 9.将公钥文件id_rsa.pub,用记事本打开,将公钥复制。 10.登录github或者gitlab之类的服务器找到profile setting sshkey 添加进去公钥内容就可以使用了 ## 3.idea配置git 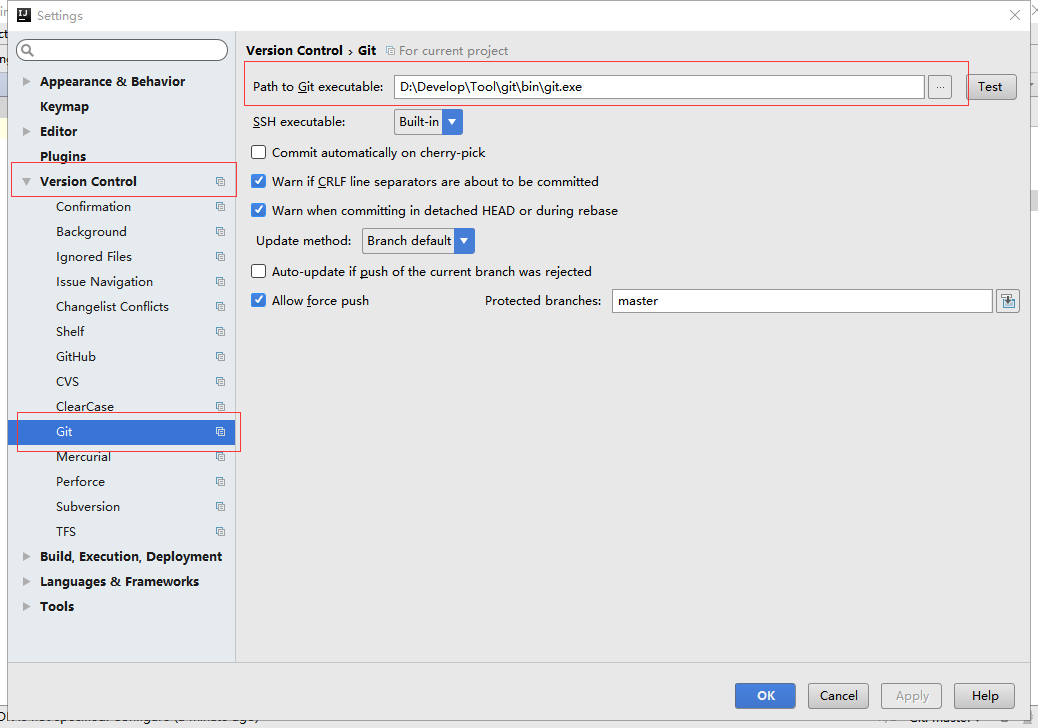  下载即可!
作者:Happy生龙
Mybatis 链接 MySQL中使用case语句当返回结果只有一条的时候会中文乱码 ``` CASE f.fund_type WHEN 0 THEN CONCAT( f.fund_name, '(AAA)') ELSE f.fund_name END AS fund_name ``` 原因尚未查明
作者:微信小助手
<
作者:微信小助手
<section style="box-sizing: border-box;font-size: 16px;"> <section style="margin-top: 10px;margin-bottom: 10px;box-sizing: border-box;" powered-by="xiumi.us"> <section style="padding-top: 10px;padding-right: 10px;padding-left: 10px;box-sizing: border-box;background-color: rgb(239, 239, 239);"> <span style="display: inline-block;width: 5%;line-height: 0.8;font-weight: bolder;font-size: 48px;box-sizing: border-box;" title="" class="horizontal-tb" opera-tn-ra-cell="_$.pages:0.layers:0.comps:0.txt1"> <section style="box-sizing: border-box;"> “ </section></span> <section class="horizontal-tb" style="display: inline-block;vertical-align: top;float: right;width: 90%;line-height: 1.5;font-size: 15px;color: rgb(89, 89, 89);box-sizing: border-box;"> <p style="box-sizing: border-box;"><span style="letter-spacing: 1px;">想必大家一定听说过 Nginx,若没听说过它,那么一定听过它的"同行"Apache 吧!</span></p> </section> <section style="clear: both;box-sizing: border-box;"></section> </section> </section> </section> <section style="line-height: 1.75em;"> <br> </section> <section style="text-align: center;margin-left: 8px;margin-right: 8px;"> <img class="rich_pages" data-ratio="0.5625" data-s="300,640" src="/upload/bc9cb619c30159af5afeb4550ef269c0.jpg" data-type="jpeg" data-w="1280" style=""> </section> <p style="text-align: center;margin-left: 8px;margin-right: 8px;line-height: 1.75em;"><span style="font-size: 14px;"><em><span style="color: rgb(89, 89, 89);letter-spacing: 1px;">图片来自 Pexels</span></em></span><span style="font-size: 15px;color: rgb(89, 89, 89);letter-spacing: 1px;"></span></p> <section style="line-height: normal;"> <br> </section> <section style="box-sizing: border-box;font-size: 16px;"> <section style="border-bottom-width: 1px;border-bottom-style: solid;border-bottom-color: black;margin-top: 0.5em;margin-bottom: 0.5em;line-height: 1.2;box-sizing: border-box;" powered-by="xiumi.us"> <section class="horizontal-tb" style="display: inline-block;border-bottom-width: 6px;border-bottom-style: solid;border-color: rgb(89, 89, 89);margin-bottom: -1px;font-size: 20px;color: rgb(89, 89, 89);box-sizing: border-box;"> <p style="box-sizing: border-box;">Nginx 的产生</p> </section> </section> </section> <section style="line-height: normal;"> <br> </section> <p style="text-align: justify;margin-left: 8px;margin-right: 8px;line-height: 1.75em;"><span style="font-size: 15px;color: rgb(89, 89, 89);letter-spacing: 1px;">Nginx 同 Apache 一样都是一种 Web 服务器。基于 REST 架构风格,以统一资源描述符(Uniform Resources Identifier<span style="line-height: 29.75px;">)</span>URI 或者统一资源定位符(Uniform Resources Locator<span style="line-height: 29.75px;">)</span>URL 作为沟通依据,通过 HTTP 协议提供各种网络服务。</span><br style="max-width: 100%;box-sizing: border-box !important;word-wrap: break-word !important;"></p> <section style="line-height: normal;"> <br> </section> <p style="text-align: justify;margin-left: 8px;margin-right: 8px;line-height: 1.75em;"><span style="font-size: 15px;color: rgb(89, 89, 89);letter-spacing: 1px;">然而,这些服务器在设计之初受到当时环境的局限,例如当时的用户规模,网络带宽,产品特点等局限并且各自的定位和发展都不尽相同。这也使得各个 Web 服务器有着各自鲜明的特点。</span></p> <p style="line-height: normal;"><br></p> <p style="text-align: justify;margin-left: 8px;margin-right: 8px;line-height: 1.75em;"><span style="font-size: 15px;color: rgb(89, 89, 89);letter-spacing: 1px;">Apache 的发展时期很长,而且是毫无争议的世界第一大服务器。它有着很多优点:稳定、开源、跨平台等等。</span></p> <section style="line-height: normal;"> <br> </section> <p style="text-align: justify;margin-left: 8px;margin-right: 8px;line-height: 1.75em;"><span style="font-size: 15px;color: rgb(89, 89, 89);letter-spacing: 1px;">它出现的时间太长了,它兴起的年代,互联网产业远远比不上现在。所以它被设计为一个重量级的。</span></p> <section style="line-height: normal;"> <br> </section> <p style="text-align: justify;margin-left: 8px;margin-right: 8px;line-height: 1.75em;"><span style="font-size: 15px;color: rgb(89, 89, 89);letter-spacing: 1px;">它不支持高并发的服务器。在 Apache 上运行数以万计的并发访问,会导致服务器消耗大量内存。</span></p> <section style="line-height: normal;"> <br> </section> <p style="text-align: justify;margin-left: 8px;margin-right: 8px;line-height: 1.75em;"><span style="font-size: 15px;color: rgb(89, 89, 89);letter-spacing: 1px;">操作系统对其进行进程或线程间的切换也消耗了大量的 CPU 资源,导致 HTTP 请求的平均响应速度降低。</span></p> <section style="line-height: normal;"> <br> </section> <p style="text-align: justify;margin-left: 8px;margin-right: 8px;line-height: 1.75em;"><span style="font-size: 15px;color: rgb(89, 89, 89);letter-spacing: 1px;">这些都决定了 Apache 不可能成为高性能 Web 服务器,轻量级高并发服务器 Nginx 就应运而生了。</span></p> <section style="line-height: normal;"> <br> </section> <p style="text-align: justify;margin-left: 8px;margin-right: 8px;line-height: 1.75em;"><span style="font-size: 15px;color: rgb(89, 89, 89);letter-spacing: 1px;">俄罗斯的工程师 Igor Sysoev,他在为 Rambler Media 工作期间,使用 C 语言开发了 Nginx。</span></p> <section style="line-height: normal;"> <br> </section> <p style="text-align: justify;margin-left: 8px;margin-right: 8px;line-height: 1.75em;"><span style="font-size: 15px;color: rgb(89, 89, 89);letter-spacing: 1px;">Nginx 作为 Web 服务器一直为 Rambler Media 提供出色而又稳定的服务。</span><span style="color: rgb(89, 89, 89);font-size: 15px;letter-spacing: 1px;line-height: 1.75em;">然后呢,Igor Sysoev 将 Nginx 代码开源,并且赋予自由软件许可证。</span></p> <section style="line-height: normal;"> <br> </section> <p style="text-align: justify;margin-left: 8px;margin-right: 8px;line-height: 1.75em;"><span style="font-size: 15px;letter-spacing: 1px;color: rgb(71, 193, 168);">由于以下这几点,<span style="line-height: 29.75px;">所以,Nginx 火了</span>:</span></p> <ul class=" list-paddingleft-2" style="list-style-type: disc;"> <li><p><span style="font-size: 15px;color: rgb(89, 89, 89);letter-spacing: 1px;">Nginx 使用基于事件驱动架构,使得其可以支持数以百万级别的 TCP 连接。</span></p></li> <li><p><span style="font-size: 15px;color: rgb(89, 89, 89);letter-spacing: 1px;">高度的模块化和自由软件许可证使得第三方模块层出不穷(这是个开源的时代啊<span style="line-height: 24px;">)</span>。</span></p></li> <li><p><span style="font-size: 15px;color: rgb(89, 89, 89);letter-spacing: 1px;">Nginx 是一个跨平台服务器,可以运行在 Linux、Windows<span style="line-height: 24px;">、</span>FreeBSD<span style="line-height: 24px;">、</span>Solaris<span style="line-height: 24px;">、</span>AIX<span style="line-height: 24px;">、</span>Mac OS 等操作系统上。</span></p></li> <li><p><span style="font-size: 15px;color: rgb(89, 89, 89);letter-spacing: 1px;">这些优秀的设计带来的极大的稳定性。</span></p></li> </ul> <section style="text-align: justify;line-height: 1.75em;"></section> <section style="text-align: justify;line-height: 1.75em;"></section> <section style="text-align: justify;line-height: 1.75em;"></section> <section style="text-align: justify;line-height: 1.75em;"></section> <p style="line-height: normal;"><br></p> <section style="box-sizing: border-box;font-size: 16px;"> <section style="transform: rotate(0deg);-webkit-transform: rotate(0deg);-moz-transform: rotate(0deg);-o-transform: rotate(0deg);box-sizing: border-box;" powered-by="xiumi.us"> <section style="border-bottom-width: 1px;border-bottom-style: solid;border-bottom-color: black;margin-top: 0.5em;margin-bottom: 0.5em;line-height: 1.2;box-sizing: border-box;"> <section class="horizontal-tb" style="display: inline-block;border-bottom-width: 6px;border-bottom-style: solid;border-color: rgb(89, 89, 89);margin-bottom: -1px;font-size: 20px;color: rgb(89, 89, 89);box-sizing: border-box;"> <p style="box-sizing: border-box;">Nginx 的用武之地</p> </section> </section> </section> </section> <section style="line-height: normal;"> <br> </section> <section style="text-align: justify;margin-left: 8px;margin-right: 8px;line-height: 1.75em;"> <span style="font-size: 15px;color: rgb(89, 89, 89);letter-spacing: 1px;">Nginx 是一款自由的、开源的、高性能的 HTTP 服务器和反向代理服务器;同时也是一个 IMAP、POP3、SMTP 代理服务器。</span> </section> <p style="line-height: normal;"><br></p> <section style="text-align: justify;margin-left: 8px;margin-right: 8px;line-height: 1.75em;"> <span style="font-size: 15px;color: rgb(89, 89, 89);letter-spacing: 1px;">Nginx 可以作为一个 HTTP 服务器进行网站的发布处理,另外 Nginx 可以作为反向代理进行负载均衡的实现。</span> </section> <p style="line-height: normal;"><br></p> <section style="box-sizing: border-box;font-size: 16px;"> <section style="transform: rotate(0deg);-webkit-transform: rotate(0deg);-moz-transform: rotate(0deg);-o-transform: rotate(0deg);box-sizing: border-box;" powered-by="xiumi.us"> <section style="margin-top: 10px;margin-bottom: 10px;box-sizing: border-box;"> <section style="width: 0.6em;display: inline-block;vertical-align: middle;box-sizing: border-box;"> <span style="width: 0.6em;height: 0.6em;display: block;opacity: 0.2;box-sizing: border-box;background-color: rgb(89, 89, 89);"></span> <strong><span style="width: 0.6em;height: 0.6em;display: block;opacity: 0.6;margin-top: 2px;margin-bottom: 2px;box-sizing: border-box;background-color: rgb(89, 89, 89);"></span> <span style="width: 0.6em;height: 0.6em;display: block;opacity: 1;box-sizing: border-box;background-color: rgb(89, 89, 89);"></span> </strong> </section> <section class="horizontal-tb" style="display: inline-block;vertical-align: middle;font-size: 18px;padding-left: 5px;color: rgb(89, 89, 89);box-sizing: border-box;"> <p style="box-sizing: border-box;"><strong>关于代理</strong></p> </section> </section> </section> </section> <p style="line-height: normal;"><br></p> <section style="text-align: justify;margin-left: 8px;margin-right: 8px;line-height: 1.75em;"> <span style="font-size: 15px;color: rgb(89, 89, 89);letter-spacing: 1px;">说到代理,首先我们要明确一个概念,所谓代理就是一个代表、一个渠道;</span> <span style="color: rgb(89, 89, 89);font-size: 15px;letter-spacing: 1px;line-height: 1.75em;">此时就涉及到两个角色,一个是被代理角色,一个是目标角色。</span> </section> <p style="line-height: normal;"><br></p> <section style="text-align: justify;margin-left: 8px;margin-right: 8px;line-height: 1.75em;"> <span style="font-size: 15px;color: rgb(89, 89, 89);letter-spacing: 1px;">被代理角色通过这个代理访问目标角色完成一些任务的过程称为代理操作过程;如同生活中的专卖店,客人到 adidas 专卖店买了一双鞋,这个专卖店就是代理,被代理角色就是 adidas 厂家,目标角色就是用户。</span> </section> <section style="line-height: normal;"> <br> </section> <section style="box-sizing: border-box;font-size: 16px;"> <section style="margin-top: 10px;margin-bottom: 10px;box-sizing: border-box;" powered-by="xiumi.us"> <section style="width: 0.6em;display: inline-block;vertical-align: middle;box-sizing: border-box;"> <span style="width: 0.6em;height: 0.6em;display: block;opacity: 0.2;box-sizing: border-box;background-color: rgb(89, 89, 89);"></span> <strong><span style="width: 0.6em;height: 0.6em;display: block;opacity: 0.6;margin-top: 2px;margin-bottom: 2px;box-sizing: border-box;background-color: rgb(89, 89, 89);"></span> <span style="width: 0.6em;height: 0.6em;display: block;opacity: 1;box-sizing: border-box;background-color: rgb(89, 89, 89);"></span> </strong> </section> <section class="horizontal-tb" style="display: inline-block;vertical-align: middle;font-size: 18px;padding-left: 5px;color: rgb(89, 89, 89);box-sizing: border-box;"> <p style="box-sizing: border-box;"><strong>正向代理</strong></p> </section> </section> </section> <p style="line-height: normal;"><br></p> <section style="text-align: justify;margin-left: 8px;margin-right: 8px;line-height: 1.75em;"> <span style="font-size: 15px;color: rgb(89, 89, 89);letter-spacing: 1px;">说反向代理之前,我们先看看正向代理,正向代理也是大家最常接触到的代理模式,我们会从两个方面来说关于正向代理的处理模式,分别从软件方面和生活方面来解释一下什么叫正向代理。</span> </section> <p style="line-height: normal;"><br></p> <section style="text-align: justify;margin-left: 8px;margin-right: 8px;line-height: 1.75em;"> <span style="font-size: 15px;color: rgb(89, 89, 89);letter-spacing: 1px;">在如今的网络环境下,我们如果由于技术需要要去访问国外的某些网站,此时你会发现位于国外的某网站我们通过浏览器是没有办法访问的。</span> </section> <p style="line-height: normal;"><br></p> <section style="text-align: justify;margin-left: 8px;margin-right: 8px;line-height: 1.75em;"> <span style="font-size: 15px;color: rgb(89, 89, 89);letter-spacing: 1px;">此时大家可能都会用一个操作 FQ 进行访问,FQ 的方式主要是找到一个可以访问国外网站的代理服务器,我们将请求发送给代理服务器,代理服务器去访问国外的网站,然后将访问到的数据传递给我们!</span> </section> <p style="line-height: normal;"><br></p> <section style="text-align: justify;margin-left: 8px;margin-right: 8px;line-height: 1.75em;"> <span style="font-size: 15px;color: rgb(89, 89, 89);letter-spacing: 1px;">上述这样的代理模式称为正向代理,正向代理最大的特点是客户端非常明确要访问的服务器地址;服务器只清楚请求来自哪个代理服务器,而不清楚来自哪个具体的客户端;正向代理模式屏蔽或者隐藏了真实客户端信息。</span> </section> <p style="line-height: normal;"><br></p> <p style="text-align: justify;margin-left: 8px;margin-right: 8px;line-height: 1.75em;margin-bottom: 5px;"><span style="font-size: 15px;letter-spacing: 1px;color: rgb(71, 193, 168);">来看个示意图(我把客户端和正向代理框在一块,同属于一个环境,后面我有介绍):</span></p> <section style="text-align: justify;margin-left: 8px;margin-right: 8px;line-height: 1.75em;"></section> <p style="text-align: center;margin-left: 8px;margin-right: 8px;margin-bottom: 5px;"><img class="rich_pages" data-ratio="0.3387096774193548" data-s="300,640" src="/upload/8a5c502abdd8a62f241bcee0c4459e4e.png" data-type="png" data-w="1240" style=""></p> <section style="text-align: justify;margin-left: 8px;margin-right: 8px;line-height: 1.75em;"> <span style="font-size: 15px;color: rgb(89, 89, 89);letter-spacing: 1px;">客户端必须设置正向代理服务器,当然前提是要知道正向代理服务器的 IP 地址,还有代理程序的端口。</span> </section> <section style="line-height: normal;"> <br> </section> <p style="text-align: justify;margin-left: 8px;margin-right: 8px;line-height: 1.75em;margin-bottom: 5px;"><span style="font-size: 15px;letter-spacing: 1px;color: rgb(71, 193, 168);">如下图:</span></p> <p style="text-align: center;margin-left: 8px;margin-right: 8px;margin-bottom: 5px;"><img class="rich_pages" data-ratio="0.5142215568862275" data-s="300,640" src="/upload/a129dc8eec479670bf8b2053fab5c542.png" data-type="png" data-w="1336" style=""></p> <section style="text-align: justify;margin-left: 8px;margin-right: 8px;line-height: 1.75em;"> <strong><span style="font-size: 15px;color: rgb(89, 89, 89);letter-spacing: 1px;">总结来说:</span></strong> <span style="font-size: 15px;color: rgb(89, 89, 89);letter-spacing: 1px;">正向代理,"它代理的是客户端",是一个位于客户端和原始服务器(Origin Server<span style="line-height: 29.75px;">)</span>之间的服务器,为了从原始服务器取得内容,客户端向代理发送一个请求并指定目标(原始服务器<span style="line-height: 29.75px;">)</span>。</span> </section> <p style="line-height: normal;"><br></p> <section style="text-align: justify;margin-left: 8px;margin-right: 8px;line-height: 1.75em;"> <span style="font-size: 15px;color: rgb(89, 89, 89);letter-spacing: 1px;">然后代理向原始服务器转交请求并将获得的内容返回给客户端。客户端必须要进行一些特别的设置才能使用正向代理。</span> </section> <section style="line-height: normal;"> <br> </section> <section style="text-align: justify;margin-left: 8px;margin-right: 8px;line-height: 1.75em;"> <span style="font-size: 15px;letter-spacing: 1px;color: rgb(71, 193, 168);">正向代理的用途:</span> </section> <ul class=" list-paddingleft-2" style="list-style-type: disc;"> <li><p><span style="font-size: 15px;color: rgb(89, 89, 89);letter-spacing: 1px;">访问原来无法访问的资源,如 Google。</span></p></li> <li><p><span style="font-size: 15px;color: rgb(89, 89, 89);letter-spacing: 1px;">可以做缓存,加速访问资源。</span></p></li> <li><p><span style="font-size: 15px;color: rgb(89, 89, 89);letter-spacing: 1px;">对客户端访问授权,上网进行认证。</span></p></li> <li><p><span style="font-size: 15px;color: rgb(89, 89, 89);letter-spacing: 1px;">代理可以记录用户访问记录(上网行为管理),对外隐藏用户信息。</span></p></li> </ul> <section style="text-align: justify;margin-left: 8px;margin-right: 8px;line-height: 1.75em;"></section> <section style="text-align: justify;margin-left: 8px;margin-right: 8px;line-height: 1.75em;"></section> <section style="text-align: justify;margin-left: 8px;margin-right: 8px;line-height: 1.75em;"></section> <section style="text-align: justify;margin-left: 8px;margin-right: 8px;line-height: 1.75em;"></section> <section style="box-sizing: border-box;font-size: 16px;"></section> <p style="line-height: normal;"><br></p> <section style="box-sizing: border-box;font-size: 16px;"> <section style="margin-top: 10px;margin-bottom: 10px;box-sizing: border-box;" powered-by="xiumi.us"> <section style="width: 0.6em;display: inline-block;vertical-align: middle;box-sizing: border-box;"> <span style="width: 0.6em;height: 0.6em;display: block;opacity: 0.2;box-sizing: border-box;background-color: rgb(89, 89, 89);"></span> <strong><span style="width: 0.6em;height: 0.6em;display: block;opacity: 0.6;margin-top: 2px;margin-bottom: 2px;box-sizing: border-box;background-color: rgb(89, 89, 89);"></span> <span style="width: 0.6em;height: 0.6em;display: block;opacity: 1;box-sizing: border-box;background-color: rgb(89, 89, 89);"></span> </strong> </section> <section class="horizontal-tb" style="display: inline-block;vertical-align: middle;font-size: 18px;padding-left: 5px;color: rgb(89, 89, 89);box-sizing: border-box;"> <p style="box-sizing: border-box;"><strong>反向代理</strong></p> </section> </section> </section> <section> <section powered-by="xiumi.us"> <p style="line-height: normal;"><br></p> </section> </section> <section style="text-align: justify;margin-left: 8px;margin-right: 8px;line-height: 1.75em;"> <span style="font-size: 15px;color: rgb(89, 89, 89);letter-spacing: 1px;">明白了什么是正向代理,我们继续看关于反向代理的处理方式,举例如我国的某宝网站,每天同时连接到网站的访问人数已经爆表,单个服务器远远不能满足人民日益增长的购买欲望了。</span> </section> <p style="line-height: normal;"><br></p> <section style="text-align: justify;margin-left: 8px;margin-right: 8px;line-height: 1.75em;"> <span style="font-size: 15px;color: rgb(89, 89, 89);letter-spacing: 1px;">此时就出现了一个大家耳熟能详的名词:分布式部署;也就是通过部署多台服务器来解决访问人数限制的问题。</span> </section> <p style="line-height: normal;"><br></p> <section style="text-align: justify;margin-left: 8px;margin-right: 8px;line-height: 1.75em;"> <span style="font-size: 15px;color: rgb(89, 89, 89);letter-spacing: 1px;">某宝网站中大部分功能也是直接使用 Nginx 进行反向代理实现的,并且通过封装 Nginx 和其他的组件之后起了个高大上的名字:Tengine。</span> </section> <p style="line-height: normal;"><br></p> <p style="text-align: justify;margin-left: 8px;margin-right: 8px;line-height: 1.75em;margin-bottom: 5px;"><span style="font-size: 15px;color: rgb(89, 89, 89);letter-spacing: 1px;">有兴趣的童鞋可以访问 Tengine 的官网查看具体的信息:</span></p> <section class="output_wrapper" style="font-size: 16px;color: rgb(62, 62, 62);line-height: 1.6;letter-spacing: 0px;font-family: 'Helvetica Neue', Helvetica, 'Hiragino Sans GB', 'Microsoft YaHei', Arial, sans-serif;"> <pre style="font-size: inherit;color: inherit;line-height: inherit;"><code class="hljs cpp" style="margin-right: 2px;margin-left: 2px;line-height: 18px;font-size: 14px;letter-spacing: 0px;font-family: Consolas, Inconsolata, Courier, monospace;border-radius: 0px;color: rgb(169, 183, 198);padding: 0.5em;word-wrap: normal !important;word-break: normal !important;overflow: auto !important;display: -webkit-box !important;background: rgb(40, 43, 46);">http:<span class="hljs-comment" style="font-size: inherit;line-height: inherit;color: rgb(128, 128, 128);word-wrap: inherit !important;word-break: inherit !important;">//tengine.taobao.org/</span><br></code></pre> </section> <p style="line-height: normal;"><br></p> <p style="text-align: justify;margin-left: 8px;margin-right: 8px;line-height: 1.75em;margin-bottom: 5px;"><span style="font-size: 15px;color: rgb(89, 89, 89);letter-spacing: 1px;">那么反向代理具体是通过什么样的方式实现的分布式的集群操作呢,我们先看一个示意图(我把服务器和反向代理框在一块,同属于一个环境,后面我有介绍):</span></p> <p style="text-align: center;margin-left: 8px;margin-right: 8px;margin-bottom: 5px;"><img class="rich_pages" data-ratio="0.43870967741935485" data-s="300,640" src="/upload/af8c1cc649189609a5297bc47cb53da.png" data-type="png" data-w="1240" style=""></p> <section style="text-align: justify;margin-left: 8px;margin-right: 8px;line-height: 1.75em;"> <span style="font-size: 15px;color: rgb(89, 89, 89);letter-spacing: 1px;">通过上述的图解大家就可以看清楚了,多个客户端给服务器发送的请求,Nginx 服务器接收到之后,按照一定的规则分发给了后端的业务处理服务器进行处理了。</span> </section> <p style="line-height: normal;"><br></p> <section style="text-align: justify;margin-left: 8px;margin-right: 8px;line-height: 1.75em;"> <span style="font-size: 15px;color: rgb(89, 89, 89);letter-spacing: 1px;">此时请求的来源也就是客户端是明确的,但是请求具体由哪台服务器处理的并不明确了,Nginx 扮演的就是一个反向代理角色。</span> </section> <p style="line-height: normal;"><br></p> <section style="text-align: justify;margin-left: 8px;margin-right: 8px;line-height: 1.75em;"> <span style="font-size: 15px;color: rgb(89, 89, 89);letter-spacing: 1px;">客户端是无感知代理的存在的,反向代理对外都是透明的,访问者并不知道自己访问的是一个代理。因为客户端不需要任何配置就可以访问。</span> </section> <p style="line-height: normal;"><br></p> <section style="text-align: justify;margin-left: 8px;margin-right: 8px;line-height: 1.75em;"> <span style="font-size: 15px;color: rgb(89, 89, 89);letter-spacing: 1px;">反向代理,"它代理的是服务端",主要用于服务器集群分布式部署的情况下,反向代理隐藏了服务器的信息。</span> </section> <p style="line-height: normal;"><br></p> <section style="text-align: justify;margin-left: 8px;margin-right: 8px;line-height: 1.75em;"> <span style="font-size: 15px;letter-spacing: 1px;color: rgb(71, 193, 168);">反向代理的作用:</span> </section> <ul class=" list-paddingleft-2" style="list-style-type: disc;"> <li><p><span style="font-size: 15px;color: rgb(89, 89, 89);letter-spacing: 1px;">保证内网的安全,通常将反向代理作为公网访问地址,Web 服务器是内网。</span></p></li> <li><p><span style="font-size: 15px;color: rgb(89, 89, 89);letter-spacing: 1px;">负载均衡,通过反向代理服务器来优化网站的负载。</span></p></li> </ul> <section style="text-align: justify;margin-left: 8px;margin-right: 8px;line-height: 1.75em;"></section> <section style="text-align: justify;margin-left: 8px;margin-right: 8px;line-height: 1.75em;"></section> <section style="box-sizing: border-box;font-size: 16px;"> <section style="transform: rotate(0deg);-webkit-transform: rotate(0deg);-moz-transform: rotate(0deg);-o-transform: rotate(0deg);box-sizing: border-box;" powered-by="xiumi.us"></section> </section> <p style="line-height: normal;"><br></p> <section style="box-sizing: border-box;font-size: 16px;"> <section style="margin-top: 10px;margin-bottom: 10px;box-sizing: border-box;" powered-by="xiumi.us"> <section style="width: 0.6em;display: inline-block;vertical-align: middle;box-sizing: border-box;"> <span style="width: 0.6em;height: 0.6em;display: block;opacity: 0.2;box-sizing: border-box;background-color: rgb(89, 89, 89);"></span> <strong><span style="width: 0.6em;height: 0.6em;display: block;opacity: 0.6;margin-top: 2px;margin-bottom: 2px;box-sizing: border-box;background-color: rgb(89, 89, 89);"></span> <span style="width: 0.6em;height: 0.6em;display: block;opacity: 1;box-sizing: border-box;background-color: rgb(89, 89, 89);"></span> </strong> </section> <section class="horizontal-tb" style="display: inline-block;vertical-align: middle;font-size: 18px;padding-left: 5px;color: rgb(89, 89, 89);box-sizing: border-box;"> <p style="box-sizing: border-box;"><strong>项目场景</strong></p> </section> </section> </section> <section style="line-height: normal;"> <br> </section> <section style="text-align: justify;margin-left: 8px;margin-right: 8px;line-height: 1.75em;"> <span style="font-size: 15px;color: rgb(89, 89, 89);letter-spacing: 1px;">通常情况下,我们在实际项目操作时,正向代理和反向代理很有可能会存在同一个应用场景中,正向代理代理客户端的请求去访问目标服务器,目标服务器是一个反向单利服务器,反向代理了多台真实的业务处理服务器。</span> </section> <p style="line-height: normal;"><br></p> <p style="text-align: justify;margin-left: 8px;margin-right: 8px;line-height: 1.75em;margin-bottom: 5px;"><span style="font-size: 15px;letter-spacing: 1px;color: rgb(71, 193, 168);">具体的拓扑图如下:</span></p> <p style="text-align: center;margin-left: 8px;margin-right: 8px;margin-bottom: 5px;"><img class="rich_pages" data-ratio="0.43306451612903224" data-s="300,640" src="/upload/909fb94f74f08fab78a724074ebc8b3d.png" data-type="png" data-w="1240" style=""></p> <p style="text-align: justify;margin-left: 8px;margin-right: 8px;line-height: 1.75em;margin-bottom: 5px;"><span style="font-size: 15px;letter-spacing: 1px;color: rgb(71, 193, 168);">截了一张图来说明正向代理和反向代理二者之间的区别,如下图:</span></p> <p style="text-align: center;margin-left: 8px;margin-right: 8px;margin-bottom: 5px;"><img class="rich_pages" data-ratio="1.0525423728813559" data-s="300,640" src="/upload/13078e4ea75405e19f60b59ed55cc1c2.png" data-type="png" data-w="590" style=""></p> <section style="text-align: justify;margin-left: 8px;margin-right: 8px;line-height: 1.75em;"> <span style="font-size: 15px;letter-spacing: 1px;color: rgb(71, 193, 168);">图解:</span> </section> <ul class=" list-paddingleft-2" style="list-style-type: disc;"> <li><p><span style="font-size: 15px;color: rgb(89, 89, 89);letter-spacing: 1px;">在正向代理中,Proxy 和 Client 同属于一个 LAN(图中方框内),隐藏了客户端信息。</span></p></li> <li><p><span style="font-size: 15px;color: rgb(89, 89, 89);letter-spacing: 1px;">在反向代理中,Proxy 和 Server 同属于一个 LAN(图中方框内),隐藏了服务端信息。</span></p></li> </ul> <p style="line-height: normal;"><br></p> <section style="text-align: justify;margin-left: 8px;margin-right: 8px;line-height: 1.75em;"> <span style="font-size: 15px;color: rgb(89, 89, 89);letter-spacing: 1px;">实际上,Proxy 在两种代理中做的事情都是替服务器代为收发请求和响应,不过从结构上看正好左右互换了一下,所以把后出现的那种代理方式称为反向代理了。</span> </section> <section style="line-height: normal;"> <br> </section> <section style="box-sizing: border-box;font-size: 16px;"> <section style="margin-top: 10px;margin-bottom: 10px;box-sizing: border-box;" powered-by="xiumi.us"> <section style="width: 0.6em;display: inline-block;vertical-align: middle;box-sizing: border-box;"> <span style="width: 0.6em;height: 0.6em;display: block;opacity: 0.2;box-sizing: border-box;background-color: rgb(89, 89, 89);"></span> <strong><span style="width: 0.6em;height: 0.6em;display: block;opacity: 0.6;margin-top: 2px;margin-bottom: 2px;box-sizing: border-box;background-color: rgb(89, 89, 89);"></span> <span style="width: 0.6em;height: 0.6em;display: block;opacity: 1;box-sizing: border-box;background-color: rgb(89, 89, 89);"></span> </strong> </section> <section class="horizontal-tb" style="display: inline-block;vertical-align: middle;font-size: 18px;padding-left: 5px;color: rgb(89, 89, 89);box-sizing: border-box;"> <p style="box-sizing: border-box;"><strong>负载均衡</strong></p> </section> </section> </section> <section style="box-sizing: border-box;font-size: 16px;"> <section powered-by="xiumi.us"> <p style="line-height: normal;"><br></p> </section> </section> <section style="text-align: justify;margin-left: 8px;margin-right: 8px;line-height: 1.75em;"> <span style="font-size: 15px;color: rgb(89, 89, 89);letter-spacing: 1px;">我们已经明确了所谓代理服务器的概念,那么接下来,Nginx 扮演了反向代理服务器的角色,它是依据什么样的规则进行请求分发的呢?不用的项目应用场景,分发的规则是否可以控制呢?</span> </section> <p style="line-height: normal;"><br></p> <section style="text-align: justify;margin-left: 8px;margin-right: 8px;line-height: 1.75em;"> <span style="font-size: 15px;color: rgb(89, 89, 89);letter-spacing: 1px;">这里提到的客户端发送的、Nginx 反向代理服务器接收到的请求数量,就是我们说的负载量。</span> </section> <p style="line-height: normal;"><br></p> <section style="text-align: justify;margin-left: 8px;margin-right: 8px;line-height: 1.75em;"> <span style="font-size: 15px;color: rgb(89, 89, 89);letter-spacing: 1px;">请求数量按照一定的规则进行分发,到不同的服务器处理的规则,就是一种均衡规则。</span> </section> <p style="line-height: normal;"><br></p> <section style="text-align: justify;margin-left: 8px;margin-right: 8px;line-height: 1.75em;"> <span style="font-size: 15px;color: rgb(89, 89, 89);letter-spacing: 1px;">所以将服务器接收到的请求按照规则分发的过程,称为负载均衡。</span> </section> <p style="line-height: normal;"><br></p> <section style="text-align: justify;margin-left: 8px;margin-right: 8px;line-height: 1.75em;"> <span style="font-size: 15px;color: rgb(89, 89, 89);letter-spacing: 1px;">负载均衡在实际项目操作过程中,有硬件负载均衡和软件负载均衡两种,硬件负载均衡也称为硬负载,如 F5 负载均衡,相对造价昂贵成本较高。</span> </section> <p style="line-height: normal;"><br></p> <section style="text-align: justify;margin-left: 8px;margin-right: 8px;line-height: 1.75em;"> <span style="font-size: 15px;color: rgb(89, 89, 89);letter-spacing: 1px;">但是数据的稳定性安全性等等有非常好的保障,如中国移动中国联通这样的公司才会选择硬负载进行操作。</span> </section> <p style="line-height: normal;"><br></p> <p style="text-align: justify;margin-left: 8px;margin-right: 8px;line-height: 1.75em;margin-bottom: 5px;"><span style="font-size: 15px;color: rgb(89, 89, 89);letter-spacing: 1px;">更多的公司考虑到成本原因,会选择使用软件负载均衡,软件负载均衡是利用现有的技术结合主机硬件实现的一种消息队列分发机制。</span></p> <p style="text-align: center;margin-left: 8px;margin-right: 8px;margin-bottom: 5px;"><img class="rich_pages" data-ratio="0.43790322580645163" data-s="300,640" src="/upload/f0104dfc2e33790adf2f2ae608817c1a.png" data-type="png" data-w="1240" style=""></p> <section style="text-align: justify;margin-left: 8px;margin-right: 8px;line-height: 1.75em;"> <span style="font-size: 15px;letter-spacing: 1px;color: rgb(71, 193, 168);">Nginx 支持的负载均衡调度算法方式如下:</span> </section> <section style="line-height: normal;"> <strong><span style="font-size: 15px;color: rgb(89, 89, 89);letter-spacing: 1px;"><br></span></strong> </section> <section style="margin-left: 8px;margin-right: 8px;"> <strong><span style="font-size: 15px;color: rgb(89, 89, 89);letter-spacing: 1px;">①weight 轮询(默认<span style="line-height: 24px;">)</span>:</span></strong> <span style="font-size: 15px;color: rgb(89, 89, 89);letter-spacing: 1px;">接收到的请求按照顺序逐一分配到不同的后端服务器,即使在使用过程中,某一台后端服务器宕机,Nginx 会自动将该服务器剔除出队列,请求受理情况不会受到任何影响。</span> </section> <p style="line-height: normal;"><br></p> <section style="margin-left: 8px;margin-right: 8px;"> <span style="font-size: 15px;color: rgb(89, 89, 89);letter-spacing: 1px;">这种方式下,可以给不同的后端服务器设置一个权重值(weight<span style="line-height: 24px;">)</span>,用于调整不同的服务器上请求的分配率。</span> </section> <p style="line-height: normal;"><br></p> <section style="margin-left: 8px;margin-right: 8px;"> <span style="font-size: 15px;color: rgb(89, 89, 89);letter-spacing: 1px;">权重数据越大,被分配到请求的几率越大;该权重值,主要是针对实际工作环境中不同的后端服务器硬件配置进行调整的。</span> </section> <p style="line-height: normal;"><br></p> <section style="margin-left: 8px;margin-right: 8px;"> <strong><span style="font-size: 15px;color: rgb(89, 89, 89);letter-spacing: 1px;">②ip_hash:</span></strong> <span style="font-size: 15px;color: rgb(89, 89, 89);letter-spacing: 1px;">每个请求按照发起客户端的 ip 的 hash 结果进行匹配,这样的算法下一个固定 ip 地址的客户端总会访问到同一个后端服务器,这也在一定程度上解决了集群部署环境下 Session 共享的问题。</span> </section> <p style="line-height: normal;"><br></p> <section style="margin-left: 8px;margin-right: 8px;"> <strong><span style="font-size: 15px;color: rgb(89, 89, 89);letter-spacing: 1px;">③fair:</span></strong> <span style="font-size: 15px;color: rgb(89, 89, 89);letter-spacing: 1px;">智能调整调度算法,动态的根据后端服务器的请求处理到响应的时间进行均衡分配。</span> </section> <p style="line-height: normal;"><br></p> <section style="margin-left: 8px;margin-right: 8px;"> <span style="font-size: 15px;color: rgb(89, 89, 89);letter-spacing: 1px;">响应时间短处理效率高的服务器分配到请求的概率高,响应时间长处理效率低的服务器分配到的请求少,它是结合了前两者的优点的一种调度算法。</span> </section> <p style="line-height: normal;"><br></p> <section style="margin-left: 8px;margin-right: 8px;"> <span style="font-size: 15px;color: rgb(89, 89, 89);letter-spacing: 1px;">但是需要注意的是 Nginx 默认不支持 fair 算法,如果要使用这种调度算法,请安装 upstream_fair 模块。</span> </section> <p style="line-height: normal;"><br></p> <section style="margin-left: 8px;margin-right: 8px;"> <span style="font-size: 15px;color: rgb(89, 89, 89);letter-spacing: 1px;"><strong>④url_hash:</strong>按照访问的 URL 的 hash 结果分配请求,每个请求的 <span style="color: rgb(89, 89, 89);font-size: 15px;letter-spacing: 1px;line-height: 24px;">URL</span> 会指向后端固定的某个服务器,可以在 Nginx 作为静态服务器的情况下提高缓存效率。</span> </section> <p style="line-height: normal;"><br></p> <section style="margin-left: 8px;margin-right: 8px;"> <span style="font-size: 15px;color: rgb(89, 89, 89);letter-spacing: 1px;">同样要注意 Nginx 默认不支持这种调度算法,要使用的话需要安装 Nginx 的 hash 软件包。</span> </section> <section style="line-height: normal;"> </section> <section style="box-sizing: border-box;font-size: 16px;"> <section style="transform: rotate(0deg);-webkit-transform: rotate(0deg);-moz-transform: rotate(0deg);-o-transform: rotate(0deg);box-sizing: border-box;" powered-by="xiumi.us"> <section style="border-bottom-width: 1px;border-bottom-style: solid;border-bottom-color: black;margin-top: 0.5em;margin-bottom: 0.5em;line-height: 1.2;box-sizing: border-box;"> <section class="horizontal-tb" style="display: inline-block;border-bottom-width: 6px;border-bottom-style: solid;border-color: rgb(89, 89, 89);margin-bottom: -1px;font-size: 20px;color: rgb(89, 89, 89);box-sizing: border-box;"> <p style="box-sizing: border-box;">Web 服务器对比</p> </section> </section> </section> </section> <section style="line-height: normal;"> <br> </section> <section style="text-align: justify;margin-left: 8px;margin-right: 8px;line-height: 1.75em;margin-bottom: 5px;"> <span style="font-size: 15px;letter-spacing: 1px;color: rgb(71, 193, 168);">几种常用 Web 服务器对比如下图:</span> </section> <section style="text-align: center;margin-bottom: 5px;"> <img class="rich_pages" data-ratio="0.8170426065162907" data-s="300,640" src="/upload/c52ded98ec79d9820bcaf748843f2bea.png" data-type="png" data-w="399" style=""> </section> <p style="white-space: normal;line-height: 1.75em;"><span style="color: rgb(89, 89, 89);letter-spacing: 1px;"><em><span style="font-size: 14px;">作者:<em><span style="line-height: 27.2px;">蔷薇Nina</span></em></span></em></span></p> <p style="white-space: normal;line-height: 1.75em;"><span style="color: rgb(89, 89, 89);letter-spacing: 1px;"><em><span style="font-size: 14px;">编辑:陶家龙、孙淑娟</span></em></span><br></p> <p style="white-space: normal;line-height: 1.75em;"><em><span style="font-size: 14px;color: rgb(89, 89, 89);letter-spacing: 1px;">出处:</span><span style="font-size: 14px;color: rgb(89, 89, 89);font-family: -apple-system-font, BlinkMacSystemFont, 'Helvetica Neue', 'PingFang SC', 'Hiragino Sans GB', 'Microsoft YaHei UI', 'Microsoft YaHei', Arial, sans-serif;letter-spacing: 0.544px;line-height: 20px;text-align: start;">www.cnblogs.com/wcwnina/p/8728391.html</span></em></p> <p style="text-align: center;"><img class="rich_pages" data-ratio="0.39375" src="/upload/eccf90ae5f48405df149baa3056d4bf3.gif" data-type="gif" data-w="640" style=""></p> <section style="box-sizing: border-box;font-size: 16px;"> <section style="margin-top: 0.5em;margin-bottom: 0.5em;box-sizing: border-box;" powered-by="xiumi.us"> <section class="horizontal-tb" style="font-size: 15px;border-style: solid;border-width: 0px 0px 1px;color: rgb(89, 89, 89);border-bottom-color: rgba(215, 215, 215, 0.960784);box-sizing: border-box;"> <p style="box-sizing: border-box;"><span style="letter-spacing: 1px;"><strong>精彩文章推荐:</strong></span></p> </section> </section> </section> <p style="line-height: 2em;"><a href="http://mp.weixin.qq.com/s?__biz=MjM5ODI5Njc2MA==&mid=2655821541&idx=1&sn=01c187372ce52ed7bc51ce5c9679e1ea&chksm=bd74d3328a035a248effe13126b4f81780daf538a77cc43cd8f3aa3ce69b145f6fe022f6c4cb&scene=21#wechat_redirect" target="_blank" data-itemshowtype="11" style="font-size: 14px;color: rgb(89, 89, 89);letter-spacing: 1px;" data-linktype="2"><span style="font-size: 14px;color: rgb(89, 89, 89);letter-spacing: 1px;">掌握Nginx监控运维,这一篇足矣!</span></a></p> <p style="line-height: 2em;"><a href="http://mp.weixin.qq.com/s?__biz=MjM5ODI5Njc2MA==&mid=2655820468&idx=1&sn=7b79ed5d1b7acc411a24c3b074d4ca8a&chksm=bd74d7638a035e754c88cc4a2bf0414319072c78713617792256c810ac0ca817fc40bf16da9e&scene=21#wechat_redirect" target="_blank" data-itemshowtype="11" style="font-size: 14px;color: rgb(89, 89, 89);letter-spacing: 1px;" data-linktype="2"><span style="font-size: 14px;color: rgb(89, 89, 89);letter-spacing: 1px;">百万并发下的Nginx优化,看这一篇就够了!</span></a><br></p> <p style="line-height: 2em;"><span style="font-size: 14px;color: rgb(89, 89, 89);letter-spacing: 1px;"><a href="http://mp.weixin.qq.com/s?__biz=MjM5ODI5Njc2MA==&mid=2655825701&idx=1&sn=0f0588757bba77cfdbc37b9ddbf3e2f6&chksm=bd74e2f28a036be4e80f48c0234cadac60ca4de7d38f79f3ea22245b02ce9f23b672f0da6b0c&scene=21#wechat_redirect" target="_blank" data-itemshowtype="0" style="font-size: 14px;color: rgb(89, 89, 89);letter-spacing: 1px;" data-linktype="2">你真的掌握LVS、Nginx及HAProxy工作原理吗?</a></span></p>
作者:じ☆ve宝贝
**能用图解决的事情就不墨迹了,直接看图**    
作者:微信小助手
<p><br></p> <p style="margin-left: 0px;margin-right: 0px;line-height: 1.5em;"><img class="currentImg" data-before-oversubscription-url="https://mmbiz.qpic.cn/mmbiz_jpg/l89kosVutonDlJQHqx8ib2qgeicbx1Nwq3e1A9IEZscQVAeEsDFpWLgMpUNORSujdESic5Bk4jcaljBcBZUDqyTiag/640?wx_fmt=jpeg" data-croporisrc="/upload/d58bca2c232bd0a107613993e3332532.jpg" data-cropx1="0" data-cropx2="640" data-cropy1="0" data-cropy2="420.1438848920863" data-ratio="0.65625" src="https://mmbiz.qpic.cn/mmbiz_jpg/l89kosVutonDlJQHqx8ib2qgeicbx1Nwq3e1A9IEZscQVAeEsDFpWLgMpUNORSujdESic5Bk4jcaljBcBZUDqyTiag/640?wx_fmt=jpeg" data-type="jpeg" data-w="640" style="top: 105px;left: 302px;width: 524px;height: auto;cursor: pointer;" title="点击查看源网页"></p> <p><br></p> <p style="margin-left: 0px;margin-right: 0px;line-height: 1.5em;"><strong>问题描述</strong></p> <p style="margin-left: 0px;margin-right: 0px;line-height: 1.5em;"><strong><br></strong></p> <p style="margin-left: 0px;margin-right: 0px;line-height: 1.5em;"><span style="font-size: 16px;">支付清结算系统"外部对账"部分任务在早上6:00~7:00时间段内对账速度缓慢,且经常造成对账统计结果不准确问题,导致结转记账不准确。</span></p> <p style="margin-left: 0px;margin-right: 0px;line-height: 1.5em;"><span style="font-size: 16px;"><br></span></p> <p style="margin-left: 0px;margin-right: 0px;line-height: 1.5em;"><span style="font-size: 17px;"><strong>初步分析及处理过程</strong></span></p> <p style="margin-left: 0px;margin-right: 0px;line-height: 1.5em;"><span style="font-size: 17px;"><strong><br></strong></span></p> <p style="margin-left: 0px;margin-right: 0px;line-height: 1.5em;"><span style="font-size: 16px;">由于外部对账是经过性能优化的,且在压测环境表现良好,所以最开始初步认为是由于数据库性能瓶颈导致,初步处理方式为将线上6:00~7:00之前的慢SQL进行了一番排查,并对涉及外部系统的慢SQL进行了优化,这个步骤理论上是可以解决此类问题,但RDS(阿里云Mysql可能存在慢SQL统计不准确问题)。</span></p> <p style="margin-left: 0px;margin-right: 0px;line-height: 1.5em;"><span style="font-size: 16px;"><br></span></p> <p style="line-height: 1.5em;"><strong><span style="font-size: 17px;">特点时间段内线程栈分析</span></strong></p> <p style="line-height: 1.5em;"><strong><span style="font-size: 17px;"><br></span></strong></p> <p style="line-height: 1.5em;"><span style="font-size: 16px;">特定时间段线程栈分析,由于SQL优化部分并没有解决此类问题,为了查看在早上6:00~7:00这个时间段内程序JVM内部到底发生了什么,所以采取了定时抓取线程栈日志的手段(具体方式为在Linux服务器添加cron任务,并累计输出日志的方式,脚本如👇)。</span></p> <p style="line-height: 1.5em;"><span style="font-size: 16px;"><br></span></p> <p style="line-height: 1.5em;"><span style="font-size: 16px;"> #clearjstack.sh</span></p> <section class="output_wrapper" style="font-size: 16px;color: rgb(62, 62, 62);line-height: 1.6;word-spacing: 0px;letter-spacing: 0px;font-family: 'Helvetica Neue', Helvetica, 'Hiragino Sans GB', 'Microsoft YaHei', Arial, sans-serif;background-image: linear-gradient(90deg, rgba(50, 0, 0, 0.05) 3%, rgba(0, 0, 0, 0) 3%), linear-gradient(360deg, rgba(50, 0, 0, 0.05) 3%, rgba(0, 0, 0, 0) 3%);background-size: 20px 20px;background-position: center center;"> <pre style="font-size: inherit;color: inherit;line-height: inherit;margin: 0px;padding: 0px;"><p style="margin: 0px 2px;font-size: 14px;font-weight: normal;word-spacing: 0px;letter-spacing: 0px;font-family: Consolas, Inconsolata, Courier, monospace;border-radius: 0px;color: rgb(169, 183, 198);background: rgb(40, 43, 46) none repeat scroll 0% 0%;padding: 0.5em;display: block !important;white-space: pre !important;overflow-wrap: normal !important;word-break: normal !important;overflow: auto !important;line-height: 1.5em;"><span class="hljs-meta" style="font-size: inherit;line-height: inherit;margin: 0px;padding: 0px;color: rgb(91, 218, 237);word-wrap: inherit !important;word-break: inherit !important;">#</span><span class="bash" style="font-size: inherit;color: inherit;line-height: inherit;margin: 0px;padding: 0px;word-wrap: inherit !important;word-break: inherit !important;">!/bin/sh</span><br>DATE='/bin/date'<br>timestamp() {<br><span class="hljs-meta" style="font-size: inherit;line-height: inherit;margin: 0px;padding: 0px;color: rgb(91, 218, 237);word-wrap: inherit !important;word-break: inherit !important;">$</span><span class="bash" style="font-size: inherit;color: inherit;line-height: inherit;margin: 0px;padding: 0px;word-wrap: inherit !important;word-break: inherit !important;">DATE +<span class="hljs-string" style="font-size: inherit;line-height: inherit;margin: 0px;padding: 0px;color: rgb(238, 220, 112);word-wrap: inherit !important;word-break: inherit !important;">'%Y-%m-%d %H:%M:%S'</span></span><br>}<br>ts=`timestamp`<br>echo "start log $ts" >> /tmp/clearjstack.log<br>/usr/java/jdk1.7.0_67/bin/jstack -l `/usr/java/jdk1.7.0_67/bin/jps -lvm | grep tomcat-clear | awk '{print $1}'` >> /tmp/clearjstack.log<br>ts=`timestamp`<br>echo "end log $ts" >> /tmp/clearjstack.log<br></p></pre> </section> <p style="line-height: 1.5em;"><span style="font-size: 16px;"></span><span style="font-size: 16px;"> <br></span></p> <p style="line-height: 1.5em;"><span style="font-size: 16px;">Linux下添加定时任务的方式:</span></p> <section class="output_wrapper" style="font-size: 16px;color: rgb(62, 62, 62);line-height: 1.6;word-spacing: 0px;letter-spacing: 0px;font-family: 'Helvetica Neue', Helvetica, 'Hiragino Sans GB', 'Microsoft YaHei', Arial, sans-serif;background-image: linear-gradient(90deg, rgba(50, 0, 0, 0.05) 3%, rgba(0, 0, 0, 0) 3%), linear-gradient(360deg, rgba(50, 0, 0, 0.05) 3%, rgba(0, 0, 0, 0) 3%);background-size: 20px 20px;background-position: center center;"> <pre style="font-size: inherit;color: inherit;line-height: inherit;margin: 0px;padding: 0px;"><p style="margin: 0px 2px;font-size: 14px;font-weight: normal;word-spacing: 0px;letter-spacing: 0px;font-family: Consolas, Inconsolata, Courier, monospace;border-radius: 0px;color: rgb(169, 183, 198);background: rgb(40, 43, 46) none repeat scroll 0% 0%;padding: 0.5em;display: block !important;white-space: pre !important;overflow-wrap: normal !important;word-break: normal !important;overflow: auto !important;line-height: 1.5em;">//添加计划任务<br>[root@123.57.28.241/10.172.233.8 tmp]cd /var/spool/cron/<br>[root@123.57.28.241/10.172.233.8 cron]pwd<br>/var/spool/cron/具体用户名(如为root用户)<br>[root@123.57.28.241/10.172.233.8 cron]vim root<br>*/5 * * * * /bin/sh /tmp/clearjstack.sh > /dev/null 2>&1<br></p></pre> </section> <p style="line-height: 2em;"><br></p> <section class="output_wrapper" style="font-size: 16px;color: rgb(62, 62, 62);line-height: 1.6;word-spacing: 0px;letter-spacing: 0px;font-family: 'Helvetica Neue', Helvetica, 'Hiragino Sans GB', 'Microsoft YaHei', Arial, sans-serif;background-image: linear-gradient(90deg, rgba(50, 0, 0, 0.05) 3%, rgba(0, 0, 0, 0) 3%), linear-gradient(360deg, rgba(50, 0, 0, 0.05) 3%, rgba(0, 0, 0, 0) 3%);background-size: 20px 20px;background-position: center center;"> <pre style="font-size: inherit;color: inherit;line-height: inherit;margin: 0px;padding: 0px;"><p style="margin: 0px 2px;font-size: 14px;font-weight: normal;word-spacing: 0px;letter-spacing: 0px;font-family: Consolas, Inconsolata, Courier, monospace;border-radius: 0px;color: rgb(169, 183, 198);background: rgb(40, 43, 46) none repeat scroll 0% 0%;padding: 0.5em;display: block !important;white-space: pre !important;overflow-wrap: normal !important;word-break: normal !important;overflow: auto !important;line-height: 1.5em;">//查看计划任务<br>[root@123.57.28.241/10.172.233.8 cron]crontab -l<br>0 0 * * * /usr/local/script/Cutlog.sh >/dev/null 2>&1<br>*/5 * * * * /bin/sh /tmp/clearjstack.sh > /dev/null 2>&1<br></p></pre> </section> <p style="line-height: 1.5em;"><span style="font-size: 16px;"><br></span></p> <p style="line-height: 1.5em;"><strong><span style="font-size: 17px;">对线程栈日志分析(1)</span></strong></p> <p style="line-height: 1.5em;"><strong><span style="font-size: 17px;"><br></span></strong></p> <section class="output_wrapper" style="font-size: 16px;color: rgb(62, 62, 62);line-height: 1.6;word-spacing: 0px;letter-spacing: 0px;font-family: 'Helvetica Neue', Helvetica, 'Hiragino Sans GB', 'Microsoft YaHei', Arial, sans-serif;background-image: linear-gradient(90deg, rgba(50, 0, 0, 0.05) 3%, rgba(0, 0, 0, 0) 3%), linear-gradient(360deg, rgba(50, 0, 0, 0.05) 3%, rgba(0, 0, 0, 0) 3%);background-size: 20px 20px;background-position: center center;"> <pre style="font-size: inherit;color: inherit;line-height: inherit;margin: 0px;padding: 0px;"><p style="margin: 0px 2px;font-size: 14px;font-weight: normal;word-spacing: 0px;letter-spacing: 0px;font-family: Consolas, Inconsolata, Courier, monospace;border-radius: 0px;color: rgb(169, 183, 198);background: rgb(40, 43, 46) none repeat scroll 0% 0%;padding: 0.5em;display: block !important;white-space: pre !important;overflow-wrap: normal !important;word-break: normal !important;overflow: auto !important;line-height: 1.5em;"><span class="hljs-meta" style="font-size: inherit;line-height: inherit;margin: 0px;padding: 0px;color: rgb(91, 218, 237);word-wrap: inherit !important;word-break: inherit !important;">#</span><span class="bash" style="font-size: inherit;color: inherit;line-height: inherit;margin: 0px;padding: 0px;word-wrap: inherit !important;word-break: inherit !important;">clearjstack.log</span><br><br>start log 2016-11-24 06:20:01<br>2016-11-24 06:20:02<br>Full thread dump Java HotSpot(TM) 64-Bit Server VM (24.65-b04 mixed mode):<br><br>"Thread-70" prio=10 tid=0x00007f21f4022800 nid=0x12da runnable [0x00007f216cace000]<br>java.lang.Thread.State: RUNNABLE<br>at java.net.SocketInputStream.socketRead0(Native Method)<br>at java.net.SocketInputStream.read(SocketInputStream.java:152)<br>at java.net.SocketInputStream.read(SocketInputStream.java:122)<br>at com.mysql.jdbc.util.ReadAheadInputStream.fill(ReadAheadInputStream.java:114)<br>at com.mysql.jdbc.util.ReadAheadInputStream.readFromUnderlyingStreamIfNecessary(ReadAheadInputStream.java:161)<br>at com.mysql.jdbc.util.ReadAheadInputStream.read(ReadAheadInputStream.java:189)<br>- locked <0x0000000786facbc8> (a com.mysql.jdbc.util.ReadAheadInputStream)<br>at com.mysql.jdbc.MysqlIO.readFully(MysqlIO.java:3014)<br>at com.mysql.jdbc.MysqlIO.reuseAndReadPacket(MysqlIO.java:3467)<br>at com.mysql.jdbc.MysqlIO.reuseAndReadPacket(MysqlIO.java:3456)<br>at com.mysql.jdbc.MysqlIO.checkErrorPacket(MysqlIO.java:3997)<br>at com.mysql.jdbc.MysqlIO.sendCommand(MysqlIO.java:2468)<br>at com.mysql.jdbc.MysqlIO.sqlQueryDirect(MysqlIO.java:2629)<br>at com.mysql.jdbc.ConnectionImpl.execSQL(ConnectionImpl.java:2719)<br>- locked <0x0000000786f9a650> (a com.mysql.jdbc.JDBC4Connection)<br>at com.mysql.jdbc.PreparedStatement.executeInternal(PreparedStatement.java:2155)<br>- locked <0x0000000786f9a650> (a com.mysql.jdbc.JDBC4Connection)<br>at com.mysql.jdbc.PreparedStatement.execute(PreparedStatement.java:1379)<br>- locked <0x0000000786f9a650> (a com.mysql.jdbc.JDBC4Connection)<br>at com.alibaba.druid.pool.DruidPooledPreparedStatement.execute(DruidPooledPreparedStatement.java:493)<br>at sun.reflect.GeneratedMethodAccessor169.invoke(Unknown Source)<br>at sun.reflect.DelegatingMethodAccessorImpl.invoke(DelegatingMethodAccessorImpl.java:43)<br>at java.lang.reflect.Method.invoke(Method.java:606)<br>at org.apache.ibatis.logging.jdbc.PreparedStatementLogger.invoke(PreparedStatementLogger.java:55)<br>at com.sun.proxy.$Proxy84.execute(Unknown Source)<br>at org.apache.ibatis.executor.statement.PreparedStatementHandler.query(PreparedStatementHandler.java:56)<br>at org.apache.ibatis.executor.statement.RoutingStatementHandler.query(RoutingStatementHandler.java:70)<br>at org.apache.ibatis.executor.ReuseExecutor.doQuery(ReuseExecutor.java:54)<br>at org.apache.ibatis.executor.BaseExecutor.queryFromDatabase(BaseExecutor.java:259)<br>at org.apache.ibatis.executor.BaseExecutor.query(BaseExecutor.java:132)<br>at org.apache.ibatis.executor.BaseExecutor.query(BaseExecutor.java:115)<br>at sun.reflect.GeneratedMethodAccessor165.invoke(Unknown Source)<br>at sun.reflect.DelegatingMethodAccessorImpl.invoke(DelegatingMethodAccessorImpl.java:43)<br>at java.lang.reflect.Method.invoke(Method.java:606)<br>at org.apache.ibatis.plugin.Invocation.proceed(Invocation.java:46)<br>at com.github.miemiedev.mybatis.paginator.OffsetLimitInterceptor.intercept(OffsetLimitInterceptor.java:66)<br>at org.apache.ibatis.plugin.Plugin.invoke(Plugin.java:57)<br>at com.sun.proxy.$Proxy82.query(Unknown Source)<br>at org.apache.ibatis.session.defaults.DefaultSqlSession.selectList(DefaultSqlSession.java:104)<br>at org.apache.ibatis.session.defaults.DefaultSqlSession.selectList(DefaultSqlSession.java:98)<br>at org.apache.ibatis.session.defaults.DefaultSqlSession.selectOne(DefaultSqlSession.java:62)<br>at sun.reflect.GeneratedMethodAccessor203.invoke(Unknown Source)<br>at sun.reflect.DelegatingMethodAccessorImpl.invoke(DelegatingMethodAccessorImpl.java:43)<br>at java.lang.reflect.Method.invoke(Method.java:606)<br>at org.mybatis.spring.SqlSessionTemplate$SqlSessionInterceptor.invoke(SqlSessionTemplate.java:358)<br>at com.sun.proxy.$Proxy29.selectOne(Unknown Source)<br>at org.mybatis.spring.SqlSessionTemplate.selectOne(SqlSessionTemplate.java:163)<br>at org.apache.ibatis.binding.MapperMethod.execute(MapperMethod.java:63)<br>at org.apache.ibatis.binding.MapperProxy.invoke(MapperProxy.java:43)<br>at com.sun.proxy.$Proxy87.countOrgSettleFlow(Unknown Source)<br>at com.ninefbank.smallpay.clear.service.impl.OrgSettleFlowServiceImpl.isExistOrgSettleFlow(OrgSettleFlowServiceImpl.java:45)<br>at com.ninefbank.smallpay.clear.service.impl.OrgSettleFlowServiceImpl$$FastClassBySpringCGLIB$$c921c9ca.invoke(<generated>)<br>at org.springframework.cglib.proxy.MethodProxy.invoke(MethodProxy.java:204)<br>at org.springframework.aop.framework.CglibAopProxy$CglibMethodInvocation.invokeJoinpoint(CglibAopProxy.java:700)<br>at org.springframework.aop.framework.ReflectiveMethodInvocation.proceed(ReflectiveMethodInvocation.java:150)<br>at org.springframework.transaction.interceptor.TransactionInterceptor$1.proceedWithInvocation(TransactionInterceptor.java:96)<br>at org.springframework.transaction.interceptor.TransactionAspectSupport.invokeWithinTransaction(TransactionAspectSupport.java:260)<br>at org.springframework.transaction.interceptor.TransactionInterceptor.invoke(TransactionInterceptor.java:94)<br>at org.springframework.aop.framework.ReflectiveMethodInvocation.proceed(ReflectiveMethodInvocation.java:172)<br>at org.springframework.aop.framework.CglibAopProxy$DynamicAdvisedInterceptor.intercept(CglibAopProxy.java:633)<br>at com.ninefbank.smallpay.clear.service.impl.OrgSettleFlowServiceImpl$$EnhancerBySpringCGLIB$$6b2e2fc1.isExistOrgSettleFlow(<generated>)<br>at com.ninefbank.smallpay.clear.util.FeeCountUtil.createOrgSettleFlow(FeeCountUtil.java:235)<br>- locked <0x000000078c795ed8> (a java.lang.Class for com.ninefbank.smallpay.clear.util.FeeCountUtil)<br>at com.ninefbank.smallpay.clear.writer.OuterReconWriter.saveTaskErrorInfo(OuterReconWriter.java:126)<br>- locked <0x0000000788061c30> (a com.ninefbank.smallpay.clear.writer.OuterReconWriter)<br>at com.ninefbank.smallpay.clear.tasklet.task.OuterReconWriterParallTask.call(OuterReconWriterParallTask.java:70)<br>at com.ninefbank.smallpay.clear.tasklet.task.OuterReconWriterParallTask.call(OuterReconWriterParallTask.java:35)<br>at java.util.concurrent.FutureTask.run(FutureTask.java:262)<br>at java.util.concurrent.ThreadPoolExecutor.runWorker(ThreadPoolExecutor.java:1145)<br>at java.util.concurrent.ThreadPoolExecutor$Worker.run(ThreadPoolExecutor.java:615)<br>at java.lang.Thread.run(Thread.java:745)<br><br>Locked ownable synchronizers:<br>- <0x000000078deebbf0> (a java.util.concurrent.ThreadPoolExecutor$Worker)<br><br>"Thread-69" prio=10 tid=0x00007f21f401c000 nid=0x12d9 waiting for monitor entry [0x00007f216ccd1000]<br>java.lang.Thread.State: BLOCKED (on object monitor)<br>at com.ninefbank.smallpay.clear.writer.OuterReconWriter.saveReconData(OuterReconWriter.java:169)<br>- waiting to lock <0x0000000788061c30> (a com.ninefbank.smallpay.clear.writer.OuterReconWriter)<br>at com.ninefbank.smallpay.clear.tasklet.task.OuterReconWriterParallTask.call(OuterReconWriterParallTask.java:68)<br>at com.ninefbank.smallpay.clear.tasklet.task.OuterReconWriterParallTask.call(OuterReconWriterParallTask.java:35)<br>at java.util.concurrent.FutureTask.run(FutureTask.java:262)<br>at java.util.concurrent.ThreadPoolExecutor.runWorker(ThreadPoolExecutor.java:1145)<br>at java.util.concurrent.ThreadPoolExecutor$Worker.run(ThreadPoolExecutor.java:615)<br>at java.lang.Thread.run(Thread.java:745)<br><br>Locked ownable synchronizers:<br>- <0x000000078defb298> (a java.util.concurrent.ThreadPoolExecutor$Worker)<br><br>"Thread-68" prio=10 tid=0x00007f21f401b000 nid=0x12d8 waiting for monitor entry [0x00007f216c7cc000]<br>java.lang.Thread.State: BLOCKED (on object monitor)<br>at com.ninefbank.smallpay.clear.writer.OuterReconWriter.saveReconData(OuterReconWriter.java:169)<br>- waiting to lock <0x0000000788061c30> (a com.ninefbank.smallpay.clear.writer.OuterReconWriter)<br>at com.ninefbank.smallpay.clear.tasklet.task.OuterReconWriterParallTask.call(OuterReconWriterParallTask.java:68)<br>at com.ninefbank.smallpay.clear.tasklet.task.OuterReconWriterParallTask.call(OuterReconWriterParallTask.java:35)<br>at java.util.concurrent.FutureTask.run(FutureTask.java:262)<br>at java.util.concurrent.ThreadPoolExecutor.runWorker(ThreadPoolExecutor.java:1145)<br>at java.util.concurrent.ThreadPoolExecutor$Worker.run(ThreadPoolExecutor.java:615)<br>at java.lang.Thread.run(Thread.java:745)<br><br>Locked ownable synchronizers:<br>- <0x000000078deec880> (a java.util.concurrent.ThreadPoolExecutor$Worker)<br></p></pre> </section> <p style="line-height: 1.5em;"><strong><span style="font-size: 17px;"></span></strong><br></p> <p style="line-height: 1.5em;"><span style="font-size: 16px;">从上述日志分析线程Thread-68、Thread-69都为阻塞状态,且阻塞状态</span></p> <p style="line-height: 1.5em;"><span style="font-size: 16px;"><br></span></p> <section class="output_wrapper" style="font-size: 16px;color: rgb(62, 62, 62);line-height: 1.6;word-spacing: 0px;letter-spacing: 0px;font-family: 'Helvetica Neue', Helvetica, 'Hiragino Sans GB', 'Microsoft YaHei', Arial, sans-serif;background-image: linear-gradient(90deg, rgba(50, 0, 0, 0.05) 3%, rgba(0, 0, 0, 0) 3%), linear-gradient(360deg, rgba(50, 0, 0, 0.05) 3%, rgba(0, 0, 0, 0) 3%);background-size: 20px 20px;background-position: center center;"> <pre style="font-size: inherit;color: inherit;line-height: inherit;margin: 0px;padding: 0px;"><p style="margin: 0px 2px;font-size: 14px;font-weight: normal;word-spacing: 0px;letter-spacing: 0px;font-family: Consolas, Inconsolata, Courier, monospace;border-radius: 0px;color: rgb(169, 183, 198);background: rgb(40, 43, 46) none repeat scroll 0% 0%;padding: 0.5em;display: block !important;white-space: pre !important;overflow-wrap: normal !important;word-break: normal !important;overflow: auto !important;line-height: 1.5em;">smallpay.clear.writer.OuterReconWriter.saveReconData(OuterReconWriter.java:169)<br></p></pre> </section> <p style="line-height: 1.5em;"><span style="font-size: 16px;"><br></span></p> <p style="line-height: 1.5em;"><span style="font-size: 16px;">所对应的代码主要体现在对账结果写入部分,另外从日志</span></p> <p style="line-height: 1.5em;"><span style="font-size: 16px;"><br></span></p> <section class="output_wrapper" style="font-size: 16px;color: rgb(62, 62, 62);line-height: 1.6;word-spacing: 0px;letter-spacing: 0px;font-family: 'Helvetica Neue', Helvetica, 'Hiragino Sans GB', 'Microsoft YaHei', Arial, sans-serif;background-image: linear-gradient(90deg, rgba(50, 0, 0, 0.05) 3%, rgba(0, 0, 0, 0) 3%), linear-gradient(360deg, rgba(50, 0, 0, 0.05) 3%, rgba(0, 0, 0, 0) 3%);background-size: 20px 20px;background-position: center center;"> <pre style="font-size: inherit;color: inherit;line-height: inherit;margin: 0px;padding: 0px;"><p style="margin: 0px 2px;font-size: 14px;font-weight: normal;word-spacing: 0px;letter-spacing: 0px;font-family: Consolas, Inconsolata, Courier, monospace;border-radius: 0px;color: rgb(169, 183, 198);background: rgb(40, 43, 46) none repeat scroll 0% 0%;padding: 0.5em;display: block !important;white-space: pre !important;overflow-wrap: normal !important;word-break: normal !important;overflow: auto !important;line-height: 1.5em;">- locked <0x0000000786f9a650> (a com.mysql.jdbc.JDBC4Connection)<br></p></pre> </section> <p style="line-height: 1.5em;"><span style="font-size: 16px;"></span><br></p> <p style="line-height: 1.5em;"><span style="font-size: 16px;">所以此时很容易觉得问题出现在连接池与MySQL数据库本身的问题上。按照这个思路(JVM日志很丰富,去伪存真,往往需要尝试与不断试错),开始了对连接池本身及MySQL本身问题的排查(Google),以下为几种Google结果链接及原因概述。</span></p> <p style="line-height: 1.5em;"><span style="font-size: 16px;"><br></span></p> <p style="text-align: left;line-height: 1.5em;"><strong><span style="font-size: 16px;">1)、网络原因&MySQL设置&换连接池</span></strong><span style="font-size: 16px;"></span></p> <p style="text-align: left;line-height: 1.5em;"><span style="font-size: 16px;"><span class="invisible">http://www.</span><span class="visible">cnblogs.com/zhukunrong/</span><span class="invisible">p/4525955.html</span></span></p> <p style="text-align: left;line-height: 1.5em;"><span style="font-size: 16px;"><span class="invisible">http://</span><span class="visible">blog.csdn.net/cnhnnyzhy</span><span class="invisible">/article/details/50753025</span><br></span></p> <p style="text-align: left;line-height: 1.5em;"><span style="font-size: 16px;">在以上链接所述的原因中,重点是说了MySQL及网络方面的原因。针对这种叙述,与运维大哥沟通后调取了阿里云RDS MySQL实例的参数设置,如下:<br></span></p> <p style="text-align: left;line-height: 1.5em;"><span style="font-size: 16px;"><br></span></p> <section class="output_wrapper" style="font-size: 16px;color: rgb(62, 62, 62);line-height: 1.6;word-spacing: 0px;letter-spacing: 0px;font-family: 'Helvetica Neue', Helvetica, 'Hiragino Sans GB', 'Microsoft YaHei', Arial, sans-serif;background-image: linear-gradient(90deg, rgba(50, 0, 0, 0.05) 3%, rgba(0, 0, 0, 0) 3%), linear-gradient(360deg, rgba(50, 0, 0, 0.05) 3%, rgba(0, 0, 0, 0) 3%);background-size: 20px 20px;background-position: center center;"> <pre style="font-size: inherit;color: inherit;line-height: inherit;margin: 0px;padding: 0px;"><p style="margin: 0px 2px;font-size: 14px;font-weight: normal;word-spacing: 0px;letter-spacing: 0px;font-family: Consolas, Inconsolata, Courier, monospace;border-radius: 0px;color: rgb(169, 183, 198);background: rgb(40, 43, 46) none repeat scroll 0% 0%;padding: 0.5em;display: block !important;white-space: pre !important;overflow-wrap: normal !important;word-break: normal !important;overflow: auto !important;line-height: 1.5em;">show global variables like '%timeout%'<br></p></pre> </section> <p style="text-align: left;line-height: 1.5em;"><span style="font-size: 16px;"></span><br></p> <p style="text-align: left;line-height: 1.5em;"><span style="font-size: 16px;">最后一个参数wait_timeout表明Mysql服务器与客户端连接空闲自动断开的超时时间为24小时,也就是说只有连接在与MySQL服务器连接后24小时内无任何操作,MySQL服务器才会主动断开与客户端(这里为应用连接池中与MySQL数据库建立的连接),然而对于应用来说,这种可能性基本不存在,况且大多数连接池配置都有对连接是否可用以及自动探测连接的配置。</span></p> <p style="text-align: left;line-height: 1.5em;"><span style="font-size: 16px;"><br></span></p> <p style="text-align: left;line-height: 1.5em;"><span style="font-size: 16px;">查看应用连接池配置:</span></p> <p><br></p> <section class="output_wrapper" style="font-size: 16px;color: rgb(62, 62, 62);line-height: 1.6;word-spacing: 0px;letter-spacing: 0px;font-family: 'Helvetica Neue', Helvetica, 'Hiragino Sans GB', 'Microsoft YaHei', Arial, sans-serif;background-image: linear-gradient(90deg, rgba(50, 0, 0, 0.05) 3%, rgba(0, 0, 0, 0) 3%), linear-gradient(360deg, rgba(50, 0, 0, 0.05) 3%, rgba(0, 0, 0, 0) 3%);background-size: 20px 20px;background-position: center center;"> <pre style="font-size: inherit;color: inherit;line-height: inherit;margin: 0px;padding: 0px;"><p style="margin: 0px 2px;font-size: 14px;font-weight: normal;word-spacing: 0px;letter-spacing: 0px;font-family: Consolas, Inconsolata, Courier, monospace;border-radius: 0px;color: rgb(169, 183, 198);background: rgb(40, 43, 46) none repeat scroll 0% 0%;padding: 0.5em;display: block !important;white-space: pre !important;overflow-wrap: normal !important;word-break: normal !important;overflow: auto !important;line-height: 1.5em;"><property name="timeBetweenEvictionRunsMillis" value="3000" /><br><property name="minEvictableIdleTimeMillis" value="300000" /><br><property name="validationQuery" value="SELECT 'x'" /><br><property name="testWhileIdle" value="true" /><br><property name="testOnBorrow" value="true" /><br><property name="testOnReturn" value="true" /><br><property name="poolPreparedStatements" value="false" /><br><property name="maxPoolPreparedStatementPerConnectionSize" value="-1" /><br></p></pre> </section> <p><br></p> <p style="text-align: left;line-height: 1.5em;"><span style="font-size: 16px;">按照上述配置基本上不会出现连接长时间与MySQL服务器无任何交互的可能性,除非连接池本身的处理存在问题(druid连接池为阿里高性能数据库连接池),但是出于怀疑的态度,按照链接中的说法druid在处理长时间连接等待方面可能不如c3p0好,也不排除druid本身存在问题。但出于谨慎角度,并没有立刻采用对连接池进行替换的措施,而是将焦点转移到应用服务器与MySQL服务器网络连接上(也确实有人是因为网络防火墙设置导致出现此类问题的)。</span></p> <p style="text-align: left;line-height: 1.5em;"><span style="font-size: 16px;"><br></span></p> <p style="text-align: left;line-height: 1.5em;"><strong><span style="font-size: 16px;">2)、网络连接参数调整</span></strong><span style="font-size: 16px;"><br><span class="invisible">http://</span><span class="visible">m.blog.csdn.net/article</span><span class="invisible">/details?id=49018865</span><br><span class="invisible">http://</span><span class="visible">m.oschina.net/question/</span><span class="invisible">121401_47863</span><br>由于阿里云底层网络结构并不对用户透明,且遇到问题的应用存在批量大数据插入的使用场景,确实是存在TCP缓冲区不够的可能性,通过对MySQL官方文档相关章节的阅读,MySQL连接串参数中确实提供了tcpRcvBuf这样的参数,其对该参数的说明是:“connecting using TCP/IP, should the driver set SO_RCV_BUF to the given value? The default value of '0', means use the platform default value for this property)”。</span></p> <p style="text-align: left;line-height: 1.5em;"><span style="font-size: 16px;">于是觉得这种可能性会相对大些,所以在线上调整了连接参数而并没有更换连接池(如若不行,可再尝试替换连接池),参数调整如下:<br></span></p> <p style="text-align: left;line-height: 1.5em;"><span style="font-size: 16px;"><br></span></p> <section class="output_wrapper" style="font-size: 16px;color: rgb(62, 62, 62);line-height: 1.6;word-spacing: 0px;letter-spacing: 0px;font-family: 'Helvetica Neue', Helvetica, 'Hiragino Sans GB', 'Microsoft YaHei', Arial, sans-serif;background-image: linear-gradient(90deg, rgba(50, 0, 0, 0.05) 3%, rgba(0, 0, 0, 0) 3%), linear-gradient(360deg, rgba(50, 0, 0, 0.05) 3%, rgba(0, 0, 0, 0) 3%);background-size: 20px 20px;background-position: center center;"> <pre style="font-size: inherit;color: inherit;line-height: inherit;margin: 0px;padding: 0px;"><p style="margin: 0px 2px;font-size: 14px;font-weight: normal;word-spacing: 0px;letter-spacing: 0px;font-family: Consolas, Inconsolata, Courier, monospace;border-radius: 0px;color: rgb(169, 183, 198);background: rgb(40, 43, 46) none repeat scroll 0% 0%;padding: 0.5em;display: block !important;white-space: pre !important;overflow-wrap: normal !important;word-break: normal !important;overflow: auto !important;line-height: 1.5em;">jdbc:mysql://xxx.xxx.xx.xx:3306/xx?useUnicode=true&characterEncoding=UTF-8&tcpRcvBuf=1024000&autoReconnect=true&failOverReadOnly=false&connectTimeout=0<br></p></pre> </section> <p style="text-align: left;line-height: 1.5em;"><span style="font-size: 16px;"></span><br></p> <p style="text-align: left;line-height: 1.5em;"><span style="font-size: 16px;">连接TCP缓冲区的大小被调整为1M。</span></p> <p style="line-height: 1.5em;"><span style="font-size: 16px;"><br></span></p> <p style="line-height: 1.5em;"><strong><span style="font-size: 17px;">对线程栈日志分析(2)</span></strong></p> <p style="line-height: 1.5em;"><strong><span style="font-size: 17px;"><br></span></strong></p> <p style="line-height: 1.5em;"><span style="font-size: 16px;">在4中通过对网络连接参数的调整后,并没有起到作用,于是对线程栈日志再次进行了调取,并进行了地毯式阅读,终于发现了问题的症结:</span></p> <p style="line-height: 1.5em;"><span style="font-size: 16px;"><br></span></p> <section class="output_wrapper" style="font-size: 16px;color: rgb(62, 62, 62);line-height: 1.6;word-spacing: 0px;letter-spacing: 0px;font-family: 'Helvetica Neue', Helvetica, 'Hiragino Sans GB', 'Microsoft YaHei', Arial, sans-serif;background-image: linear-gradient(90deg, rgba(50, 0, 0, 0.05) 3%, rgba(0, 0, 0, 0) 3%), linear-gradient(360deg, rgba(50, 0, 0, 0.05) 3%, rgba(0, 0, 0, 0) 3%);background-size: 20px 20px;background-position: center center;"> <pre style="font-size: inherit;color: inherit;line-height: inherit;margin: 0px;padding: 0px;"><p style="margin: 0px 2px;font-size: 14px;font-weight: normal;word-spacing: 0px;letter-spacing: 0px;font-family: Consolas, Inconsolata, Courier, monospace;border-radius: 0px;color: rgb(169, 183, 198);background: rgb(40, 43, 46) none repeat scroll 0% 0%;padding: 0.5em;display: block !important;white-space: pre !important;overflow-wrap: normal !important;word-break: normal !important;overflow: auto !important;text-align: left;line-height: 1.5em;">at com.ninefbank.smallpay.clear.service.impl.OrgSettleFlowServiceImpl$$EnhancerBySpringCGLIB$$5775a83.isExistOrgSettleFlow(<generated>)<br>at com.ninefbank.smallpay.clear.util.FeeCountUtil.createOrgSettleFlow(FeeCountUtil.java:235)<br>- locked <0x000000078b4d8e98> (a java.lang.Class for com.ninefbank.smallpay.clear.util.FeeCountUtil)<br>at com.ninefbank.smallpay.clear.writer.OuterReconWriter.saveTaskErrorInfo(OuterReconWriter.java:126)<br>- locked <0x00000007880399f0> (a com.ninefbank.smallpay.clear.writer.OuterReconWriter)<br>at com.ninefbank.smallpay.clear.tasklet.task.OuterReconWriterParallTask.call(OuterReconWriterParallTask.java:70)<br>at com.ninefbank.smallpay.clear.tasklet.task.OuterReconWriterParallTask.call(OuterReconWriterPara<br></p></pre> </section> <p><br></p> <p style="line-height: 1.5em;"><span style="font-size: 16px;"></span></p> <p style="line-height: 1.5em;"><span style="font-size: 16px;">通过对比多日问题时段的线程栈日志,发现都存在两处代码都指向同一个方法,即isExistOrgSettleFlow,于是找到代码所对应的方法,发现是由于该方法高频访问了一个未加相关索引的大数据表,导致方法本身的执行存在阻塞及锁住的情况,占用了大量连接资源,从而导致4中所看到的其他方法拿不到数据库连接出现长时间等待,甚至超时的情况。加上索引后,隔日观察问题消失。</span></p> <p style="line-height: 1.5em;"><span style="font-size: 16px;"><br></span></p> <p style="line-height: 1.5em;"><span style="font-size: 17px;"><strong>总结</strong></span></p> <p style="line-height: 1.5em;"><span style="font-size: 17px;"><strong><br></strong></span></p> <ul style="list-style-type: disc;" class=" list-paddingleft-2"> <li><p style="text-align: left;line-height: 1.5em;"><span style="font-size: 16px;">对陌生问题的分析,需要通过各类分析手段从而找到问题所在并进行解决(这其中需要运用各类分析工具Linux命令、JDK命令、网络命令等等);</span></p></li> </ul> <p style="text-align: left;line-height: 1.5em;"><span style="font-size: 16px;"><br></span></p> <ul style="list-style-type: disc;" class=" list-paddingleft-2"> <li><p style="text-align: left;line-height: 1.5em;"><span style="font-size: 16px;">要心存思辨之心,对传统的权威的东西在敬畏的同时也要大胆的怀疑并进行分析、尝试,切不可畏惧不前;</span></p></li> </ul> <p style="text-align: left;line-height: 1.5em;"><span style="font-size: 16px;"><br></span></p> <ul style="list-style-type: disc;" class=" list-paddingleft-2"> <li><p style="text-align: left;line-height: 1.5em;"><span style="font-size: 16px;">在编码方面,对代码类、方法的命名一定要合理、规范,不然日后出现疑难问题在排查时,会给人造成错觉从而延长解决时间;</span></p></li> </ul> <p style="line-height: 1.5em;"><span style="font-size: 16px;"><br></span></p> <p style="line-height: 1.5em;"><span style="font-size: 16px;"><br></span></p> <p style="max-width: 100%;min-height: 1em;letter-spacing: 0.544px;white-space: normal;text-align: center;box-sizing: border-box !important;overflow-wrap: break-word !important;line-height: 1.5em;"><span style="max-width: 100%;font-family: Avenir, -apple-system-font, 微软雅黑, sans-serif;letter-spacing: 0.544px;color: rgb(137, 135, 145);font-size: 16px;box-sizing: border-box !important;word-wrap: break-word !important;overflow-wrap: break-word !important;">—————END—————</span></p> <p class="" style="max-width: 100%;min-height: 1em;letter-spacing: 0.544px;white-space: normal;text-align: center;box-sizing: border-box !important;word-wrap: break-word !important;"><br style="max-width: 100%;box-sizing: border-box !important;word-wrap: break-word !important;"></p> <p style="max-width: 100%;min-height: 1em;letter-spacing: 0.544px;text-indent: 0em;white-space: normal;word-spacing: 2px;font-family: Avenir, -apple-system-font, 微软雅黑, sans-serif;text-align: center;box-sizing: border-box !important;overflow-wrap: break-word !important;line-height: 1.5em;"><img class="" data-copyright="0" data-ratio="1" data-s="300,640" data-type="jpeg" data-w="258" style="font-family: -apple-system-font, BlinkMacSystemFont, "Helvetica Neue", "PingFang SC", "Hiragino Sans GB", "Microsoft YaHei UI", "Microsoft YaHei", Arial, sans-serif;letter-spacing: 0.544px;text-indent: 0em;border-radius: 4px;box-sizing: border-box !important;overflow-wrap: break-word !important;visibility: visible !important;width: 258px !important;height: auto !important;" src="/upload/b5b5c2f05535c1a82d6645d73092e98f.jpg"><br></p> <p style="margin-top: 15px;margin-right: 8px;margin-left: 8px;max-width: 100%;min-height: 1em;font-variant-numeric: normal;font-variant-east-asian: normal;white-space: normal;background-color: rgb(255, 255, 255);font-size: 16px;text-align: center;letter-spacing: 1px;box-sizing: border-box !important;overflow-wrap: break-word !important;line-height: 1.5em;"><span style="max-width: 100%;box-sizing: border-box !important;word-wrap: break-word !important;overflow-wrap: break-word !important;"><span style="max-width: 100%;color: rgb(127, 127, 127);line-height: 1.75em;">识别图片二维码,关注“</span><span style="max-width: 100%;line-height: 1.75em;color: rgb(0, 176, 240);">无敌码农</span><span style="max-width: 100%;color: rgb(127, 127, 127);line-height: 1.75em;">”获取精彩内容</span></span></p>
作者:じ☆ve宝贝
## Java使用mysql-jdbc连接MySQL出现如下警告: Establishing SSL connection without server's identity verification is not recommended. According to MySQL 5.5.45+, 5.6.26+ and 5.7.6+ requirements SSL connection must be established by default if explicit option isn't set. For compliance with existing applications not using SSL the verifyServerCertificate property is set to 'false'. You need either to explicitly disable SSL by setting useSSL=false, or set useSSL=true and provide truststore for server certificate verification. ##解决方案: 在mysql连接字符串url中加入ssl=true或者false即可,如下所示。 ` url=jdbc:mysql://127.0.0.1:3306/studyjava?characterEncoding=utf8&useSSL=true `
作者:微信小助手
<section class="" mpa-from-tpl="t" data-mpa-powered-by="yiban.io"> <section style="text-align: left;margin-left: 16px;margin-right: 16px;margin-bottom: 20px;line-height: 1.75em;"></section> <section style="text-align: left;margin-left: 16px;margin-right: 16px;margin-bottom: 20px;line-height: 1.75em;"></section> </section> <section style="margin-right: 16px;margin-bottom: 20px;margin-left: 16px;font-family: -apple-system-font, BlinkMacSystemFont, "Helvetica Neue", "PingFang SC", "Hiragino Sans GB", "Microsoft YaHei UI", "Microsoft YaHei", Arial, sans-serif;letter-spacing: 0.544px;white-space: normal;background-color: rgb(255, 255, 255);text-align: left;line-height: 1.75em;"> <img class="" data-copyright="0" data-ratio="0.4" data-s="300,640" data-type="png" data-w="750" src="/upload/f65931186c03d7e3c9feec291b6e213f.null" style="color: rgb(0, 0, 0);font-size: medium;letter-spacing: 0.544px;text-align: justify;visibility: visible !important;width: auto !important;"> <br> </section> <p style="margin-right: 16px;margin-bottom: 20px;margin-left: 16px;font-family: -apple-system-font, BlinkMacSystemFont, "Helvetica Neue", "PingFang SC", "Hiragino Sans GB", "Microsoft YaHei UI", "Microsoft YaHei", Arial, sans-serif;letter-spacing: 0.544px;white-space: normal;background-color: rgb(255, 255, 255);line-height: 1.75em;text-align: center;"><span style="color: rgb(0, 122, 170);font-size: 13px;">源 /</span><span style="color: rgb(64, 62, 62);font-size: 13px;"> </span><span style="color: rgb(136, 136, 136);font-family: -apple-system-font, system-ui, "Helvetica Neue", "PingFang SC", "Hiragino Sans GB", "Microsoft YaHei UI", "Microsoft YaHei", Arial, sans-serif;font-size: 13px;">良许Linux <span style="font-family: -apple-system-font, BlinkMacSystemFont, "Helvetica Neue", "PingFang SC", "Hiragino Sans GB", "Microsoft YaHei UI", "Microsoft YaHei", Arial, sans-serif;letter-spacing: 0.544px;color: rgb(0, 122, 170);">作者 /</span><span style="font-family: -apple-system-font, BlinkMacSystemFont, "Helvetica Neue", "PingFang SC", "Hiragino Sans GB", "Microsoft YaHei UI", "Microsoft YaHei", Arial, sans-serif;letter-spacing: 0.544px;color: rgb(64, 62, 62);"> </span><span style="letter-spacing: 0.544px;">杨玉杰</span></span></p> <section style="text-align: left;margin-left: 16px;margin-right: 16px;margin-bottom: 20px;line-height: 1.75em;"> <span style="color: rgb(64, 62, 62);font-size: 15px;">去年上半年开始全面使用linux进行开发和娱乐了,现在已经回不去windows了。</span> <br> </section> <section style="text-align: left;margin-left: 16px;margin-right: 16px;margin-bottom: 20px;line-height: 1.75em;"> <span style="font-size: 15px;color: rgb(64, 62, 62);">话归正传,在linux上一直使用vim,慢慢熟悉了它的命令,才终于领悟了什么是编辑器之神。</span> </section> <section style="text-align: left;margin-left: 16px;margin-right: 16px;margin-bottom: 20px;line-height: 1.75em;"> <span style="font-size: 15px;color: rgb(64, 62, 62);">最近抽空整理了这份速查表,收获颇丰,并分享给大家。</span> </section> <section data-role="outer" label="Powered by 135editor.com"> <section class="" data-tools="135编辑器" data-id="89226"> <section> <section style="text-align: center;margin-left: 16px;margin-right: 16px;margin-bottom: 20px;line-height: 1.75em;"> <strong><span style="color: rgb(255, 120, 0);"><span style="font-size: 15px;">进入vim</span></span></strong> </section> </section> </section> </section> <section style="text-align: center;margin-left: 16px;margin-right: 16px;margin-bottom: 20px;line-height: 1.75em;"> <strong><img class="" data-ratio="0.43622047244094486" data-s="300,640" data-type="png" data-w="635" src="/upload/cb715b1b513f985c8f30460b840e477f.png" style="box-shadow: rgb(170, 170, 170) 0px 0px 14px 0px;border-radius: 24px;width: 632px !important;visibility: visible !important;"></strong> </section> <section data-role="outer" label="Powered by 135editor.com"> <section class="" data-tools="135编辑器" data-id="89226"> <section> <section style="text-align: center;margin-left: 16px;margin-right: 16px;margin-bottom: 20px;line-height: 1.75em;"> <strong><span style="color: rgb(255, 120, 0);"><span style="color: rgb(255, 120, 0);font-size: 15px;">vim配置</span></span></strong> </section> </section> </section> </section> <section style="text-align: center;margin-left: 16px;margin-right: 16px;margin-bottom: 20px;line-height: 1.75em;"> <strong><img class="" data-ratio="1.377567140600316" data-s="300,640" data-type="png" data-w="633" src="/upload/b7836328a912af85f06c6d60094a82c8.png" style="box-shadow: rgb(170, 170, 170) 0px 0px 14px 0px;border-radius: 24px;width: 632px !important;visibility: visible !important;"></strong> </section> <section data-role="outer" label="Powered by 135editor.com"> <section class="" data-tools="135编辑器" data-id="89226"> <section> <section style="text-align: center;margin-left: 16px;margin-right: 16px;margin-bottom: 20px;line-height: 1.75em;"> <strong><span style="font-size: 15px;color: rgb(255, 120, 0);">移动光标</span></strong> </section> </section> </section> </section> <section style="text-align: center;margin-left: 16px;margin-right: 16px;margin-bottom: 20px;line-height: 1.75em;"> <strong><img class="" data-ratio="1.7278481012658229" data-s="300,640" data-type="png" data-w="632" src="/upload/57407bd929e56b89dd823ebef7ba2183.png" style="box-shadow: rgb(170, 170, 170) 0px 0px 14px 0px;border-radius: 28px;width: 632px !important;visibility: visible !important;"></strong> </section> <section data-role="outer" label="Powered by 135editor.com"> <section class="" data-tools="135编辑器" data-id="89226"> <section> <section style="text-align: center;margin-left: 16px;margin-right: 16px;margin-bottom: 20px;line-height: 1.75em;"> <strong><span style="font-size: 15px;color: rgb(255, 120, 0);">屏幕滚动</span></strong> </section> </section> </section> </section> <section style="text-align: center;margin-left: 16px;margin-right: 16px;margin-bottom: 20px;line-height: 1.75em;"> <strong><img class="" data-ratio="0.37756714060031593" data-s="300,640" data-type="png" data-w="633" src="/upload/95bd35317b188df853c3866aa2b2a833.png" style="box-shadow: rgb(170, 170, 170) 0px 0px 14px 0px;border-radius: 24px;width: 632px !important;visibility: visible !important;"></strong> </section> <section data-role="outer" label="Powered by 135editor.com"> <section class="" data-tools="135编辑器" data-id="89226"> <section> <section style="text-align: center;margin-left: 16px;margin-right: 16px;margin-bottom: 20px;line-height: 1.75em;"> <strong><span style="font-size: 15px;color: rgb(255, 120, 0);">插入文本类</span></strong> </section> </section> </section> </section> <section style="text-align: center;margin-left: 16px;margin-right: 16px;margin-bottom: 20px;line-height: 1.75em;"> <strong><img class="" data-ratio="0.786053882725832" data-s="300,640" data-type="png" data-w="631" src="/upload/478f69ff5bcb7b23f0db890ce9daba6a.png" style="box-shadow: rgb(170, 170, 170) 0px 0px 14px 0px;border-radius: 28px;width: 631px !important;visibility: visible !important;"></strong> </section> <section data-role="outer" label="Powered by 135editor.com"> <section class="" data-tools="135编辑器" data-id="89226"> <section> <section style="text-align: center;margin-left: 16px;margin-right: 16px;margin-bottom: 20px;line-height: 1.75em;"> <strong><span style="font-size: 15px;color: rgb(255, 120, 0);">删除命令</span></strong> </section> </section> </section> </section> <section style="text-align: center;margin-left: 16px;margin-right: 16px;margin-bottom: 20px;line-height: 1.75em;"> <strong><img class="" data-ratio="1.0125984251968505" data-s="300,640" data-type="png" data-w="635" src="/upload/c27f578446fccc577d3c552fe8fb8d44.png" style="box-shadow: rgb(170, 170, 170) 0px 0px 14px 0px;border-radius: 28px;width: 632px !important;visibility: visible !important;"></strong> </section> <section data-role="outer" label="Powered by 135editor.com"> <section class="" data-tools="135编辑器" data-id="89226"> <section> <section style="text-align: center;margin-left: 16px;margin-right: 16px;margin-bottom: 20px;line-height: 1.75em;"> <strong><span style="font-size: 15px;color: rgb(255, 120, 0);">复制粘贴</span></strong> </section> </section> </section> </section> <section style="text-align: center;margin-left: 16px;margin-right: 16px;margin-bottom: 20px;line-height: 1.75em;"> <strong><img class="" data-ratio="0.4344391785150079" data-s="300,640" data-type="png" data-w="633" src="/upload/7fd64ce88059c65393eac851c9f98ec3.png" style="box-shadow: rgb(170, 170, 170) 0px 0px 14px 0px;border-radius: 28px;width: 632px !important;visibility: visible !important;"></strong> </section> <section data-role="outer" label="Powered by 135editor.com"> <section class="" data-tools="135编辑器" data-id="89226"> <section> <section style="text-align: center;margin-left: 16px;margin-right: 16px;margin-bottom: 20px;line-height: 1.75em;"> <strong><span style="font-size: 15px;color: rgb(255, 120, 0);">撤销</span></strong> </section> </section> </section> </section> <section style="text-align: center;margin-left: 16px;margin-right: 16px;margin-bottom: 20px;line-height: 1.75em;"> <strong><img class="" data-ratio="0.20063694267515925" data-s="300,640" data-type="png" data-w="628" src="/upload/e4e6f478f43dca468c15747c6eed085a.png" style="box-shadow: rgb(170, 170, 170) 0px 0px 14px 0px;border-radius: 28px;width: 628px !important;visibility: visible !important;"></strong> </section> <section data-role="outer" label="Powered by 135editor.com"> <section class="" data-tools="135编辑器" data-id="89226"> <section> <section style="text-align: center;margin-left: 16px;margin-right: 16px;margin-bottom: 20px;line-height: 1.75em;"> <strong><span style="font-size: 15px;color: rgb(255, 120, 0);">搜索及替换</span></strong> </section> </section> </section> </section> <section style="text-align: center;margin-left: 16px;margin-right: 16px;margin-bottom: 20px;line-height: 1.75em;"> <strong><img class="" data-ratio="0.7222222222222222" data-s="300,640" data-type="png" data-w="630" src="/upload/20a753241fbda91151e62112b9b94f67.png" style="box-shadow: rgb(170, 170, 170) 0px 0px 14px 0px;border-radius: 28px;width: 630px !important;visibility: visible !important;"></strong> </section> <section data-role="outer" label="Powered by 135editor.com"> <section class="" data-tools="135编辑器" data-id="89226"> <section> <section style="text-align: center;margin-left: 16px;margin-right: 16px;margin-bottom: 20px;line-height: 1.75em;"> <strong><span style="font-size: 15px;color: rgb(255, 120, 0);">书签</span></strong> </section> </section> </section> </section> <section style="text-align: center;margin-left: 16px;margin-right: 16px;margin-bottom: 20px;line-height: 1.75em;"> <strong><img class="" data-ratio="0.19873817034700317" data-s="300,640" data-type="png" data-w="634" src="/upload/f60a6209eecd5a9d77c28dc47cbbd9b4.png" style="box-shadow: rgb(170, 170, 170) 0px 0px 14px 0px;border-radius: 24px;width: 632px !important;visibility: visible !important;"></strong> </section> <section data-role="outer" label="Powered by 135editor.com"> <section class="" data-tools="135编辑器" data-id="89226"> <section> <section style="text-align: center;margin-left: 16px;margin-right: 16px;margin-bottom: 20px;line-height: 1.75em;"> <strong><span style="font-size: 15px;color: rgb(255, 120, 0);">visual模式</span></strong> </section> </section> </section> </section> <section style="text-align: center;margin-left: 16px;margin-right: 16px;margin-bottom: 20px;line-height: 1.75em;"> <strong><img class="" data-ratio="0.37400950871632327" data-s="300,640" data-type="png" data-w="631" src="/upload/130df9a4786ee524c26be1ff879918b3.png" style="box-shadow: rgb(170, 170, 170) 0px 0px 14px 0px;border-radius: 24px;width: 631px !important;visibility: visible !important;"></strong> </section> <section data-role="outer" label="Powered by 135editor.com"> <section class="" data-tools="135编辑器" data-id="89226"> <section> <section style="text-align: center;margin-left: 16px;margin-right: 16px;margin-bottom: 20px;line-height: 1.75em;"> <strong><span style="font-size: 15px;color: rgb(255, 120, 0);">行方式命令</span></strong> </section> </section> </section> </section> <section style="text-align: center;margin-left: 16px;margin-right: 16px;margin-bottom: 20px;line-height: 1.75em;"> <strong><img class="" data-ratio="0.314873417721519" data-s="300,640" data-type="png" data-w="632" src="/upload/9ac4b7cc840bb6623beb017408cc9a99.png" style="box-shadow: rgb(170, 170, 170) 0px 0px 14px 0px;border-radius: 28px;width: 632px !important;visibility: visible !important;"></strong> </section> <section style="text-align: left;margin-left: 16px;margin-right: 16px;margin-bottom: 20px;line-height: 1.75em;"> <span style="color: rgb(64, 62, 62);"><span style="font-size: 15px;">若不指定n1,n2,则表示将整个文件内容作为command的输入 |</span></span> <strong><span style="font-size: 15px;color: rgb(255, 120, 0);"></span></strong> </section> <section data-role="outer" label="Powered by 135editor.com"> <section class="" data-tools="135编辑器" data-id="89226"> <section> <section style="text-align: center;margin-left: 16px;margin-right: 16px;margin-bottom: 20px;line-height: 1.75em;"> <strong><span style="font-size: 15px;color: rgb(255, 120, 0);">宏</span></strong> </section> </section> </section> </section> <section style="text-align: center;margin-left: 16px;margin-right: 16px;margin-bottom: 20px;line-height: 1.75em;"> <strong><img class="" data-ratio="0.1962025316455696" data-s="300,640" data-type="png" data-w="632" src="/upload/b71c7afebc1c908fafe7bcdb1f65ae3c.png" style="box-shadow: rgb(170, 170, 170) 0px 0px 14px 0px;border-radius: 28px;width: 632px !important;visibility: visible !important;"></strong> </section> <section data-role="outer" label="Powered by 135editor.com"> <section class="" data-tools="135编辑器" data-id="89226"> <section> <section style="text-align: center;margin-left: 16px;margin-right: 16px;margin-bottom: 20px;line-height: 1.75em;"> <strong><span style="font-size: 15px;color: rgb(255, 120, 0);">窗口操作</span></strong> </section> </section> </section> </section> <section style="text-align: center;margin-left: 16px;margin-right: 16px;margin-bottom: 20px;line-height: 1.75em;"> <strong><img class="" data-ratio="0.3696682464454976" data-s="300,640" data-type="png" data-w="633" src="/upload/ad3eadff4b0da964d0200708c8d59e9f.png" style="box-shadow: rgb(170, 170, 170) 0px 0px 14px 0px;border-radius: 32px;width: 632px !important;visibility: visible !important;"></strong> </section> <section data-role="outer" label="Powered by 135editor.com"> <section class="" data-tools="135编辑器" data-id="89226"> <section> <section style="text-align: center;margin-left: 16px;margin-right: 16px;margin-bottom: 20px;line-height: 1.75em;"> <strong><span style="font-size: 15px;color: rgb(255, 120, 0);">文件及其他</span></strong> </section> </section> </section> </section> <section style="text-align: center;margin-left: 16px;margin-right: 16px;margin-bottom: 20px;line-height: 1.75em;"> <strong><img class="" data-ratio="0.7233704292527822" data-s="300,640" data-type="png" data-w="629" src="/upload/1bdbcff2b7e77188cfed8c54f8187ad1.png" style="z-index: -1;cursor: pointer;box-shadow: rgb(170, 170, 170) 0px 0px 14px 0px;border-radius: 32px;width: 629px !important;visibility: visible !important;"></strong> </section> <p style="margin-right: 16px;margin-bottom: 20px;margin-left: 16px;font-family: -apple-system-font, BlinkMacSystemFont, "Helvetica Neue", "PingFang SC", "Hiragino Sans GB", "Microsoft YaHei UI", "Microsoft YaHei", Arial, sans-serif;letter-spacing: 0.544px;white-space: normal;background-color: rgb(255, 255, 255);font-size: medium;color: rgb(0, 0, 0);text-align: center;line-height: 1.75em;"><span style="color: rgb(136, 136, 136);font-size: 15px;"><strong mpa-from-tpl="t" style="color: rgb(0, 122, 170);">-END-</strong></span></p> <p style="margin-right: 16px;margin-bottom: 10px;margin-left: 16px;font-family: -apple-system-font, BlinkMacSystemFont, "Helvetica Neue", "PingFang SC", "Hiragino Sans GB", "Microsoft YaHei UI", "Microsoft YaHei", Arial, sans-serif;letter-spacing: 0.544px;white-space: normal;background-color: rgb(255, 255, 255);text-align: center;line-height: normal;"><strong><span style="color: rgb(255, 120, 0);font-size: 15px;">【读者福利】9.9元Python编程课</span></strong></p> <p style="margin-right: 16px;margin-bottom: 10px;margin-left: 16px;font-family: -apple-system-font, BlinkMacSystemFont, "Helvetica Neue", "PingFang SC", "Hiragino Sans GB", "Microsoft YaHei UI", "Microsoft YaHei", Arial, sans-serif;letter-spacing: 0.544px;white-space: normal;background-color: rgb(255, 255, 255);text-align: center;line-height: normal;"><strong><span style="font-size: 15px;color: rgb(255, 120, 0);">专为零基础小白打造</span></strong></p> <p style="margin-right: 16px;margin-bottom: 10px;margin-left: 16px;font-family: -apple-system-font, BlinkMacSystemFont, "Helvetica Neue", "PingFang SC", "Hiragino Sans GB", "Microsoft YaHei UI", "Microsoft YaHei", Arial, sans-serif;letter-spacing: 0.544px;white-space: normal;background-color: rgb(255, 255, 255);text-align: center;line-height: normal;"><strong><span style="font-size: 15px;color: rgb(255, 120, 0);">学Python就像打游戏</span><span style="font-size: 15px;color: rgb(255, 120, 0);"></span></strong></p> <p style="margin-right: 16px;margin-bottom: 10px;margin-left: 16px;font-family: -apple-system-font, BlinkMacSystemFont, "Helvetica Neue", "PingFang SC", "Hiragino Sans GB", "Microsoft YaHei UI", "Microsoft YaHei", Arial, sans-serif;letter-spacing: 0.544px;white-space: normal;background-color: rgb(255, 255, 255);text-align: center;line-height: normal;"><strong><span style="font-size: 15px;color: rgb(255, 120, 0);"><strong>⏰</strong>限时24h,速速抢购👇</span></strong></p> <p style="text-align: center;"><img class="rich_pages" data-copyright="0" data-ratio="1.7777777777777777" data-s="300,640" src="/upload/2a51a49db2c294467d79ab6ada3b248d.jpg" data-type="jpeg" data-w="720" style="box-shadow: rgb(170, 170, 170) 0em 0em 1em 0px;width: 77%;height: auto !important;"></p> <section style="text-align: left;margin-left: 16px;margin-right: 16px;margin-bottom: 20px;line-height: 1.75em;"></section> <section class="" data-mpa-template-id="1324376" data-mpa-color="null" data-mpa-category="fav"> <section style="text-align: left;margin-left: 16px;margin-right: 16px;margin-bottom: 20px;line-height: 1.75em;"></section> </section>
作者:微信小助手
<section style="text-align: left;margin-left: 16px;margin-right: 16px;margin-bottom: 20px;line-height: 1.75em;" data-mpa-powered-by="yiban.io"></section> <section style="text-align: right;margin-left: 16px;margin-right: 16px;margin-bottom: 20px;line-height: 1.75em;"> <span style="font-size: 13px;color: rgb(136, 136, 136);">作者:</span> <span style="font-size: 13px;color: rgb(136, 136, 136);">bojiangzhou<br>www.cnblogs.com/chiangchou/p/idea-debug.html</span> </section> <section style="text-align: left;margin-left: 16px;margin-right: 16px;margin-bottom: 20px;line-height: 1.75em;"> <span style="font-size: 15px;color: rgb(64, 62, 62);">Debug用来追踪代码的运行流程,通常在程序运行过程中出现异常,启用Debug模式可以分析定位异常发生的位置,以及在运行过程中参数的变化。</span> <span style="font-size: 15px;color: rgb(64, 62, 62);">通常我们也可以启用Debug模式来跟踪代码的运行流程去学习三方框架的源码。</span> </section> <section style="text-align: left;margin-left: 16px;margin-right: 16px;margin-bottom: 20px;line-height: 1.75em;"> <span style="font-size: 15px;color: rgb(64, 62, 62);">所以学习下如何在Intellij IDEA中使用好Debug,主要包括如下内容:</span> </section> <ol class=" list-paddingleft-2" style="list-style-type: decimal;margin-left: 16px;margin-right: 16px;"> <li> <section style="text-align: left;margin-bottom: 20px;line-height: 1.75em;"> <span style="font-size: 15px;color: rgb(64, 62, 62);">Debug开篇</span> <br> </section></li> <li> <section style="text-align: left;margin-bottom: 20px;line-height: 1.75em;"> <span style="font-size: 15px;color: rgb(64, 62, 62);">基本用法&快捷键</span> <br> </section></li> <li> <section style="text-align: left;margin-bottom: 20px;line-height: 1.75em;"> <span style="font-size: 15px;color: rgb(64, 62, 62);">变量查看</span> <br> </section></li> <li> <section style="text-align: left;margin-bottom: 20px;line-height: 1.75em;"> <span style="font-size: 15px;color: rgb(64, 62, 62);">计算表达式</span> <br> </section></li> <li> <section style="text-align: left;margin-bottom: 20px;line-height: 1.75em;"> <span style="font-size: 15px;color: rgb(64, 62, 62);">智能步入</span> <br> </section></li> <li> <section style="text-align: left;margin-bottom: 20px;line-height: 1.75em;"> <span style="font-size: 15px;color: rgb(64, 62, 62);">断点条件设置</span> <br> </section></li> <li> <section style="text-align: left;margin-bottom: 20px;line-height: 1.75em;"> <span style="font-size: 15px;color: rgb(64, 62, 62);">多线程调试</span> <br> </section></li> <li> <section style="text-align: left;margin-bottom: 20px;line-height: 1.75em;"> <span style="font-size: 15px;color: rgb(64, 62, 62);">回退断点</span> <br> </section></li> <li> <section style="text-align: left;margin-bottom: 20px;line-height: 1.75em;"> <span style="font-size: 15px;color: rgb(64, 62, 62);">中断Debug</span> <br> </section></li> <li> <section style="text-align: left;margin-bottom: 20px;line-height: 1.75em;"> <span style="font-size: 15px;color: rgb(64, 62, 62);">附:</span> <span style="font-size: 15px;color: rgb(64, 62, 62);">JRebel激活</span> </section></li> </ol> <section style="text-align: left;margin-left: 16px;margin-right: 16px;margin-bottom: 20px;line-height: 1.75em;"> <strong><span style="font-size: 15px;color: rgb(64, 62, 62);">一、Debug开篇</span></strong> </section> <section style="text-align: left;margin-left: 16px;margin-right: 16px;margin-bottom: 20px;line-height: 1.75em;"> <span style="font-size: 15px;color: rgb(64, 62, 62);">首先看下IDEA中Debug模式下的界面。</span> </section> <section style="text-align: left;margin-left: 16px;margin-right: 16px;margin-bottom: 20px;line-height: 1.75em;"> <span style="font-size: 15px;color: rgb(64, 62, 62);">如下是在IDEA中启动Debug模式,进入断点后的界面,我这里是Windows,可能和Mac的图标等会有些不一样。</span> <span style="font-size: 15px;color: rgb(64, 62, 62);">就简单说下图中标注的8个地方:</span> </section> <ol class=" list-paddingleft-2" style="list-style-type: decimal;margin-left: 16px;margin-right: 16px;"> <li> <section style="text-align: left;margin-bottom: 20px;line-height: 1.75em;"> <span style="font-size: 15px;color: rgb(64, 62, 62);">以Debug模式启动服务,左边的一个按钮则是以Run模式启动。</span> <span style="font-size: 15px;color: rgb(64, 62, 62);">在开发中,我一般会直接启动Debug模式,方便随时调试代码。</span> <br> </section></li> <li> <section style="text-align: left;margin-bottom: 20px;line-height: 1.75em;"> <span style="font-size: 15px;color: rgb(64, 62, 62);">断点:</span> <span style="font-size: 15px;color: rgb(64, 62, 62);">在左边行号栏单击左键,或者快捷键Ctrl+F8 打上/取消断点,断点行的颜色可自己去设置。</span> <br> </section></li> <li> <section style="text-align: left;margin-bottom: 20px;line-height: 1.75em;"> <span style="font-size: 15px;color: rgb(64, 62, 62);">Debug窗口:</span> <span style="font-size: 15px;color: rgb(64, 62, 62);">访问请求到达第一个断点后,会自动激活Debug窗口。</span> <span style="font-size: 15px;color: rgb(64, 62, 62);">如果没有自动激活,可以去设置里设置,如图1.2。</span> <br> </section></li> <li> <section style="text-align: left;margin-bottom: 20px;line-height: 1.75em;"> <span style="font-size: 15px;color: rgb(64, 62, 62);">调试按钮:</span> <span style="font-size: 15px;color: rgb(64, 62, 62);">一共有8个按钮,调试的主要功能就对应着这几个按钮,鼠标悬停在按钮上可以查看对应的快捷键。</span> <span style="font-size: 15px;color: rgb(64, 62, 62);">在菜单栏Run里可以找到同样的对应的功能,如图1.4。</span> <br> </section></li> <li> <section style="text-align: left;margin-bottom: 20px;line-height: 1.75em;"> <span style="font-size: 15px;color: rgb(64, 62, 62);">服务按钮:</span> <span style="font-size: 15px;color: rgb(64, 62, 62);">可以在这里关闭/启动服务,设置断点等。</span> <br> </section></li> <li> <section style="text-align: left;margin-bottom: 20px;line-height: 1.75em;"> <span style="font-size: 15px;color: rgb(64, 62, 62);">方法调用栈:</span> <span style="font-size: 15px;color: rgb(64, 62, 62);">这里显示了该线程调试所经过的所有方法,勾选右上角的[Show All Frames]按钮,就不会显示其它类库的方法了,否则这里会有一大堆的方法。</span> <br> </section></li> <li> <section style="text-align: left;margin-bottom: 20px;line-height: 1.75em;"> <span style="font-size: 15px;color: rgb(64, 62, 62);">Variables:</span> <span style="font-size: 15px;color: rgb(64, 62, 62);">在变量区可以查看当前断点之前的当前方法内的变量。</span> <br> </section></li> <li> <section style="text-align: left;margin-bottom: 20px;line-height: 1.75em;"> <span style="font-size: 15px;color: rgb(64, 62, 62);">Watches:</span> <span style="font-size: 15px;color: rgb(64, 62, 62);">查看变量,可以将Variables区中的变量拖到Watches中查看 </span> </section></li> </ol> <section style="text-align: center;margin-left: 16px;margin-right: 16px;margin-bottom: 20px;line-height: 1.75em;"> <img class="rich_pages" data-ratio="0.54140625" data-s="300,640" src="/upload/71ab7fd532e5bd89191a178e4233e646.png" data-type="png" data-w="1280" style=""> <br> <span style="color: rgb(136, 136, 136);font-size: 13px;">[图1.1]</span> </section> <section style="text-align: left;margin-left: 16px;margin-right: 16px;margin-bottom: 20px;line-height: 1.75em;"> <span style="font-size: 15px;color: rgb(64, 62, 62);">在设置里勾选Show debug window on breakpoint,则请求进入到断点后自动激活Debug窗口</span> </section> <section style="text-align: center;margin-left: 16px;margin-right: 16px;margin-bottom: 20px;line-height: 1.75em;"> <img class="rich_pages" data-ratio="0.58203125" data-s="300,640" src="/upload/dccecf33298a8f5e2f845a7bb99dac88.png" data-type="png" data-w="1280" style=""> <br> <span style="color: rgb(136, 136, 136);font-size: 13px;">[图1.2]</span> </section> <section style="text-align: left;margin-left: 16px;margin-right: 16px;margin-bottom: 20px;line-height: 1.75em;"> <span style="font-size: 15px;color: rgb(64, 62, 62);">如果你的IDEA底部没有显示工具栏或状态栏,可以在View里打开,显示出工具栏会方便我们使用。</span> <span style="font-size: 15px;color: rgb(64, 62, 62);">可以自己去尝试下这四个选项。</span> </section> <section style="text-align: center;margin-left: 16px;margin-right: 16px;margin-bottom: 20px;line-height: 1.75em;"> <img class="rich_pages" data-ratio="0.9890260631001372" data-s="300,640" src="/upload/d43e3d80c8808fa7a50dc08fcc85e6aa.png" data-type="png" data-w="729" style=""> <br> <span style="color: rgb(136, 136, 136);font-size: 13px;">[图1.3]</span> </section> <section style="text-align: left;margin-left: 16px;margin-right: 16px;margin-bottom: 20px;line-height: 1.75em;"> <span style="font-size: 15px;color: rgb(64, 62, 62);">在菜单栏Run里有调试对应的功能,同时可以查看对应的快捷键。</span> </section> <section style="text-align: center;margin-left: 16px;margin-right: 16px;margin-bottom: 20px;line-height: 1.75em;"> <img class="rich_pages" data-ratio="0.5671875" data-s="300,640" src="/upload/6e8ad14e5c8788497868f0cc1cf51652.png" data-type="png" data-w="1280" style=""> <br> <span style="color: rgb(136, 136, 136);font-size: 13px;">[图1.4]</span> </section> <section style="text-align: left;margin-left: 16px;margin-right: 16px;margin-bottom: 20px;line-height: 1.75em;"> <strong><span style="font-size: 15px;color: rgb(64, 62, 62);">二、基本用法&快捷键</span></strong> </section> <section style="text-align: left;margin-left: 16px;margin-right: 16px;margin-bottom: 20px;line-height: 1.75em;"> <span style="font-size: 15px;color: rgb(64, 62, 62);">Debug调试的功能主要对应着图一中4和5两组按钮:</span> </section> <section style="text-align: left;margin-left: 16px;margin-right: 16px;margin-bottom: 20px;line-height: 1.75em;"> <span style="font-size: 15px;color: rgb(64, 62, 62);">1、首先说第一组按钮,共8个按钮,从左到右依次如下:</span> </section> <section style="text-align: center;margin-left: 16px;margin-right: 16px;margin-bottom: 20px;line-height: 1.75em;"> <img class="rich_pages" data-ratio="0.14590747330960854" data-s="300,640" src="/upload/4df9bb1027c03dcef6062aa1cc495771.png" data-type="png" data-w="281" style=""> <br> <span style="color: rgb(136, 136, 136);font-size: 13px;"> [图2.1]</span> </section> <ul class=" list-paddingleft-2" style="list-style-type: disc;margin-left: 16px;margin-right: 16px;"> <li> <section style="text-align: left;margin-bottom: 20px;line-height: 1.75em;"> <span style="font-size: 15px;color: rgb(64, 62, 62);">Show Execution Point (Alt + F10):</span> <span style="font-size: 15px;color: rgb(64, 62, 62);">如果你的光标在其它行或其它页面,点击这个按钮可跳转到当前代码执行的行。</span> </section></li> <li> <section style="text-align: left;margin-bottom: 20px;line-height: 1.75em;"> <span style="font-size: 15px;color: rgb(64, 62, 62);">Step Over (F8):</span> <span style="font-size: 15px;color: rgb(64, 62, 62);">步过,一行一行地往下走,如果这一行上有方法不会进入方法。</span> <br> </section></li> <li> <section style="text-align: left;margin-bottom: 20px;line-height: 1.75em;"> <span style="font-size: 15px;color: rgb(64, 62, 62);">Step Into (F7):</span> <span style="font-size: 15px;color: rgb(64, 62, 62);">步入,如果当前行有方法,可以进入方法内部,一般用于进入自定义方法内,不会进入官方类库的方法,如第25行的put方法。</span> <br> </section></li> <li> <section style="text-align: left;margin-bottom: 20px;line-height: 1.75em;"> <span style="font-size: 15px;color: rgb(64, 62, 62);">Force Step Into (Alt + Shift + F7):</span> <span style="font-size: 15px;color: rgb(64, 62, 62);">强制步入,能进入任何方法,查看底层源码的时候可以用这个进入官方类库的方法。</span> <br> </section></li> <li> <section style="text-align: left;margin-bottom: 20px;line-height: 1.75em;"> <span style="font-size: 15px;color: rgb(64, 62, 62);">Step Out (Shift + F8):</span> <span style="font-size: 15px;color: rgb(64, 62, 62);">步出,从步入的方法内退出到方法调用处,此时方法已执行完毕,只是还没有完成赋值。</span> </section></li> <li> <section style="text-align: left;margin-bottom: 20px;line-height: 1.75em;"> <span style="font-size: 15px;color: rgb(64, 62, 62);">Drop Frame (默认无):</span> <span style="font-size: 15px;color: rgb(64, 62, 62);">回退断点,后面章节详细说明。</span> </section></li> <li> <section style="text-align: left;margin-bottom: 20px;line-height: 1.75em;"> <span style="font-size: 15px;color: rgb(64, 62, 62);">Run to Cursor (Alt + F9):</span> <span style="font-size: 15px;color: rgb(64, 62, 62);">运行到光标处,你可以将光标定位到你需要查看的那一行,然后使用这个功能,代码会运行至光标行,而不需要打断点。</span> <br> </section></li> <li> <section style="text-align: left;margin-bottom: 20px;line-height: 1.75em;"> <span style="font-size: 15px;color: rgb(64, 62, 62);">Evaluate Expression (Alt + F8):</span> <span style="font-size: 15px;color: rgb(64, 62, 62);">计算表达式,后面章节详细说明。</span> </section></li> </ul> <section style="text-align: left;margin-left: 16px;margin-right: 16px;margin-bottom: 20px;line-height: 1.75em;"> <span style="font-size: 15px;color: rgb(64, 62, 62);">2、第二组按钮,共7个按钮,从上到下依次如下:</span> </section> <section style="text-align: center;margin-left: 16px;margin-right: 16px;margin-bottom: 20px;line-height: 1.75em;"> <img class="rich_pages" data-ratio="5.613636363636363" data-s="300,640" src="/upload/f751c7c8f33ed1421cb45e0e43318994.png" data-type="png" data-w="44" style=""> <br> <span style="color: rgb(136, 136, 136);font-size: 13px;">[图2.2]</span> </section> <ul class=" list-paddingleft-2" style="list-style-type: disc;margin-left: 16px;margin-right: 16px;"> <li> <section style="text-align: left;margin-bottom: 20px;line-height: 1.75em;"> <span style="font-size: 15px;color: rgb(64, 62, 62);">Rerun 'xxxx':</span> <span style="font-size: 15px;color: rgb(64, 62, 62);">重新运行程序,会关闭服务后重新启动程序。</span> </section></li> <li> <section style="text-align: left;margin-bottom: 20px;line-height: 1.75em;"> <span style="font-size: 15px;color: rgb(64, 62, 62);">Update 'tech' application (Ctrl + F5):</span> <span style="font-size: 15px;color: rgb(64, 62, 62);">更新程序,一般在你的代码有改动后可执行这个功能。</span> <span style="font-size: 15px;color: rgb(64, 62, 62);">而这个功能对应的操作则是在服务配置里,如图2.3。</span> <br> </section></li> <li> <section style="text-align: left;margin-bottom: 20px;line-height: 1.75em;"> <span style="font-size: 15px;color: rgb(64, 62, 62);">Resume Program (F9):</span> <span style="font-size: 15px;color: rgb(64, 62, 62);">恢复程序,比如,你在第20行和25行有两个断点,当前运行至第20行,按F9,则运行到下一个断点(即第25行),再按F9,则运行完整个流程,因为后面已经没有断点了。</span> <br> </section></li> <li> <section style="text-align: left;margin-bottom: 20px;line-height: 1.75em;"> <span style="font-size: 15px;color: rgb(64, 62, 62);">Pause Program:</span> <span style="font-size: 15px;color: rgb(64, 62, 62);">暂停程序,启用Debug。</span> <span style="font-size: 15px;color: rgb(64, 62, 62);">目前没发现具体用法。</span> <br> </section></li> <li> <section style="text-align: left;margin-bottom: 20px;line-height: 1.75em;"> <span style="font-size: 15px;color: rgb(64, 62, 62);">Stop 'xxx' (Ctrl + F2):</span> <span style="font-size: 15px;color: rgb(64, 62, 62);">连续按两下,关闭程序。</span> <span style="font-size: 15px;color: rgb(64, 62, 62);">有时候你会发现关闭服务再启动时,报端口被占用,这是因为没完全关闭服务的原因,你就需要查杀所有JVM进程了。</span> <br> </section></li> <li> <section style="text-align: left;margin-bottom: 20px;line-height: 1.75em;"> <span style="font-size: 15px;color: rgb(64, 62, 62);">View Breakpoints (Ctrl + Shift + F8):</span> <span style="font-size: 15px;color: rgb(64, 62, 62);">查看所有断点,后面章节会涉及到。</span> <br> </section></li> <li> <section style="text-align: left;margin-bottom: 20px;line-height: 1.75em;"> <span style="font-size: 15px;color: rgb(64, 62, 62);">Mute Breakpoints:</span> <span style="font-size: 15px;color: rgb(64, 62, 62);">哑的断点,选择这个后,所有断点变为灰色,断点失效,按F9则可以直接运行完程序。</span> <span style="font-size: 15px;color: rgb(64, 62, 62);">再次点击,断点变为红色,有效。</span> <span style="font-size: 15px;color: rgb(64, 62, 62);">如果只想使某一个断点失效,可以在断点上右键取消Enabled,如图2.4,则该行断点失效。</span> </section></li> </ul> <section style="text-align: left;margin-left: 16px;margin-right: 16px;margin-bottom: 20px;line-height: 1.75em;"> <span style="font-size: 15px;color: rgb(64, 62, 62);">更新程序,On 'Update' actions,执行更新操作时所做的事情,一般选择'Update classes and resources',即更新类和资源文件。</span> </section> <section style="text-align: left;margin-left: 16px;margin-right: 16px;margin-bottom: 20px;line-height: 1.75em;"> <span style="font-size: 15px;color: rgb(64, 62, 62);">一般配合热部署插件会更好用,如JRebel,这样就不用每次更改代码后还要去重新启动服务。</span> <span style="font-size: 15px;color: rgb(64, 62, 62);">如何激活JRebel,在最后章节附上。</span> </section> <section style="text-align: left;margin-left: 16px;margin-right: 16px;margin-bottom: 20px;line-height: 1.75em;"> <span style="font-size: 15px;color: rgb(64, 62, 62);">下面的On frame deactivation,在IDEA窗口失去焦点时触发,即一般你从idea切换到浏览器的时候,idea会自动帮你做的事情,一般可以设置Do nothing,频繁切换会比较消耗资源的。</span> </section> <section style="text-align: center;margin-left: 16px;margin-right: 16px;margin-bottom: 20px;line-height: 1.75em;"> <img class="rich_pages" data-ratio="0.5890625" data-s="300,640" src="/upload/9aa92cf76913ca1f821ef9640d909e86.png" data-type="png" data-w="1280" style=""> <br> <span style="color: rgb(136, 136, 136);font-size: 13px;">[图2.3]</span> </section> <section style="text-align: center;margin-left: 16px;margin-right: 16px;margin-bottom: 20px;line-height: 1.75em;"> <img class="rich_pages" data-ratio="0.46422628951747086" data-s="300,640" src="/upload/cd23ef0fed968f0a23e9bba02c9bb6d4.png" data-type="png" data-w="601" style=""> <br> <span style="color: rgb(136, 136, 136);font-size: 13px;">[图2.4]</span> </section> <section style="text-align: left;margin-left: 16px;margin-right: 16px;margin-bottom: 20px;line-height: 1.75em;"> <strong><span style="font-size: 15px;color: rgb(64, 62, 62);">三、变量查看</span></strong> </section> <section style="text-align: left;margin-left: 16px;margin-right: 16px;margin-bottom: 20px;line-height: 1.75em;"> <span style="font-size: 15px;color: rgb(64, 62, 62);">在Debug过程中,跟踪查看变量的变化是非常必要的,这里就简单说下IDEA中可以查看变量的几个地方,相信大部分人都了解。</span> </section> <section style="text-align: left;margin-left: 16px;margin-right: 16px;margin-bottom: 20px;line-height: 1.75em;"> <span style="font-size: 15px;color: rgb(64, 62, 62);">1、如下,在IDEA中,参数所在行后面会显示当前变量的值。</span> </section> <section style="text-align: center;margin-left: 16px;margin-right: 16px;margin-bottom: 20px;line-height: 1.75em;"> <img class="rich_pages" data-ratio="0.5213523131672598" data-s="300,640" src="/upload/35a3626262d8722e7ecd0243b339b5a3.png" data-type="png" data-w="1124" style=""> <br> <span style="color: rgb(136, 136, 136);font-size: 13px;"> [图3.1]</span> </section> <section style="text-align: left;margin-left: 16px;margin-right: 16px;margin-bottom: 20px;line-height: 1.75em;"> <span style="font-size: 15px;color: rgb(64, 62, 62);">2、光标悬停到参数上,显示当前变量信息。</span> <span style="font-size: 15px;color: rgb(64, 62, 62);">点击打开详情如图3.3。</span> <span style="font-size: 15px;color: rgb(64, 62, 62);">我一般会使用这种方式,快捷方便。</span> </section> <section style="text-align: center;margin-left: 16px;margin-right: 16px;margin-bottom: 20px;line-height: 1.75em;"> <img class="rich_pages" data-ratio="0.297427652733119" data-s="300,640" src="/upload/a4450cbfef9ce6cf83bebb92ca338301.png" data-type="png" data-w="622" style=""> <br> <span style="color: rgb(136, 136, 136);font-size: 13px;">[图3.2]</span> </section> <section style="text-align: center;margin-left: 16px;margin-right: 16px;margin-bottom: 20px;line-height: 1.75em;"> <img class="rich_pages" data-ratio="0.346636259977195" data-s="300,640" src="/upload/e12a115c5c0e56ef3cbdc46d87f763dc.png" data-type="png" data-w="877" style=""> <br> <span style="color: rgb(136, 136, 136);font-size: 13px;"> [图3.3]</span> </section> <section style="text-align: left;margin-left: 16px;margin-right: 16px;margin-bottom: 20px;line-height: 1.75em;"> <span style="font-size: 15px;color: rgb(64, 62, 62);">3、在Variables里查看,这里显示当前方法里的所有变量。</span> </section> <section style="text-align: center;margin-left: 16px;margin-right: 16px;margin-bottom: 20px;line-height: 1.75em;"> <img class="rich_pages" data-ratio="0.5183752417794971" data-s="300,640" src="/upload/ef84e42953b7c2deba1de930166e7d4b.png" data-type="png" data-w="517" style=""> <br> <span style="color: rgb(136, 136, 136);font-size: 13px;">[图3.4]</span> </section> <section style="text-align: left;margin-left: 16px;margin-right: 16px;margin-bottom: 20px;line-height: 1.75em;"> <span style="font-size: 15px;color: rgb(64, 62, 62);">4、在Watches里,点击New Watch,输入需要查看的变量。</span> <span style="font-size: 15px;color: rgb(64, 62, 62);">或者可以从Variables里拖到Watche里查看。</span> </section> <section style="text-align: center;margin-left: 16px;margin-right: 16px;margin-bottom: 20px;line-height: 1.75em;"> <img class="rich_pages" data-ratio="0.38057324840764334" data-s="300,640" src="/upload/152e97c132664a179195f1ee3ffc962d.png" data-type="png" data-w="628" style=""> <span style="color: rgb(136, 136, 136);font-size: 13px;text-align: center;">[图3.5]</span> </section> <section style="text-align: left;margin-left: 16px;margin-right: 16px;margin-bottom: 20px;line-height: 1.75em;"> <span style="font-size: 15px;color: rgb(64, 62, 62);">如果你发现你没有Watches,可能在下图所在的地方。</span> </section> <section style="text-align: center;margin-left: 16px;margin-right: 16px;margin-bottom: 20px;line-height: 1.75em;"> <img class="rich_pages" data-ratio="0.5524475524475524" data-s="300,640" src="/upload/4f30301c0d5f149b69c66b6508c04406.png" data-type="png" data-w="429" style=""> <br> <span style="color: rgb(136, 136, 136);font-size: 13px;"> [图3.6] </span> </section> <section style="text-align: center;margin-left: 16px;margin-right: 16px;margin-bottom: 20px;line-height: 1.75em;"> <img class="rich_pages" data-ratio="0.2523364485981308" data-s="300,640" src="/upload/c31e53018615b389d5002c747f7d5fc8.png" data-type="png" data-w="963" style=""> <br> <span style="color: rgb(136, 136, 136);font-size: 13px;">[图3.7] </span> </section> <section style="text-align: left;margin-left: 16px;margin-right: 16px;margin-bottom: 20px;line-height: 1.75em;"> <strong><span style="font-size: 15px;color: rgb(64, 62, 62);">四、计算表达式</span></strong> </section> <section style="text-align: left;margin-left: 16px;margin-right: 16px;margin-bottom: 20px;line-height: 1.75em;"> <span style="font-size: 15px;color: rgb(64, 62, 62);">在前面提到的计算表达式如图4.1的按钮,Evaluate Expression (Alt + F8) 。</span> <span style="font-size: 15px;color: rgb(64, 62, 62);">可以使用这个操作在调试过程中计算某个表达式的值,而不用再去打印信息。</span> </section> <section style="text-align: center;margin-left: 16px;margin-right: 16px;margin-bottom: 20px;line-height: 1.75em;"> <img class="rich_pages" data-ratio="0.16216216216216217" data-s="300,640" src="/upload/fd6aa670f973e211a86be30f4a7e6156.png" data-type="png" data-w="333" style=""> <br> <span style="color: rgb(136, 136, 136);font-size: 13px;text-align: center;"> [图4.1]</span> </section> <section style="text-align: left;margin-left: 16px;margin-right: 16px;margin-bottom: 20px;line-height: 1.75em;"> <span style="font-size: 15px;color: rgb(64, 62, 62);">1、按Alt + F8或按钮,或者,你可以选中某个表达式再Alt + F8,弹出计算表达式的窗口,如下,回车或点击Evaluate计算表达式的值。</span> </section> <section style="text-align: left;margin-left: 16px;margin-right: 16px;margin-bottom: 20px;line-height: 1.75em;"> <span style="color: rgb(64, 62, 62);font-size: 15px;">这个表达式不仅可以是一般变量或参数,也可以是方法,当你的一行代码中调用了几个方法时,就可以通过这种方式查看查看某个方法的返回值。</span> </section> <section style="text-align: center;margin-left: 16px;margin-right: 16px;margin-bottom: 20px;line-height: 1.75em;"> <img class="rich_pages" data-ratio="0.5265625" data-s="300,640" src="/upload/d0743f5b90ccbad3199f0822bad03112.png" data-type="png" data-w="1280" style=""> <br> <span style="color: rgb(136, 136, 136);font-size: 13px;"> [图4.2]</span> </section> <section style="text-align: left;margin-left: 16px;margin-right: 16px;margin-bottom: 20px;line-height: 1.75em;"> <span style="font-size: 15px;color: rgb(64, 62, 62);">2、设置变量,在计算表达式的框里,可以改变变量的值,这样有时候就能很方便我们去调试各种值的情况了不是。</span> </section> <section style="text-align: center;margin-left: 16px;margin-right: 16px;margin-bottom: 20px;line-height: 1.75em;"> <img class="rich_pages" data-ratio="0.44140625" data-s="300,640" src="/upload/db80fff0626d40991900f39c5e73939b.png" data-type="png" data-w="1280" style=""> <br> <span style="color: rgb(136, 136, 136);font-size: 13px;">[图4.3]</span> </section> <section style="text-align: left;margin-left: 16px;margin-right: 16px;margin-bottom: 20px;line-height: 1.75em;"> <strong><span style="font-size: 15px;color: rgb(64, 62, 62);">五、智能步入</span></strong> </section> <section style="text-align: left;margin-left: 16px;margin-right: 16px;margin-bottom: 20px;line-height: 1.75em;"> <span style="font-size: 15px;color: rgb(64, 62, 62);">想想,一行代码里有好几个方法,怎么只选择某一个方法进入。</span> <span style="font-size: 15px;color: rgb(64, 62, 62);">之前提到过使用Step Into (Alt + F7) 或者 Force Step Into (Alt + Shift + F7)进入到方法内部,但这两个操作会根据方法调用顺序依次进入,这比较麻烦。</span> </section> <section style="text-align: left;margin-left: 16px;margin-right: 16px;margin-bottom: 20px;line-height: 1.75em;"> <span style="font-size: 15px;color: rgb(64, 62, 62);">那么智能步入就很方便了,智能步入,这个功能在Run里可以看到,Smart Step Into (Shift + F7),如图5.1</span> </section> <section style="text-align: center;margin-left: 16px;margin-right: 16px;margin-bottom: 20px;line-height: 1.75em;"> <img class="rich_pages" data-ratio="0.5387931034482759" data-s="300,640" src="/upload/a7b14c3fa191add8854acaa5bff5ba40.png" data-type="png" data-w="464" style=""> <br> <span style="color: rgb(136, 136, 136);font-size: 13px;text-align: center;"> [图5.1]</span> </section> <section style="text-align: left;margin-left: 16px;margin-right: 16px;margin-bottom: 20px;line-height: 1.75em;"> <span style="font-size: 15px;color: rgb(64, 62, 62);">按Shift + F7,会自动定位到当前断点行,并列出需要进入的方法,如图5.2,点击方法进入方法内部。</span> </section> <section style="text-align: left;margin-left: 16px;margin-right: 16px;margin-bottom: 20px;line-height: 1.75em;"> <span style="font-size: 15px;color: rgb(64, 62, 62);">果只有一个方法,则直接进入,类似Force Step Into。</span> </section> <section style="text-align: center;margin-left: 16px;margin-right: 16px;margin-bottom: 20px;line-height: 1.75em;"> <img class="rich_pages" data-ratio="0.2802721088435374" data-s="300,640" src="/upload/3fb958f191ec76522e54cd8051b9460.png" data-type="png" data-w="735" style=""> <br> <span style="color: rgb(136, 136, 136);font-size: 13px;text-align: left;">[图5.2]</span> </section> <section style="text-align: left;margin-left: 16px;margin-right: 16px;margin-bottom: 20px;line-height: 1.75em;"> <strong><span style="font-size: 15px;color: rgb(64, 62, 62);">六、断点条件设置</span></strong> </section> <section style="text-align: left;margin-left: 16px;margin-right: 16px;margin-bottom: 20px;line-height: 1.75em;"> <span style="font-size: 15px;color: rgb(64, 62, 62);">通过设置断点条件,在满足条件时,才停在断点处,否则直接运行。</span> </section> <section style="text-align: left;margin-left: 16px;margin-right: 16px;margin-bottom: 20px;line-height: 1.75em;"> <span style="font-size: 15px;color: rgb(64, 62, 62);">通常,当我们在遍历一个比较大的集合或数组时,在循环内设置了一个断点,难道我们要一个一个去看变量的值?</span> <span style="font-size: 15px;color: rgb(64, 62, 62);">那肯定很累,说不定你还错过这个值得重新来一次。</span> </section> <section style="text-align: left;margin-left: 16px;margin-right: 16px;margin-bottom: 20px;line-height: 1.75em;"> <span style="font-size: 15px;color: rgb(64, 62, 62);">1、在断点上右键直接设置当前断点的条件,如图6.1,我设置exist为true时断点才生效。</span> </section> <section style="text-align: center;margin-left: 16px;margin-right: 16px;margin-bottom: 20px;line-height: 1.75em;"> <img class="rich_pages" data-ratio="0.5521367521367522" data-s="300,640" src="/upload/8b8cbad54b11f024ed67bdc716f193f1.png" data-type="png" data-w="585" style=""> </section> <section style="text-align: center;margin-left: 16px;margin-right: 16px;margin-bottom: 20px;line-height: 1.75em;"> <span style="font-size: 13px;color: rgb(136, 136, 136);">[图6.1]</span> </section> <section style="text-align: left;margin-left: 16px;margin-right: 16px;margin-bottom: 20px;line-height: 1.75em;"> <span style="font-size: 15px;color: rgb(64, 62, 62);">2、点击View Breakpoints (Ctrl + Shift + F8),查看所有断点。</span> </section> <ul class=" list-paddingleft-2" style="list-style-type: disc;margin-left: 16px;margin-right: 16px;"> <li> <section style="text-align: left;margin-bottom: 20px;line-height: 1.75em;"> <span style="font-size: 15px;color: rgb(64, 62, 62);">Java Line Breakpoints 显示了所有的断点,在右边勾选Condition,设置断点的条件。</span> </section></li> <li> <section style="text-align: left;margin-bottom: 20px;line-height: 1.75em;"> <span style="font-size: 15px;color: rgb(64, 62, 62);">勾选Log message to console,则会将当前断点行输出到控制台,如图6.3</span> </section></li> <li> <section style="text-align: left;margin-bottom: 20px;line-height: 1.75em;"> <span style="font-size: 15px;color: rgb(64, 62, 62);">勾选Evaluate and log,可以在执行这行代码是计算表达式的值,并将结果输出到控制台。</span> </section></li> </ul> <section style="text-align: center;margin-left: 16px;margin-right: 16px;margin-bottom: 20px;line-height: 1.75em;"> <img class="rich_pages" data-ratio="0.54140625" data-s="300,640" src="/upload/91665edc079d2979979da71cf41f386c.png" data-type="png" data-w="1280" style=""> </section> <section style="text-align: center;margin-left: 16px;margin-right: 16px;margin-bottom: 20px;line-height: 1.75em;"> <span style="font-size: 13px;color: rgb(136, 136, 136);">[图6.2]</span> </section> <section style="text-align: center;margin-left: 16px;margin-right: 16px;margin-bottom: 20px;line-height: 1.75em;"> <img class="rich_pages" data-ratio="0.18" data-s="300,640" src="/upload/c75102b5cb042d5562ae115c6b868feb.png" data-type="png" data-w="800" style=""> </section> <section style="text-align: center;margin-left: 16px;margin-right: 16px;margin-bottom: 20px;line-height: 1.75em;"> <span style="color: rgb(136, 136, 136);font-size: 13px;"> [图6.3]</span> </section> <section style="text-align: left;margin-left: 16px;margin-right: 16px;margin-bottom: 20px;line-height: 1.75em;"> <span style="font-size: 15px;color: rgb(64, 62, 62);">3、再说说右边的Filters过滤,这些一般情况下不常用,简单说下意思。</span> </section> <ul class=" list-paddingleft-2" style="list-style-type: disc;margin-left: 16px;margin-right: 16px;"> <li> <section style="text-align: left;margin-bottom: 20px;line-height: 1.75em;"> <span style="font-size: 15px;color: rgb(64, 62, 62);">Instance filters:</span> <span style="font-size: 15px;color: rgb(64, 62, 62);">实例过滤,输入实例ID(如图6.5中的实例ID),但是我这里没有成功,不知道什么原因,知道的朋友留个言。</span> </section></li> <li> <section style="text-align: left;margin-bottom: 20px;line-height: 1.75em;"> <span style="font-size: 15px;color: rgb(64, 62, 62);">Class filters:</span> <span style="font-size: 15px;color: rgb(64, 62, 62);">类过滤,根据类名过滤,同样没有成功....</span> </section></li> <li> <section style="text-align: left;margin-bottom: 20px;line-height: 1.75em;"> <span style="font-size: 15px;color: rgb(64, 62, 62);">Pass count:</span> <span style="font-size: 15px;color: rgb(64, 62, 62);">用于循环中,如果断点在循环中,可以设置该值,循环多少次后停在断点处,之后的循环都会停在断点处。</span> </section></li> </ul> <section style="text-align: center;margin-left: 16px;margin-right: 16px;margin-bottom: 20px;line-height: 1.75em;"> <img class="rich_pages" data-ratio="0.6222760290556901" data-s="300,640" src="/upload/c3a23512bec6baed2a60e766db6c7cae.png" data-type="png" data-w="413" style=""> </section> <section style="text-align: center;margin-left: 16px;margin-right: 16px;margin-bottom: 20px;line-height: 1.75em;"> <span style="font-size: 13px;color: rgb(136, 136, 136);">[图6.4]</span> </section> <section style="text-align: center;margin-left: 16px;margin-right: 16px;margin-bottom: 20px;line-height: 1.75em;"> <img class="rich_pages" data-ratio="0.596529284164859" data-s="300,640" src="/upload/2de93772189091766ce817b80f55a246.png" data-type="png" data-w="461" style=""> </section> <section style="text-align: center;margin-left: 16px;margin-right: 16px;margin-bottom: 20px;line-height: 1.75em;"> <span style="font-size: 13px;color: rgb(136, 136, 136);">[图6.5]</span> </section> <section style="text-align: left;margin-left: 16px;margin-right: 16px;margin-bottom: 20px;line-height: 1.75em;"> <span style="font-size: 15px;color: rgb(64, 62, 62);">4、异常断点,通过设置异常断点,在程序中出现需要拦截的异常时,会自动定位到异常行。</span> </section> <section style="text-align: left;margin-left: 16px;margin-right: 16px;margin-bottom: 20px;line-height: 1.75em;"> <span style="font-size: 15px;color: rgb(64, 62, 62);">如图6.6,点击+号添加Java Exception Breakpoints,添加异常断点。</span> <span style="font-size: 15px;color: rgb(64, 62, 62);">然后输入需要断点的异常类,如图6.7,之后可以在Java Exception Breakpoints里看到添加的异常断点。</span> </section> <section style="text-align: left;margin-left: 16px;margin-right: 16px;margin-bottom: 20px;line-height: 1.75em;"> <span style="font-size: 15px;color: rgb(64, 62, 62);">我这里添加了一个NullPointerException异常断点,如图6.8,出现空指针异常后,自动定位在空指针异常行。</span> </section> <section style="text-align: center;margin-left: 16px;margin-right: 16px;margin-bottom: 20px;line-height: 1.75em;"> <img class="rich_pages" data-ratio="0.44299065420560746" data-s="300,640" src="/upload/9d969ce6fe43bc06bb23d4d163051d84.png" data-type="png" data-w="535" style=""> </section> <section style="text-align: center;margin-left: 16px;margin-right: 16px;margin-bottom: 20px;line-height: 1.75em;"> <span style="font-size: 13px;color: rgb(136, 136, 136);">[图6.6]</span> </section> <section style="text-align: center;margin-left: 16px;margin-right: 16px;margin-bottom: 20px;line-height: 1.75em;"> <img class="rich_pages" data-ratio="0.610732538330494" data-s="300,640" src="/upload/92dc128ed70c2c0935e061dcfdcdb735.png" data-type="png" data-w="1174" style=""> </section> <section style="text-align: center;margin-left: 16px;margin-right: 16px;margin-bottom: 20px;line-height: 1.75em;"> <span style="font-size: 13px;color: rgb(136, 136, 136);">[图6.7]</span> </section> <section style="text-align: center;margin-left: 16px;margin-right: 16px;margin-bottom: 20px;line-height: 1.75em;"> <img class="rich_pages" data-ratio="0.38203125" data-s="300,640" src="/upload/50a5721ee395c8da934b8a10860d127c.png" data-type="png" data-w="1280" style=""> </section> <section style="text-align: center;margin-left: 16px;margin-right: 16px;margin-bottom: 20px;line-height: 1.75em;"> <span style="color: rgb(136, 136, 136);font-size: 13px;">[图6.8]</span> </section> <section style="text-align: left;margin-left: 16px;margin-right: 16px;margin-bottom: 20px;line-height: 1.75em;"> <strong><span style="font-size: 15px;color: rgb(64, 62, 62);">七、多线程调试</span></strong> </section> <section style="text-align: left;margin-left: 16px;margin-right: 16px;margin-bottom: 20px;line-height: 1.75em;"> <span style="font-size: 15px;color: rgb(64, 62, 62);">一般情况下我们调试的时候是在一个线程中的,一步一步往下走。</span> <span style="font-size: 15px;color: rgb(64, 62, 62);">但有时候你会发现在Debug的时候,想发起另外一个请求都无法进行了?</span> </section> <section style="text-align: left;margin-left: 16px;margin-right: 16px;margin-bottom: 20px;line-height: 1.75em;"> <span style="font-size: 15px;color: rgb(64, 62, 62);">那是因为IDEA在Debug时默认阻塞级别是ALL,会阻塞其它线程,只有在当前调试线程走完时才会走其它线程。</span> <span style="font-size: 15px;color: rgb(64, 62, 62);">可以在View Breakpoints里选择Thread,如图7.1,然后点击Make Default设置为默认选项。</span> </section> <section style="text-align: center;margin-left: 16px;margin-right: 16px;margin-bottom: 20px;line-height: 1.75em;"> <img class="rich_pages" data-ratio="0.29481733220050976" data-s="300,640" src="/upload/743f4bb23cf6079fc028ab1ea03b3763.png" data-type="png" data-w="1177" style=""> </section> <section style="text-align: center;margin-left: 16px;margin-right: 16px;margin-bottom: 20px;line-height: 1.75em;"> <span style="font-size: 13px;color: rgb(136, 136, 136);">[图7.1]</span> </section> <section style="text-align: left;margin-left: 16px;margin-right: 16px;margin-bottom: 20px;line-height: 1.75em;"> <span style="font-size: 15px;color: rgb(64, 62, 62);">切换线程,在图7.2中Frames的下拉列表里,可以切换当前的线程,如下我这里有两个Debug的线程,切换另外一个则进入另一个Debug的线程。</span> </section> <section style="text-align: center;margin-left: 16px;margin-right: 16px;margin-bottom: 20px;line-height: 1.75em;"> <img class="rich_pages" data-ratio="0.53984375" data-s="300,640" src="/upload/d518e5b0a329fb310dc9368e5bf9d53d.png" data-type="png" data-w="1280" style=""> </section> <section style="text-align: center;margin-left: 16px;margin-right: 16px;margin-bottom: 20px;line-height: 1.75em;"> <span style="color: rgb(136, 136, 136);font-size: 13px;">[图7.2]</span> </section> <section style="text-align: left;margin-left: 16px;margin-right: 16px;margin-bottom: 20px;line-height: 1.75em;"> <strong><span style="font-size: 15px;color: rgb(64, 62, 62);">八、回退断点</span></strong> </section> <section style="text-align: left;margin-left: 16px;margin-right: 16px;margin-bottom: 20px;line-height: 1.75em;"> <span style="font-size: 15px;color: rgb(64, 62, 62);">在调试的时候,想要重新走一下流程而不用再次发起一个请求?</span> </section> <section style="text-align: left;margin-left: 16px;margin-right: 16px;margin-bottom: 20px;line-height: 1.75em;"> <span style="font-size: 15px;color: rgb(64, 62, 62);">1、首先认识下这个方法调用栈,如图8.1,首先请求进入DemoController的insertDemo方法,然后调用insert方法,其它的invoke我们且先不管,最上面的方法是当前断点所在的方法。</span> </section> <section style="text-align: center;margin-left: 16px;margin-right: 16px;margin-bottom: 20px;line-height: 1.75em;"> <img class="rich_pages" data-ratio="0.49765625" data-s="300,640" src="/upload/773131cc2ad200c22a61440509ef8985.png" data-type="png" data-w="1280" style=""> </section> <section style="text-align: center;margin-left: 16px;margin-right: 16px;margin-bottom: 20px;line-height: 1.75em;"> <span style="font-size: 13px;color: rgb(136, 136, 136);">[图8.1]</span> </section> <section style="text-align: left;margin-left: 16px;margin-right: 16px;margin-bottom: 20px;line-height: 1.75em;"> <span style="font-size: 15px;color: rgb(64, 62, 62);">2、断点回退</span> </section> <section style="text-align: left;margin-left: 16px;margin-right: 16px;margin-bottom: 20px;line-height: 1.75em;"> <span style="font-size: 15px;color: rgb(64, 62, 62);">所谓的断点回退,其实就是回退到上一个方法调用的开始处,在IDEA里测试无法一行一行地回退或回到到上一个断点处,而是回到上一个方法。</span> </section> <section style="text-align: left;margin-left: 16px;margin-right: 16px;margin-bottom: 20px;line-height: 1.75em;"> <span style="font-size: 15px;color: rgb(64, 62, 62);">回退的方式有两种,一种是Drop Frame按钮(图8.2),按调用的方法逐步回退,包括三方类库的其它方法(取消Show All Frames按钮会显示三方类库的方法,如图8.3)。</span> </section> <section style="text-align: left;margin-left: 16px;margin-right: 16px;margin-bottom: 20px;line-height: 1.75em;"> <span style="font-size: 15px;color: rgb(64, 62, 62);">第二种方式,在调用栈方法上选择要回退的方法,右键选择Drop Frame(图8.4),回退到该方法的上一个方法调用处,此时再按F9(Resume Program),可以看到程序进入到该方法的断点处了。</span> </section> <section style="text-align: left;margin-left: 16px;margin-right: 16px;margin-bottom: 20px;line-height: 1.75em;"> <span style="font-size: 15px;color: rgb(64, 62, 62);">但有一点需要注意,断点回退只能重新走一下流程,之前的某些参数/数据的状态已经改变了的是无法回退到之前的状态的,如对象、集合、更新了数据库数据等等。</span> </section> <section style="text-align: center;margin-left: 16px;margin-right: 16px;margin-bottom: 20px;line-height: 1.75em;"> <img class="rich_pages" data-ratio="0.2364217252396166" data-s="300,640" src="/upload/f8dde3514007bc303dcac8864fc06858.png" data-type="png" data-w="313" style=""> </section> <section style="text-align: center;margin-left: 16px;margin-right: 16px;margin-bottom: 20px;line-height: 1.75em;"> <span style="font-size: 13px;color: rgb(136, 136, 136);">图[8.2]</span> </section> <section style="text-align: center;margin-left: 16px;margin-right: 16px;margin-bottom: 20px;line-height: 1.75em;"> <img class="rich_pages" data-ratio="0.41229193341869397" data-s="300,640" src="/upload/8a7e864d20965d6a919132c16c956e4d.png" data-type="png" data-w="781" style=""> </section> <section style="text-align: center;margin-left: 16px;margin-right: 16px;margin-bottom: 20px;line-height: 1.75em;"> <span style="font-size: 13px;color: rgb(136, 136, 136);">图[8.3]</span> </section> <section style="text-align: center;margin-left: 16px;margin-right: 16px;margin-bottom: 20px;line-height: 1.75em;"> <img class="rich_pages" data-ratio="0.3521923620933522" data-s="300,640" src="/upload/b841feca2adea0083832b65866f4a57b.png" data-type="png" data-w="707" style=""> </section> <section style="text-align: center;margin-left: 16px;margin-right: 16px;margin-bottom: 20px;line-height: 1.75em;"> <span style="font-size: 13px;color: rgb(136, 136, 136);">图[8.4]</span> </section> <section style="text-align: left;margin-left: 16px;margin-right: 16px;margin-bottom: 20px;line-height: 1.75em;"> <strong><span style="font-size: 15px;color: rgb(64, 62, 62);">九、中断Debug</span></strong> </section> <section style="text-align: left;margin-left: 16px;margin-right: 16px;margin-bottom: 20px;line-height: 1.75em;"> <span style="font-size: 15px;color: rgb(64, 62, 62);">想要在Debug的时候,中断请求,不要再走剩余的流程了?</span> </section> <section style="text-align: left;margin-left: 16px;margin-right: 16px;margin-bottom: 20px;line-height: 1.75em;"> <span style="font-size: 15px;color: rgb(64, 62, 62);">有些时候,我们看到传入的参数有误后,不想走后面的流程了,怎么中断这次请求呢(后面的流程要删除数据库数据呢....),难道要关闭服务重新启动程序?</span> <span style="font-size: 15px;color: rgb(64, 62, 62);">嗯,我以前也是这么干的。</span> </section> <section style="text-align: left;margin-left: 16px;margin-right: 16px;margin-bottom: 20px;line-height: 1.75em;"> <span style="font-size: 15px;color: rgb(64, 62, 62);">确切的说,我也没发现可以直接中断请求的方式(除了关闭服务),但可以通过Force Return,即强制返回来避免后续的流程,如图9.1。</span> </section> <section style="text-align: left;margin-left: 16px;margin-right: 16px;margin-bottom: 20px;line-height: 1.75em;"> <span style="font-size: 15px;color: rgb(64, 62, 62);">点击Force Return,弹出Return Value的窗口,我这个方法的返回类型为Map,所以,我这里直接返回 results,来强制返回,从而不再进行后续的流程。</span> <span style="font-size: 15px;color: rgb(64, 62, 62);">或者你可以new HashMap<>()。</span> </section> <section style="text-align: center;margin-left: 16px;margin-right: 16px;margin-bottom: 20px;line-height: 1.75em;"> <img class="rich_pages" data-ratio="0.35127478753541075" data-s="300,640" src="/upload/82c330453218ec40eaa499fab38f8c0.png" data-type="png" data-w="706" style=""> </section> <section style="text-align: center;margin-left: 16px;margin-right: 16px;margin-bottom: 20px;line-height: 1.75em;"> <span style="font-size: 13px;color: rgb(136, 136, 136);">[图9.1]</span> </section> <section style="text-align: center;margin-left: 16px;margin-right: 16px;margin-bottom: 20px;line-height: 1.75em;"> <img class="rich_pages" data-ratio="0.5675925925925925" data-s="300,640" src="/upload/6c16e7872ac292e863ec50a1e2389d1c.png" data-type="png" data-w="1080" style=""> </section> <section style="text-align: center;margin-left: 16px;margin-right: 16px;margin-bottom: 20px;line-height: 1.75em;"> <span style="color: rgb(136, 136, 136);font-size: 13px;">[图9.2]</span> </section> <section style="text-align: left;margin-left: 16px;margin-right: 16px;margin-bottom: 20px;line-height: 1.75em;"> <strong><span style="font-size: 15px;color: rgb(64, 62, 62);">十、附:</span><span style="font-size: 15px;color: rgb(64, 62, 62);"></span><span style="font-size: 15px;color: rgb(64, 62, 62);">JRebel激活</span></strong> </section> <section style="text-align: left;margin-left: 16px;margin-right: 16px;margin-bottom: 20px;line-height: 1.75em;"> <span style="font-size: 15px;color: rgb(64, 62, 62);">目前本人一直使用JRebel做热部署工具,效果还算理想,修改Java代码或者xml等配置文件都能热更新。</span> <span style="font-size: 15px;color: rgb(64, 62, 62);">偶尔服务开久了,或更改的文件较多时,热更新没有生效,需要重新启动服务。</span> </section> <section style="text-align: left;margin-left: 16px;margin-right: 16px;margin-bottom: 20px;line-height: 1.75em;"> <span style="font-size: 15px;color: rgb(64, 62, 62);">这里只是简单说下我在网上看到的一种免费获得永久使用权的方式(非破解),不确定这种方式什么时候不能用。</span> </section> <ol class=" list-paddingleft-2" style="list-style-type: decimal;margin-left: 16px;margin-right: 16px;"> <li> <section style="text-align: left;margin-bottom: 20px;line-height: 1.75em;"> <span style="font-size: 15px;color: rgb(64, 62, 62);">首先你需要一个Facebook或Twitter的账号(最好Twitter)</span> </section></li> <li> <section style="text-align: left;margin-bottom: 20px;line-height: 1.75em;"> <span style="font-size: 15px;color: rgb(64, 62, 62);">进入这个网址:</span> <span style="font-size: 15px;color: rgb(64, 62, 62);">https://my.jrebel.com/,并登录,如图10.1</span> <br> </section></li> <li> <section style="text-align: left;margin-bottom: 20px;line-height: 1.75em;"> <span style="font-size: 15px;color: rgb(64, 62, 62);">然后在Install and Acticate里可以得到你的永久激活码。</span> <br> </section></li> <li> <section style="text-align: left;margin-bottom: 20px;line-height: 1.75em;"> <span style="font-size: 15px;color: rgb(64, 62, 62);">在设置里Jrebel里设置激活码,如图10.3,如果没有安装JRebel插件,先在Plugins里安装搜索安装JRebel插件。</span> </section></li> </ol> <section style="text-align: center;margin-left: 16px;margin-right: 16px;margin-bottom: 20px;line-height: 1.75em;"> <img class="rich_pages" data-ratio="0.4726522187822497" data-s="300,640" src="/upload/7a4c4aacd13003676262f18e46163272.png" data-type="png" data-w="969" style=""> </section> <section style="text-align: center;margin-left: 16px;margin-right: 16px;margin-bottom: 20px;line-height: 1.75em;"> <span style="font-size: 13px;color: rgb(136, 136, 136);">[图10.1]</span> </section> <section style="text-align: center;margin-left: 16px;margin-right: 16px;margin-bottom: 20px;line-height: 1.75em;"> <img class="rich_pages" data-ratio="0.328141225337487" data-s="300,640" src="/upload/a95f077557c7997396ae79cdad753785.png" data-type="png" data-w="963" style=""> </section> <section style="text-align: center;margin-left: 16px;margin-right: 16px;margin-bottom: 20px;line-height: 1.75em;"> <span style="color: rgb(136, 136, 136);font-size: 13px;">[图10.2]</span> </section> <section style="text-align: center;margin-left: 16px;margin-right: 16px;margin-bottom: 20px;line-height: 1.75em;"> <img class="rich_pages" data-ratio="0.58125" data-s="300,640" src="/upload/330d6f2e3276e8da20869aa6fccbb37c.png" data-type="png" data-w="1280" style=""> </section> <section style="text-align: center;margin-left: 16px;margin-right: 16px;margin-bottom: 20px;line-height: 1.75em;"> <span style="font-size: 13px;color: rgb(136, 136, 136);">[图10.3]</span> </section> <pre style="letter-spacing: 0.544px;text-align: left;background-color: rgb(255, 255, 255);"><p style="margin-right: 16px;margin-bottom: 20px;margin-left: 16px;letter-spacing: 0.544px;white-space: normal;word-spacing: 2px;font-family: 微软雅黑;font-size: medium;text-align: center;widows: 1;color: rgb(0, 0, 0);line-height: 1.75em;"><span style="color: rgb(136, 136, 136);font-size: 15px;"><strong mpa-from-tpl="t" style="color: rgb(0, 122, 170);">-END-</strong></span></p><p style="margin-right: 16px;margin-bottom: 20px;margin-left: 16px;font-family: -apple-system-font, BlinkMacSystemFont, "Helvetica Neue", "PingFang SC", "Hiragino Sans GB", "Microsoft YaHei UI", "Microsoft YaHei", Arial, sans-serif;letter-spacing: 0.544px;white-space: normal;word-spacing: 2px;font-size: medium;text-align: center;widows: 1;color: rgb(0, 0, 0);line-height: 1.75em;"><span style="color: rgb(255, 76, 0);font-family: "Helvetica Neue", Helvetica, "Hiragino Sans GB", "Microsoft YaHei", Arial, sans-serif;font-weight: bold;letter-spacing: 0.544px;font-size: 15px;">全新打卡学习模式</span><span style="color: rgb(255, 76, 0);font-family: "Helvetica Neue", Helvetica, "Hiragino Sans GB", "Microsoft YaHei", Arial, sans-serif;font-weight: bold;letter-spacing: 0.544px;font-size: 15px;"><br></span><span style="color: rgb(255, 76, 0);font-family: "Helvetica Neue", Helvetica, "Hiragino Sans GB", "Microsoft YaHei", Arial, sans-serif;font-weight: bold;letter-spacing: 0.544px;font-size: 15px;">每天30分钟<br></span><span style="color: rgb(255, 76, 0);font-family: "Helvetica Neue", Helvetica, "Hiragino Sans GB", "Microsoft YaHei", Arial, sans-serif;font-weight: bold;letter-spacing: 0.544px;font-size: 15px;">30天学会Python编程</span></p> <section style="margin-right: 16px;margin-bottom: 20px;margin-left: 16px;font-family: -apple-system-font, BlinkMacSystemFont, "Helvetica Neue", "PingFang SC", "Hiragino Sans GB", "Microsoft YaHei UI", "Microsoft YaHei", Arial, sans-serif;letter-spacing: 0.544px;white-space: normal;color: rgb(62, 62, 62);font-size: 15px;word-spacing: 2px;text-align: center;line-height: 1.75em;"> <img class="rich_pages " data-ratio="1.7786666666666666" data-s="300,640" data-type="png" data-w="750" src="/upload/fe81cd33932e62fe49968dd896ecb9cb.png" style="box-shadow: rgb(140, 140, 140) 0em 0em 1em 0px;visibility: visible !important;width: 264.016px !important;"> </section></pre> <p style="font-family: -apple-system-font, BlinkMacSystemFont, "Helvetica Neue", "PingFang SC", "Hiragino Sans GB", "Microsoft YaHei UI", "Microsoft YaHei", Arial, sans-serif;letter-spacing: 0.544px;white-space: normal;background-color: rgb(255, 255, 255);text-align: center;"><strong><span style="font-size: 15px;color: rgb(255, 104, 39);">世界正在奖励坚持学习的人!</span></strong></p>
作者:じ☆ve宝贝
找到 -> git 编辑本地 .git/config 增加 [credential] helper = store 保存,输入一次密码后第二次就会记住密码了